
You are currently browsing the category archive for the ‘Main Dish’ category.

Several of my family members have been visiting my parents in Nevada. Thor decided it was a good idea to order a pelmeni mold and have it delivered here. It was a good idea. It didn’t arrive until after he had left, so I had carte blanche to give it a try. Pelmeni is a small Russian dumpling that my parents love to eat. They buy bags of the frozen dumplings whenever they can find them. Pelmeni are smaller than Polish pierogi, but the fillings and method are probably similar.

I didn’t really understand how to use the mold, and the packaging is in Cyrillic script (I only know English, so there’s that), so I went to YouTube and found JeffMara Cooking’s video to see how it’s done. The video is awesome and gave me the confidence to proceed. I didn’t use their recipes, just their video how-to guide. For the recipe, I turned to Julia Frey’s Vikalinka. It turned out that her dough to filling ratio was just right. I did my own thing as far as mixing dough and making filling. For this first foray into pelmeni making, I used a meat filling, but we have eaten potato and cheese-filled pelmeni before. Mushroom filling also sounds great. Next time!
- Dough Ingredients
- 3 cups flour
- 1 tsp. salt
- 1 cup water
- 1 egg
- Meat Filling Ingredients
- 1 lb. ground beef
- 1 lb. ground pork
- 1/2 large onion, grated or run through a food processor
- 2 tsp. salt
- Remaining Ingredients
- Generous amount of flour for rolling and keeping pelmeni separated
- Large pot of salted water
- 2 bay leaves
- 1-1/2 tsp. dried dill weed
- Butter and/or sour cream for topping
Other recipes call for making the dough in your food processor, but I don’t have one here, so . . . stir together flour and salt. Whisk the egg into the cup of water. Stir the water mixture into the flour mixture. Stir as best you can until it’s all incorporated. Turn out onto a lightly floured surface and knead until the dough has elasticity. Use as little flour as possible for this stage. Place the dough back into the bowl and cover with a damp tea towel. Let stand thirty minutes.
In a large bowl mix together the filling ingredients. Place the filling in the refrigerator as you wait for the dough.
Set up a work station for forming the pelmeni. You’ll need a place to roll the dough (I have a large silicone baking mat), a place to load the mold with filling (we used a highly floured cutting board), a floured place to drop the pelmeni out of the mold (a parchment-paper-covered cookie sheet).
Divide the dough into four sections. Each section will be divided in two, one for the top and one for the bottom. If it’s easier for you to just divide it into eight sections from the start, go for it. Keep the dough you are not working on in the bowl under the damp tea-towel. The pelmeni mold I used is 10″ in diameter. On a floured surface with a floured rolling pin, roll out the dough to 10″ in diameter. Flour the mold as best you can. This will be easier the second batch. Place the 10″ dough circle on the pelmeni mold. With a teaspoon, or your fingers, set about a teaspoon of filling into each indentation. Make sure you have separation between the indents. Since there were two of us making these and we worked quicky, we did not keep the filling refrigerated between batches, but if I were doing it alone I would. As the filling warms it gets a little messy and more difficult to get into the mold without finagling.

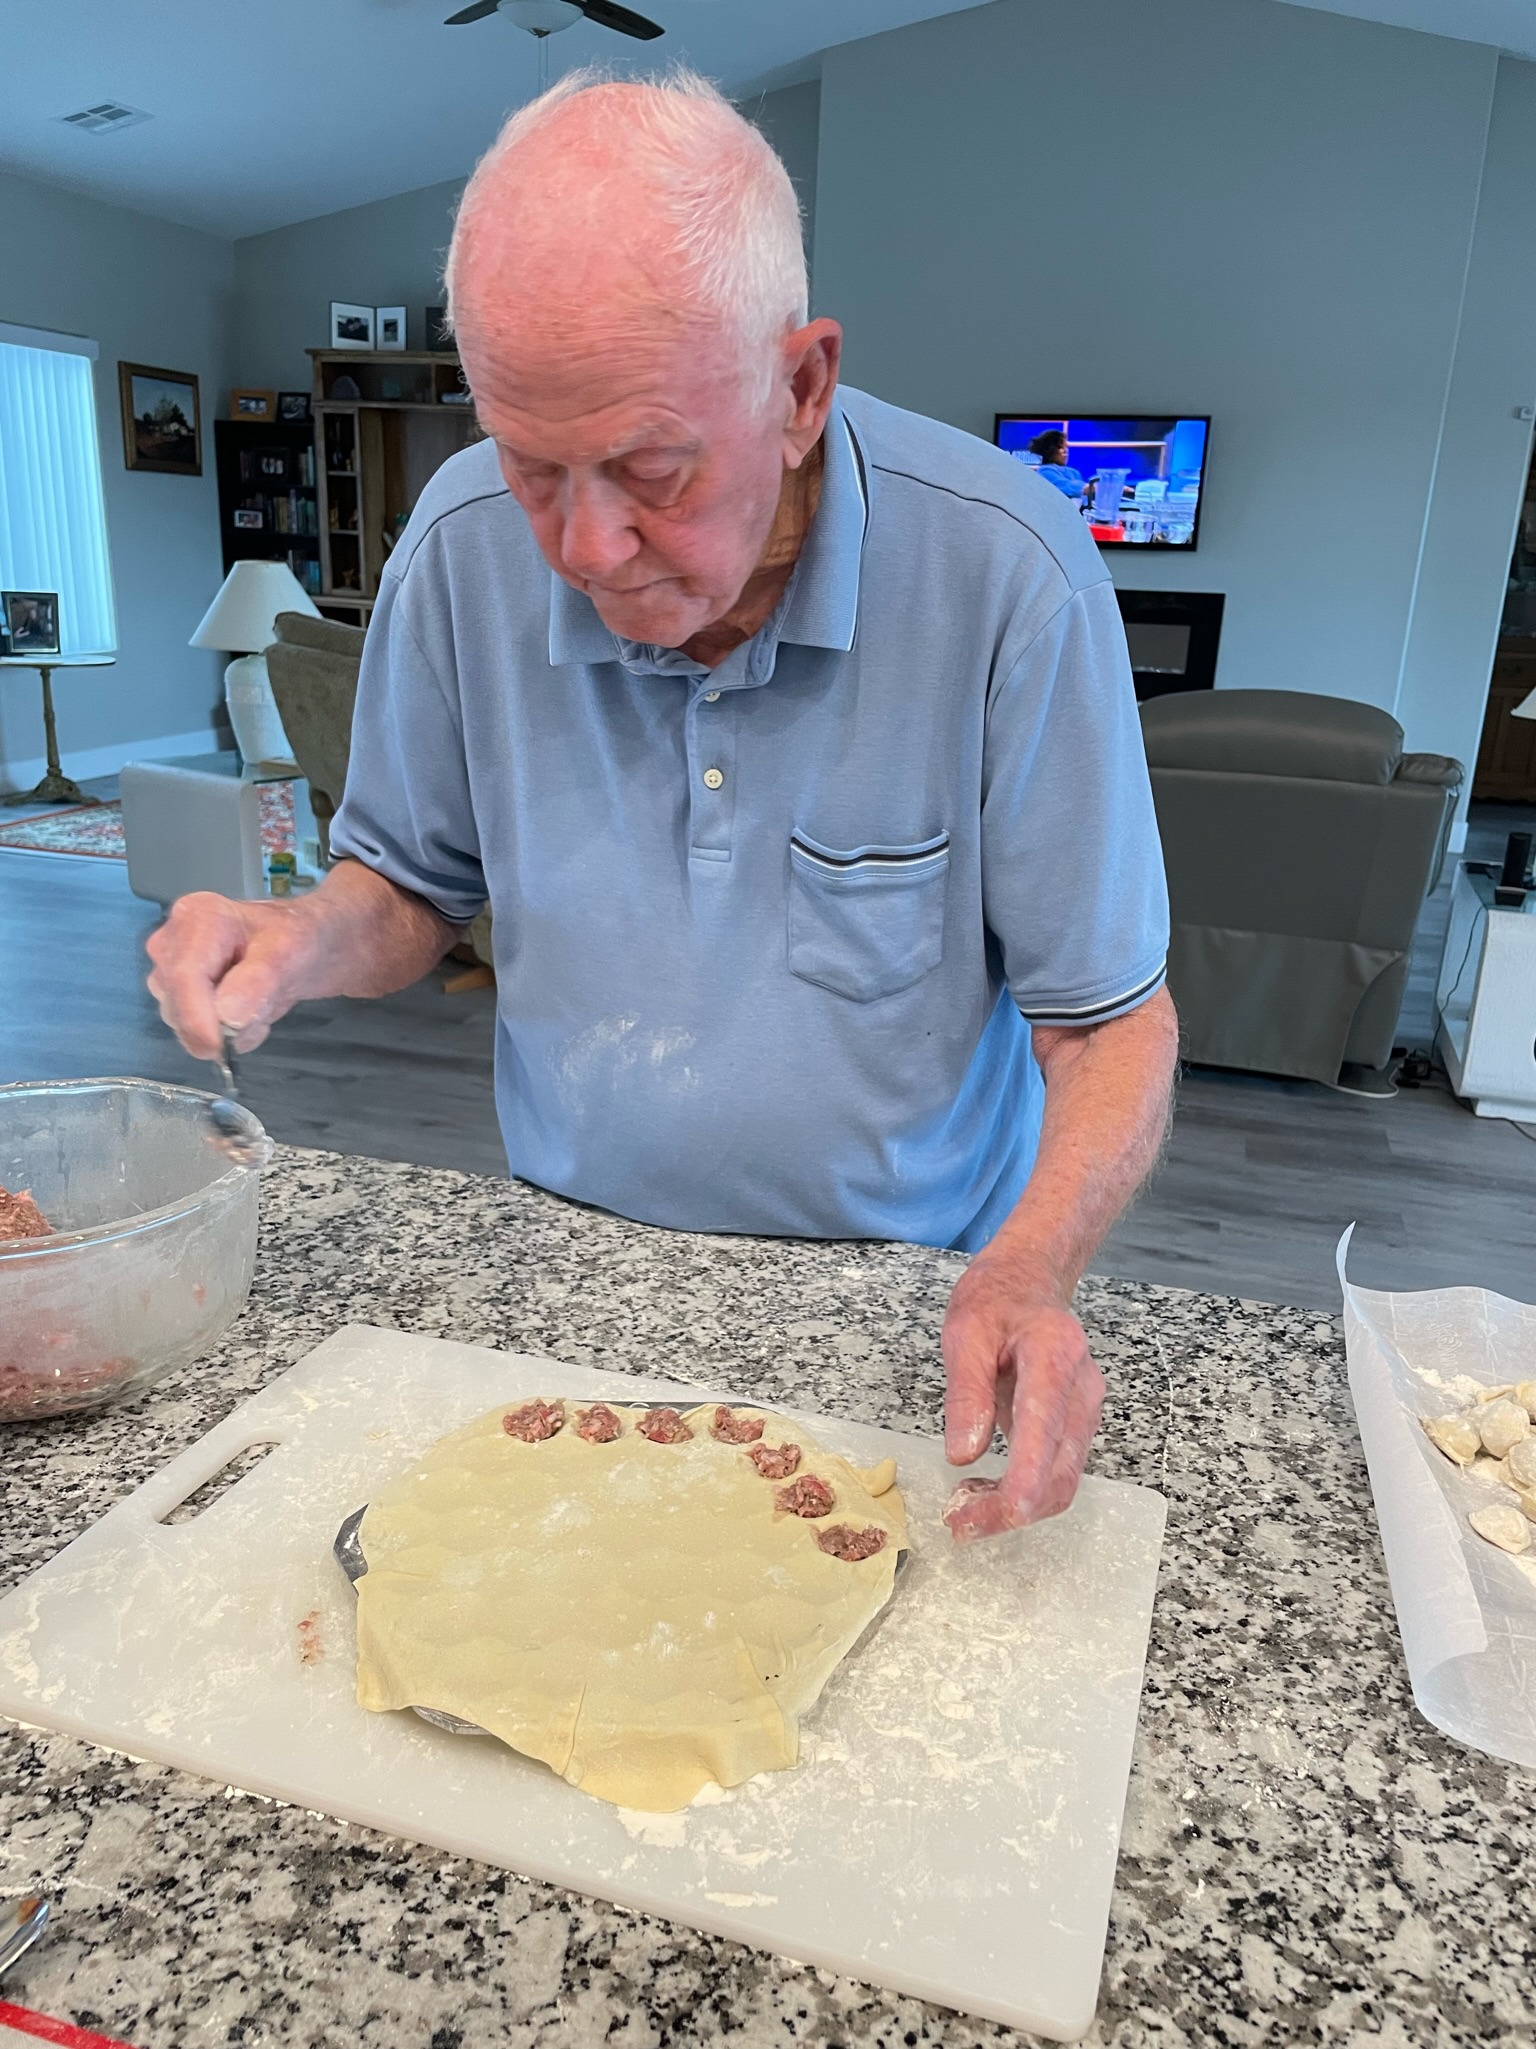

Roll out another 10″ piece of dough and place over the top of the mold. Press the top down lightly with your hands. With the floured rolling pin, starting at the center, using a back and forth motion, roll across the top of the mold until you can see the mold itself sticking through. Remove the dough along the edges and set it aside in the dough bowl under the damp cloth. Turn the mold upside down over a highly floured surface. Some pelmeni may drop out, but you’ll have to poke some out with your finger. Take a care not to pierce the dumplings. This will be easier the second time because flour will adhere to the mold better. Place the dumplings onto a highly floured surface until you’re ready to cook or freeze them.

Repeat until all four batches are made. I then used the scraps to make two more batches. That was hard to do. In retrospect I should have added more water to soften the dough scraps and make it easier to roll them out. In any event, we ended up with about 200 pelmeni.
Add bay leaves and dill weed to a pot of salted water and bring it to a boil. We also had one spoonfull of filling left, so we rolled it into a ball and dropped it into the pot for extra flavor. Drop a single layer of pelmeni into the pot. Once it comes back to a boil, let them simmer for ten minutes. Remove with a slotted spoon and serve hot, topped with butter and/or sour cream. Yummy!

It seems unlikely that you will use all these pelmeni at a single seating. Mom and Dad say that these do not freeze well after they are cooked and all the recipes I’ve seen call for them to be frozen prior to cooking. You can either set a layer of them into the freezer until frozen and then drop them into bags for long-term freezer storage, or you can roll the fresh pelmeni, a few at a time so they remain separated, in cling wrap and place into a bag and then freeze. To cook, we are going to put them directly into boiling water from frozen, wait for the water to come back to boil, and simmer for ten minutes. That’s the plan anyway.
This is simply delicious. It’s very easy to make.
- Ingredients
- 1/2 oz. dried mushrooms
- 1 cup boiling water
- 1-2 Tbsp. olive oil
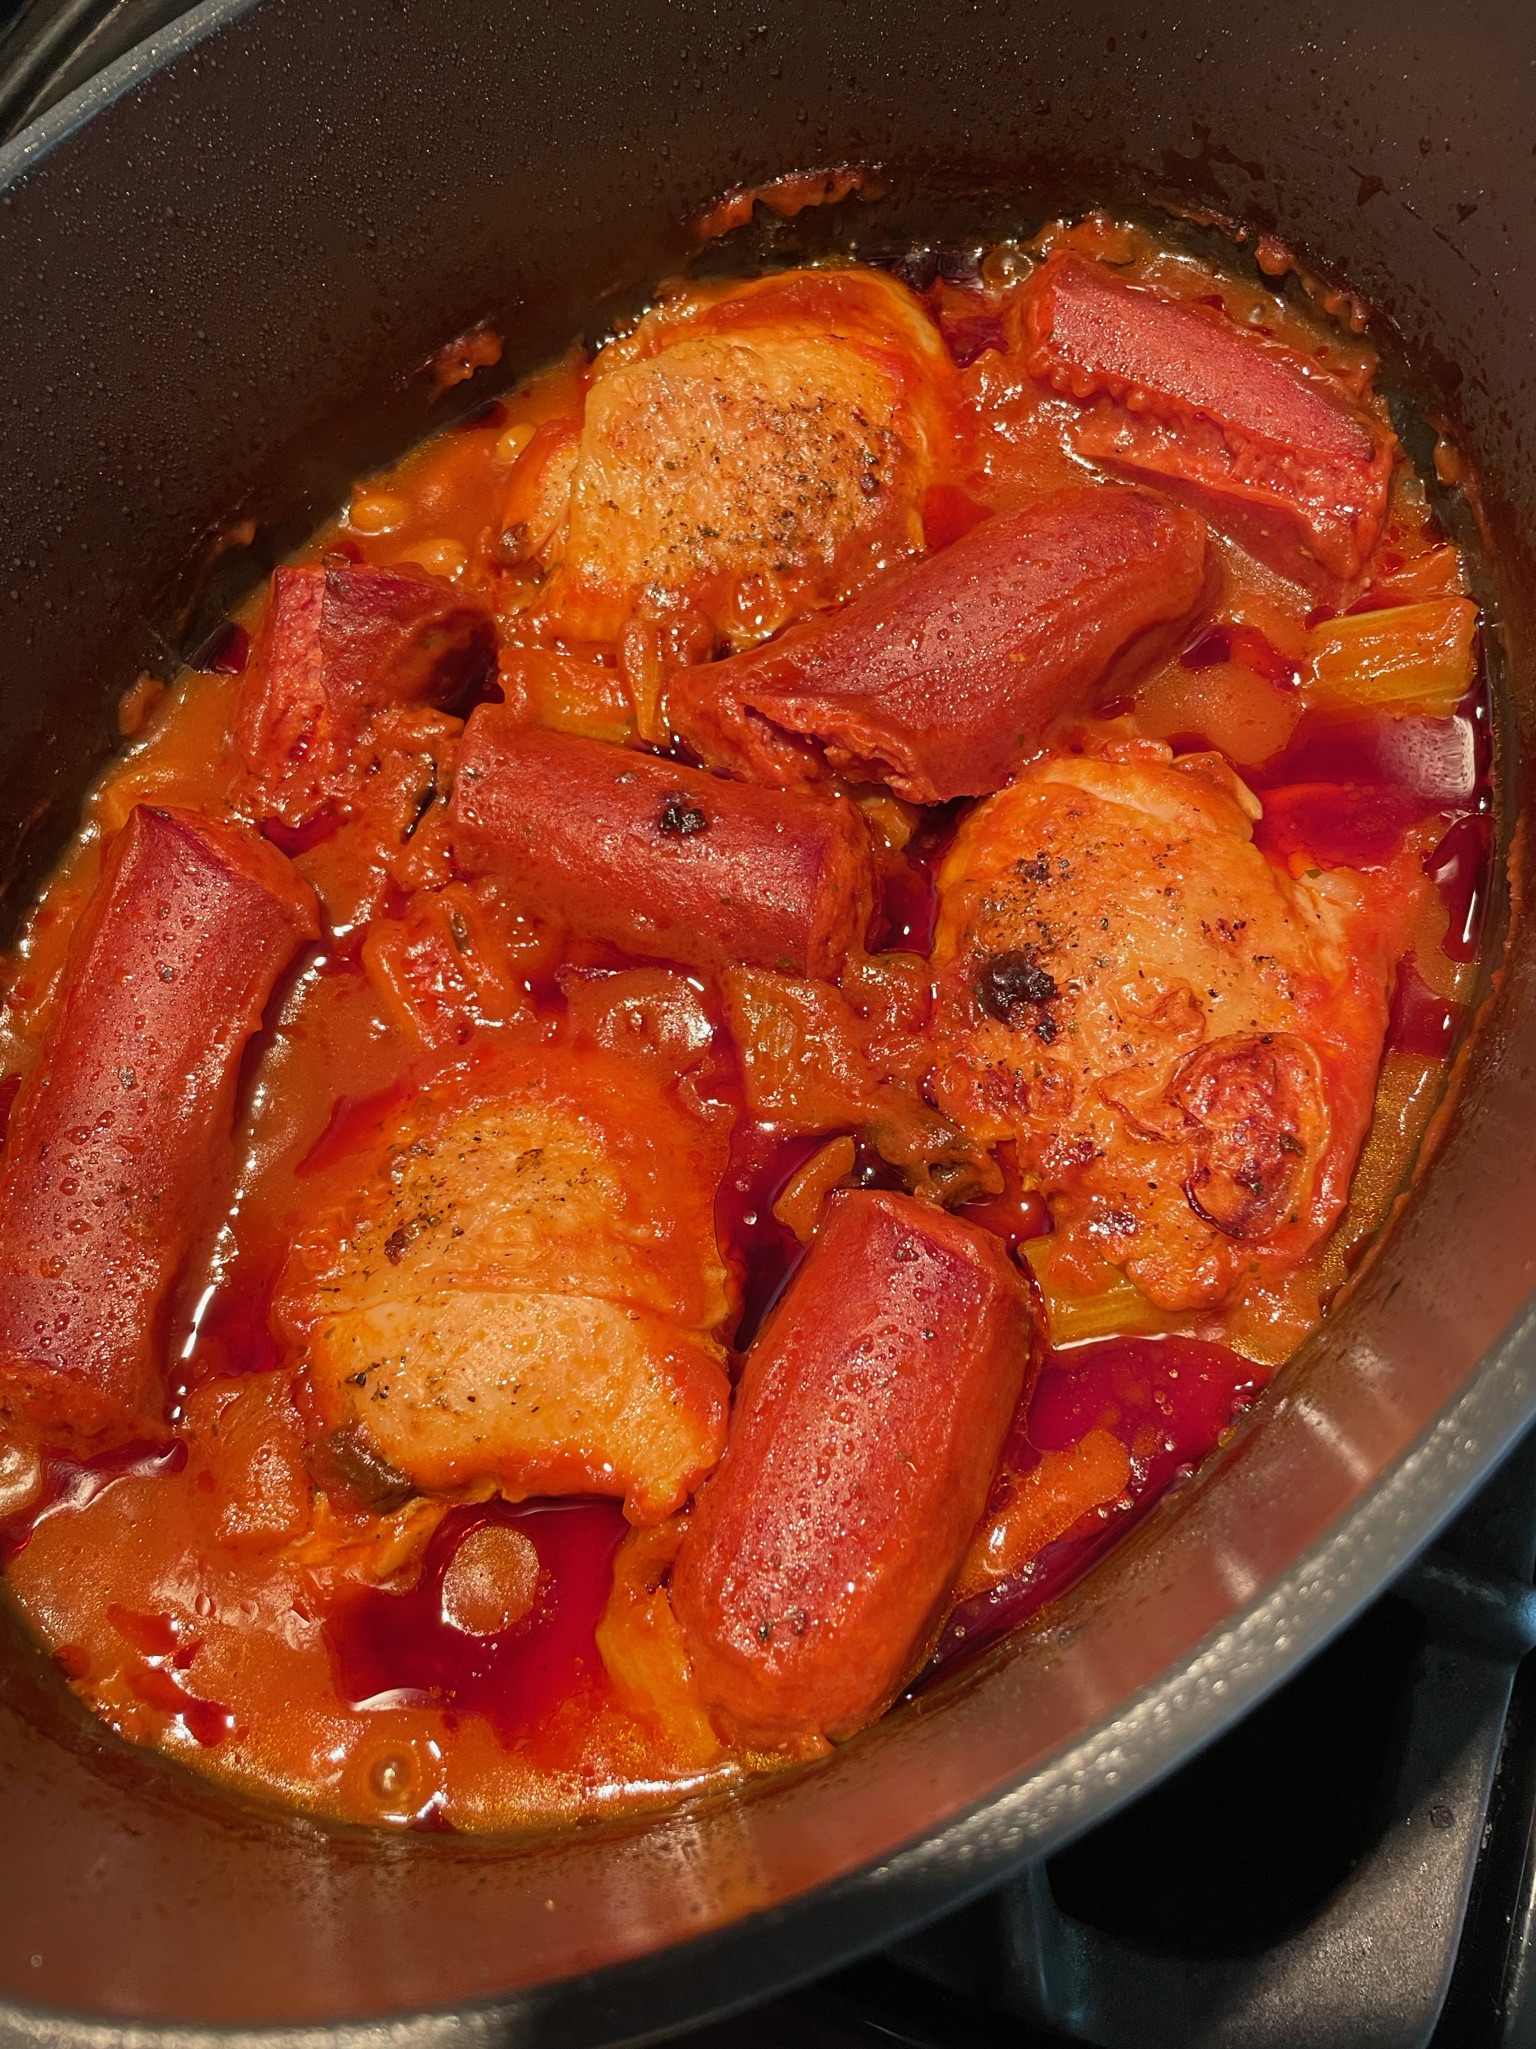
- 4 bone-in chicken thighs (with skin)
- 8-12 oz. unsmoked kielbasa (about 2 links)
- Salt (or seasoned salt) and pepper
- 1 cup chopped onion
- 1 large carrot, chopped into 2″ chunks
- 2 celery stalks, chopped into 2″ chunks
- 2 garlic cloves, minced
- 2 Tbsp. chopped fresh sage
- 1 cup white wine
- 2 dried bay leaves
- 1 can tomato puree
- 1 can cannellini beans, rinsed and drained
Preheat oven to 325 degrees F.
In a small bowl, soak the dried mushrooms in boiling water, covered, for at least fifteen minutes. Remove and chop the mushrooms, then return to the liquid, or set them aside. Reserve the liquid.
In a Dutch oven, heat 1 Tbsp. olive oil over medium high heat. Season the chicken with salt and pepper. Cut the sausage links into very large pieces, 4 inches or so. Brown the chicken and the sausage in batches until well browned. Add more olive oil as necessary. Remove chicken and sausage to a plate. Into the Dutch oven add the onions, carrots, and celery. Cook until onion is translucent. Add garlic and sage. Let it cook another minute or so. Stir in the wine and bay leaves. Let it simmer until the liquid has reduced by half. Stir in mushrooms with reserved liquid, tomato puree, beans, salt and pepper to taste. Nestle the chicken, skin side up, and sausage into the bean mixture. Cover and bake at 325 degrees for two hours.
Serves 4.
NOTES: Finding unsmoked kielbasa is a challenge. I think the dish will be great if you use a smoked sausage. I’m still using up a case of tomato puree that I bought awhile back. This is one of my favorite recipes for it. I made my own puree once by draining a 14 oz. can of tomatoes and pureeing the remaining tomatoes in a blender. Alternatively, you could try using about 4 Tbsp. tomato paste and a cup of chicken broth. I did not drain the fat from the pan before I added the vegetables, but you could do that if you had rendered what you considered too much fat from the chicken. I have used the automatic setting on my oven, so the dish was finished and sat with the heat turned off for 30-45 minutes. No problem. I was hoping it would be one of those leave-and-come-back-when-it’s-finished dishes and it was! The chicken just fell apart and was fork tender. No knives needed at the table. I suppose if you don’t have a Dutch oven you could use any type of appropriately sized baking dish, then just do everything in a skillet until you get to the baking part. I think 9 x 13″ might make too thin of a bean layer, so a dish with less square inches, but taller sides would be best. You never know until you try, though! Go forth and cook!

From Seasons & Suppers comes this luscious red-wine braised boneless short ribs dish. I can buy boneless beef short ribs at Costco, but that’s the only place I’ve ever seen them. They are cut thin and well marbelized. At Costco they come in packs of six and I break the pack into three. Two strips of meat is enough for my husband and me. I’ll give you the recipe the way that I make it for two people. You can adjust upward as needed.
- Ingredients
- Olive oil
- Salt and pepper
- 2 strips boneless beef short ribs
- 1/2 carrot, finely chopped
- 1/2 onion, finely chopped
- 1/2 Tbsp. flour
- 1/2 Tbsp. tomato paste*
- 3/4 cup red wine
- 2 Tbsp. fresh chopped parsley
- 2 Tbsp. fresh chopped thyme
- 1/2 tsp. dry rosemary (because I don’t have fresh – sigh)
- 1 small bay leaf
- 3/4 cup beef broth, plus more if needed
- 2 potatoes, cut (optional)
- 1-1/2 carrot in 4″ sections (optional)
- Handful mushrooms, cut into large pieces (optional)
- Handful of small peeled boiling onions (optional)
Preheat oven to 325 degrees F.
In an oven-proof skillet (or use a skillet for this part and move to a baking dish later) heat a swazz of olive oil over medium high heat. Dry the meat on paper towels. Sprinkle the meat on both sides with salt and pepper. Sear in olive oil to make it nice and brown. Turn the meat over and sear the other side. Remove from skillet and set aside.
Add onion and carrot to the skillet and saute until the onion is translucent. Stir in the flour and tomato paste*. Let that heat for about a minute. Stir in the red wine and let it simmer, stirring frequently, until it’s reduced by half. Don’t rush this. Just let it do its thing. Stir in the herbs and the beef broth. If you are using an oven proof skillet, lay the beef on top of the sauce. If not, then pour the sauce into a small baking dish and lay the beef on top of the sauce. Cover the skillet or dish and bake at 325 degrees F for one hour fifteen minutes.
Remove from oven. If you are adding vegetables, do it now. Just set them around in the skillet or dish. The sauce will probably be too dry, so stir in more beef broth. Return to oven for one hour fifteen minutes. Serve warm.
NOTES: I have made this many, many times with and without the potatoes, mushrooms, and boiling onions. Usually I make it without, so then I serve the sauce over polenta or mashed cauliflower.
*Here’s a trick I learned awhile back to save tomato paste. When a recipe calls for just a dab, but you have to open a whole can, take out what you need and then empty the can into a plastic Ziploc sandwich bag. Smooth out the bag to make it flat. Using the dull edge of a knife, gently score the bag into six sections. Each section should be roughly a tablespoon. Gently place the bag flat into the freezer. Next time you’re ready to use a little bit of tomato paste, pull out the bag, break off a section, and put the bag back in the freezer. Now you have a tablespoon of frozen tomato paste, ready to thaw, and use. I usually add my square of frozen tomato paste into the liquid, if using. I don’t spend any time thawing the little square.

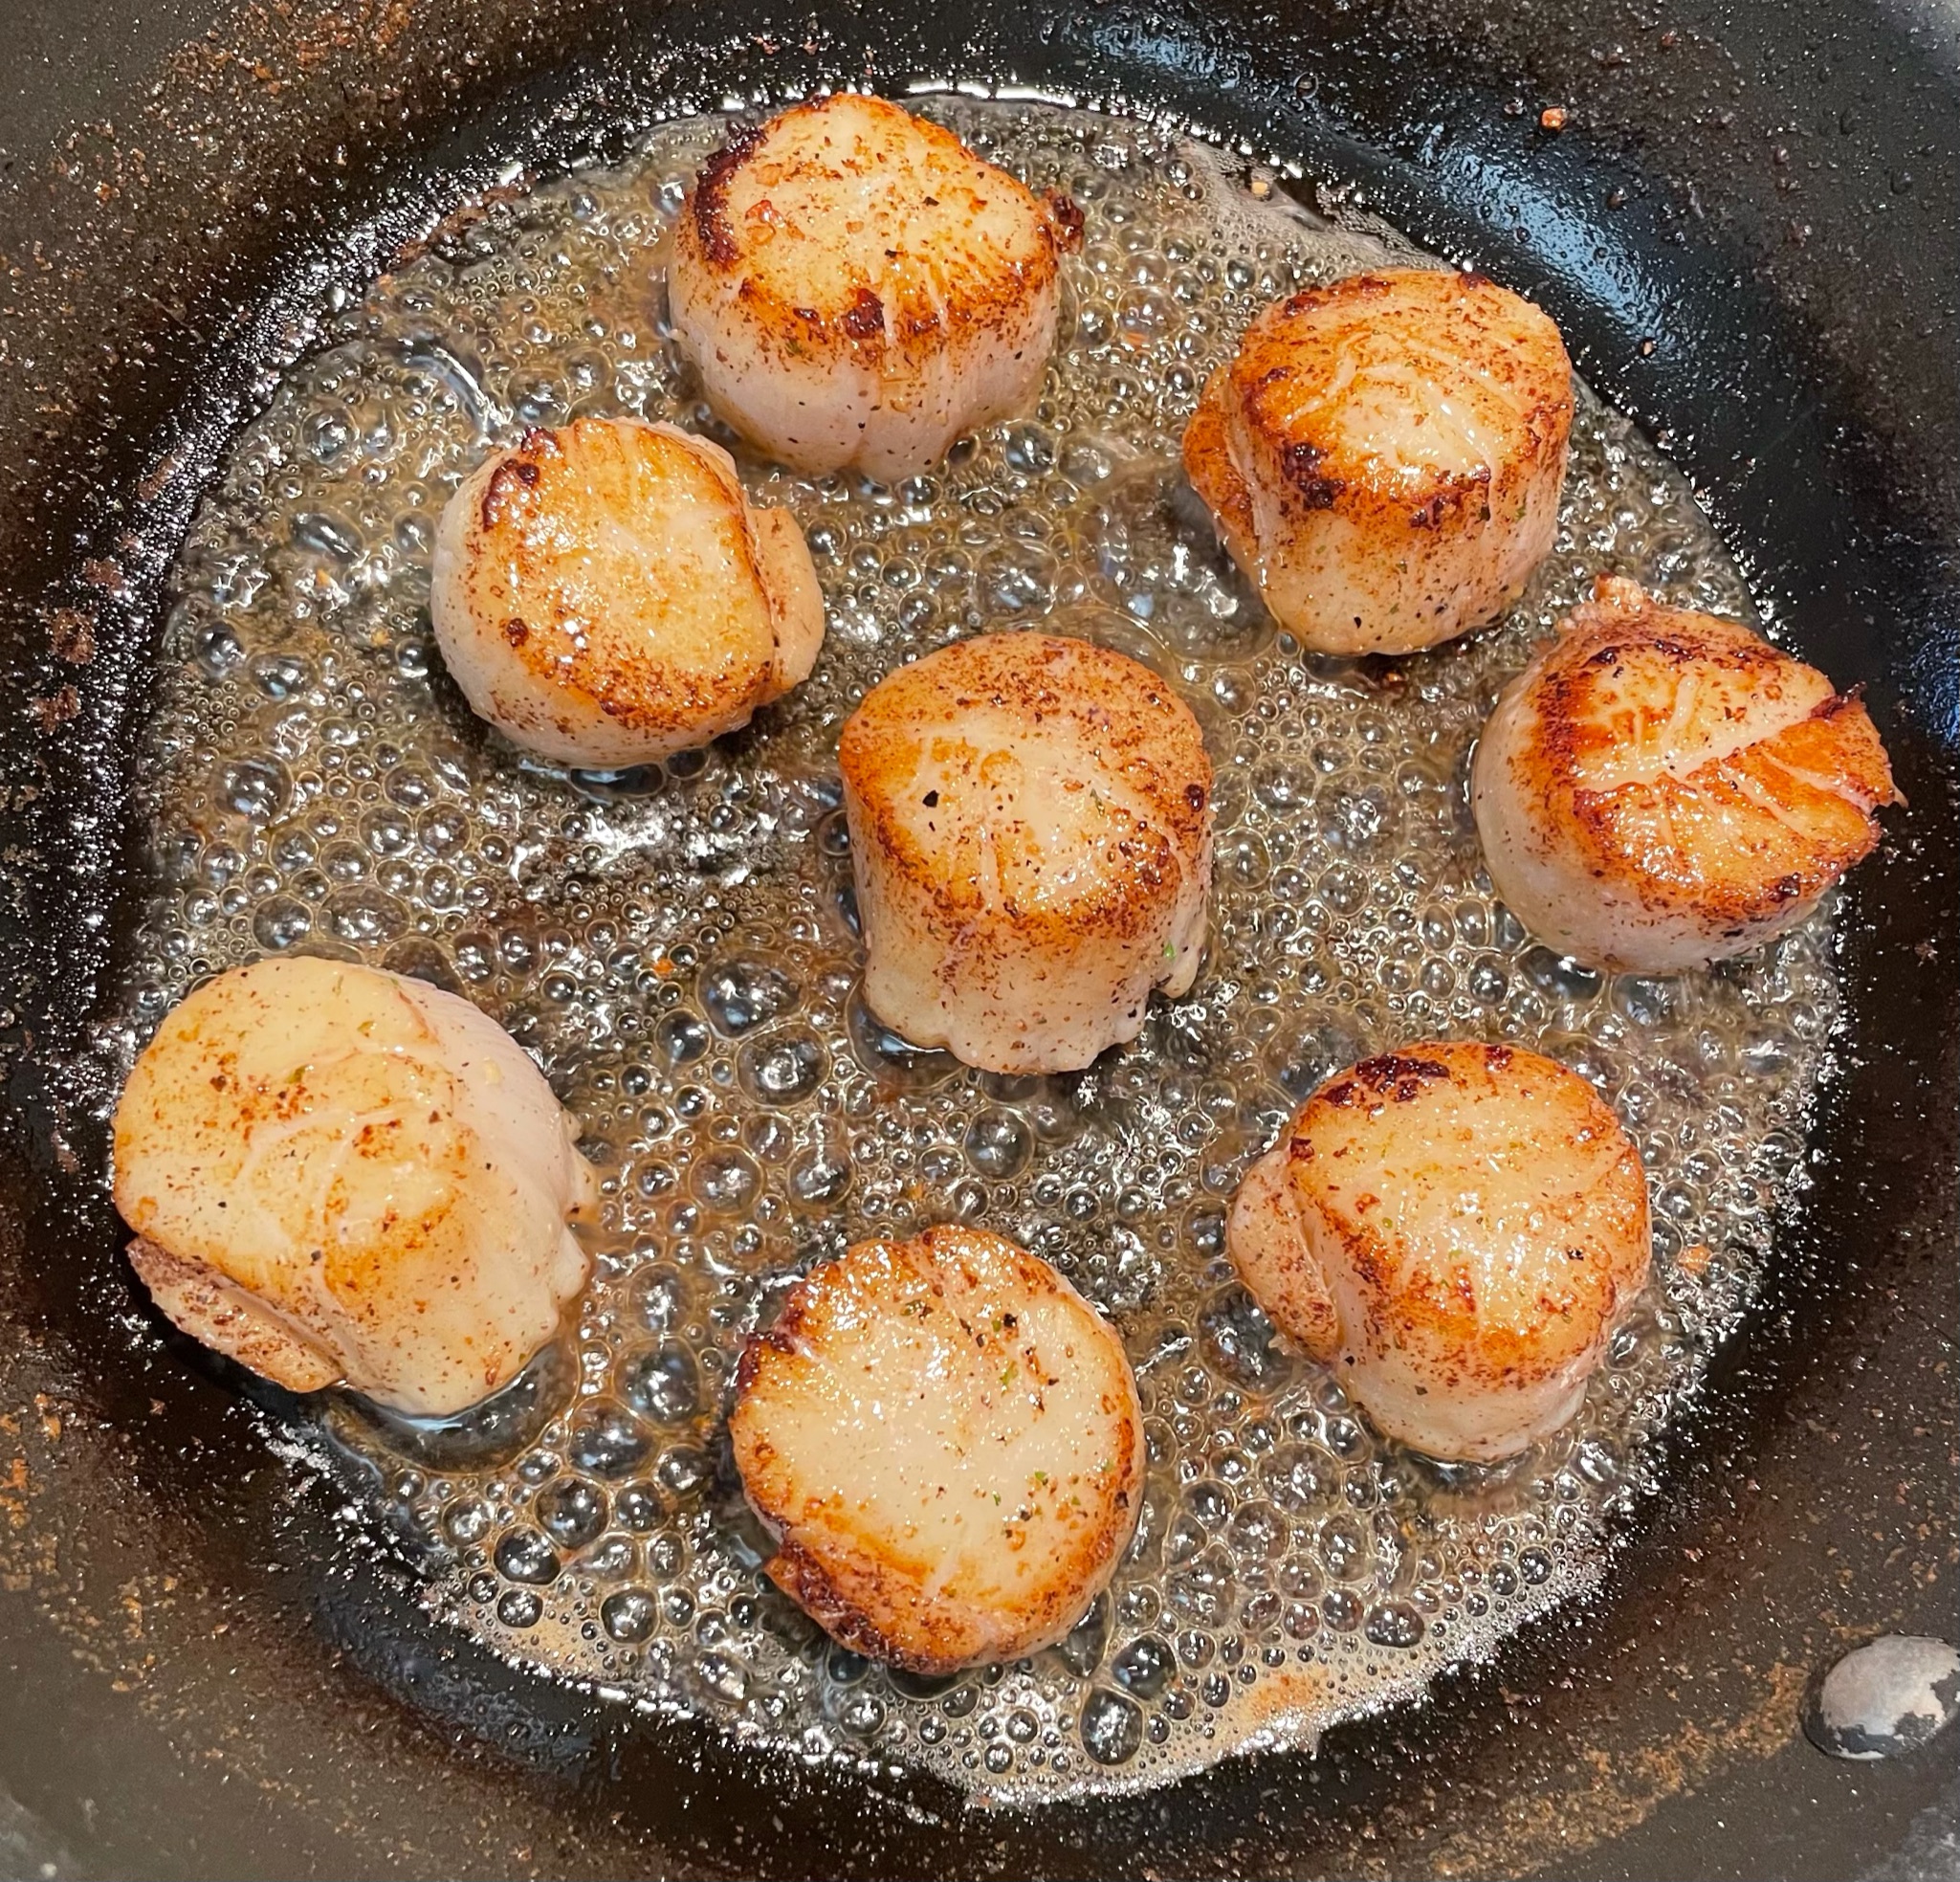
I’ve been trying to learn how to do this forever. My all-time favorite food may just be sea scallops. The James Beard cookbook says to dredge them through flour first, but that has never worked for me. A couple weeks ago I bought scallops and tried using the method below. Perfection!
- Ingredients
- Fresh scallops
- Salt and pepper
- 1 Tbsp. olive oil
- 1 Tbsp. butter
- Lemon juice, optional
Rinse the scallops and lay them out on half of a cloth towel in a single layer. Fold the other half of the towel over the top of the scallops and press lightly. Let them sit like that for awhile to remove as much moisture as possible. Sprinkle with salt and pepper. Heat oil and butter in a skillet over high heat until just at the smoking point. Gently lay the scallops in the skillet. Make sure they are not touching each other, maintain good separation. Sear for one and a half minutes. Gently turn over and sear the other side for one and a half minutes. Remove from skillet. Squeeze lemon juice over all, if desired. Serve right away. YUMMY!
Notes: You may need to add more oil and butter between batches if you’re cooking a lot of scallops. I used my garlic sea salt grind instead of regular salt.


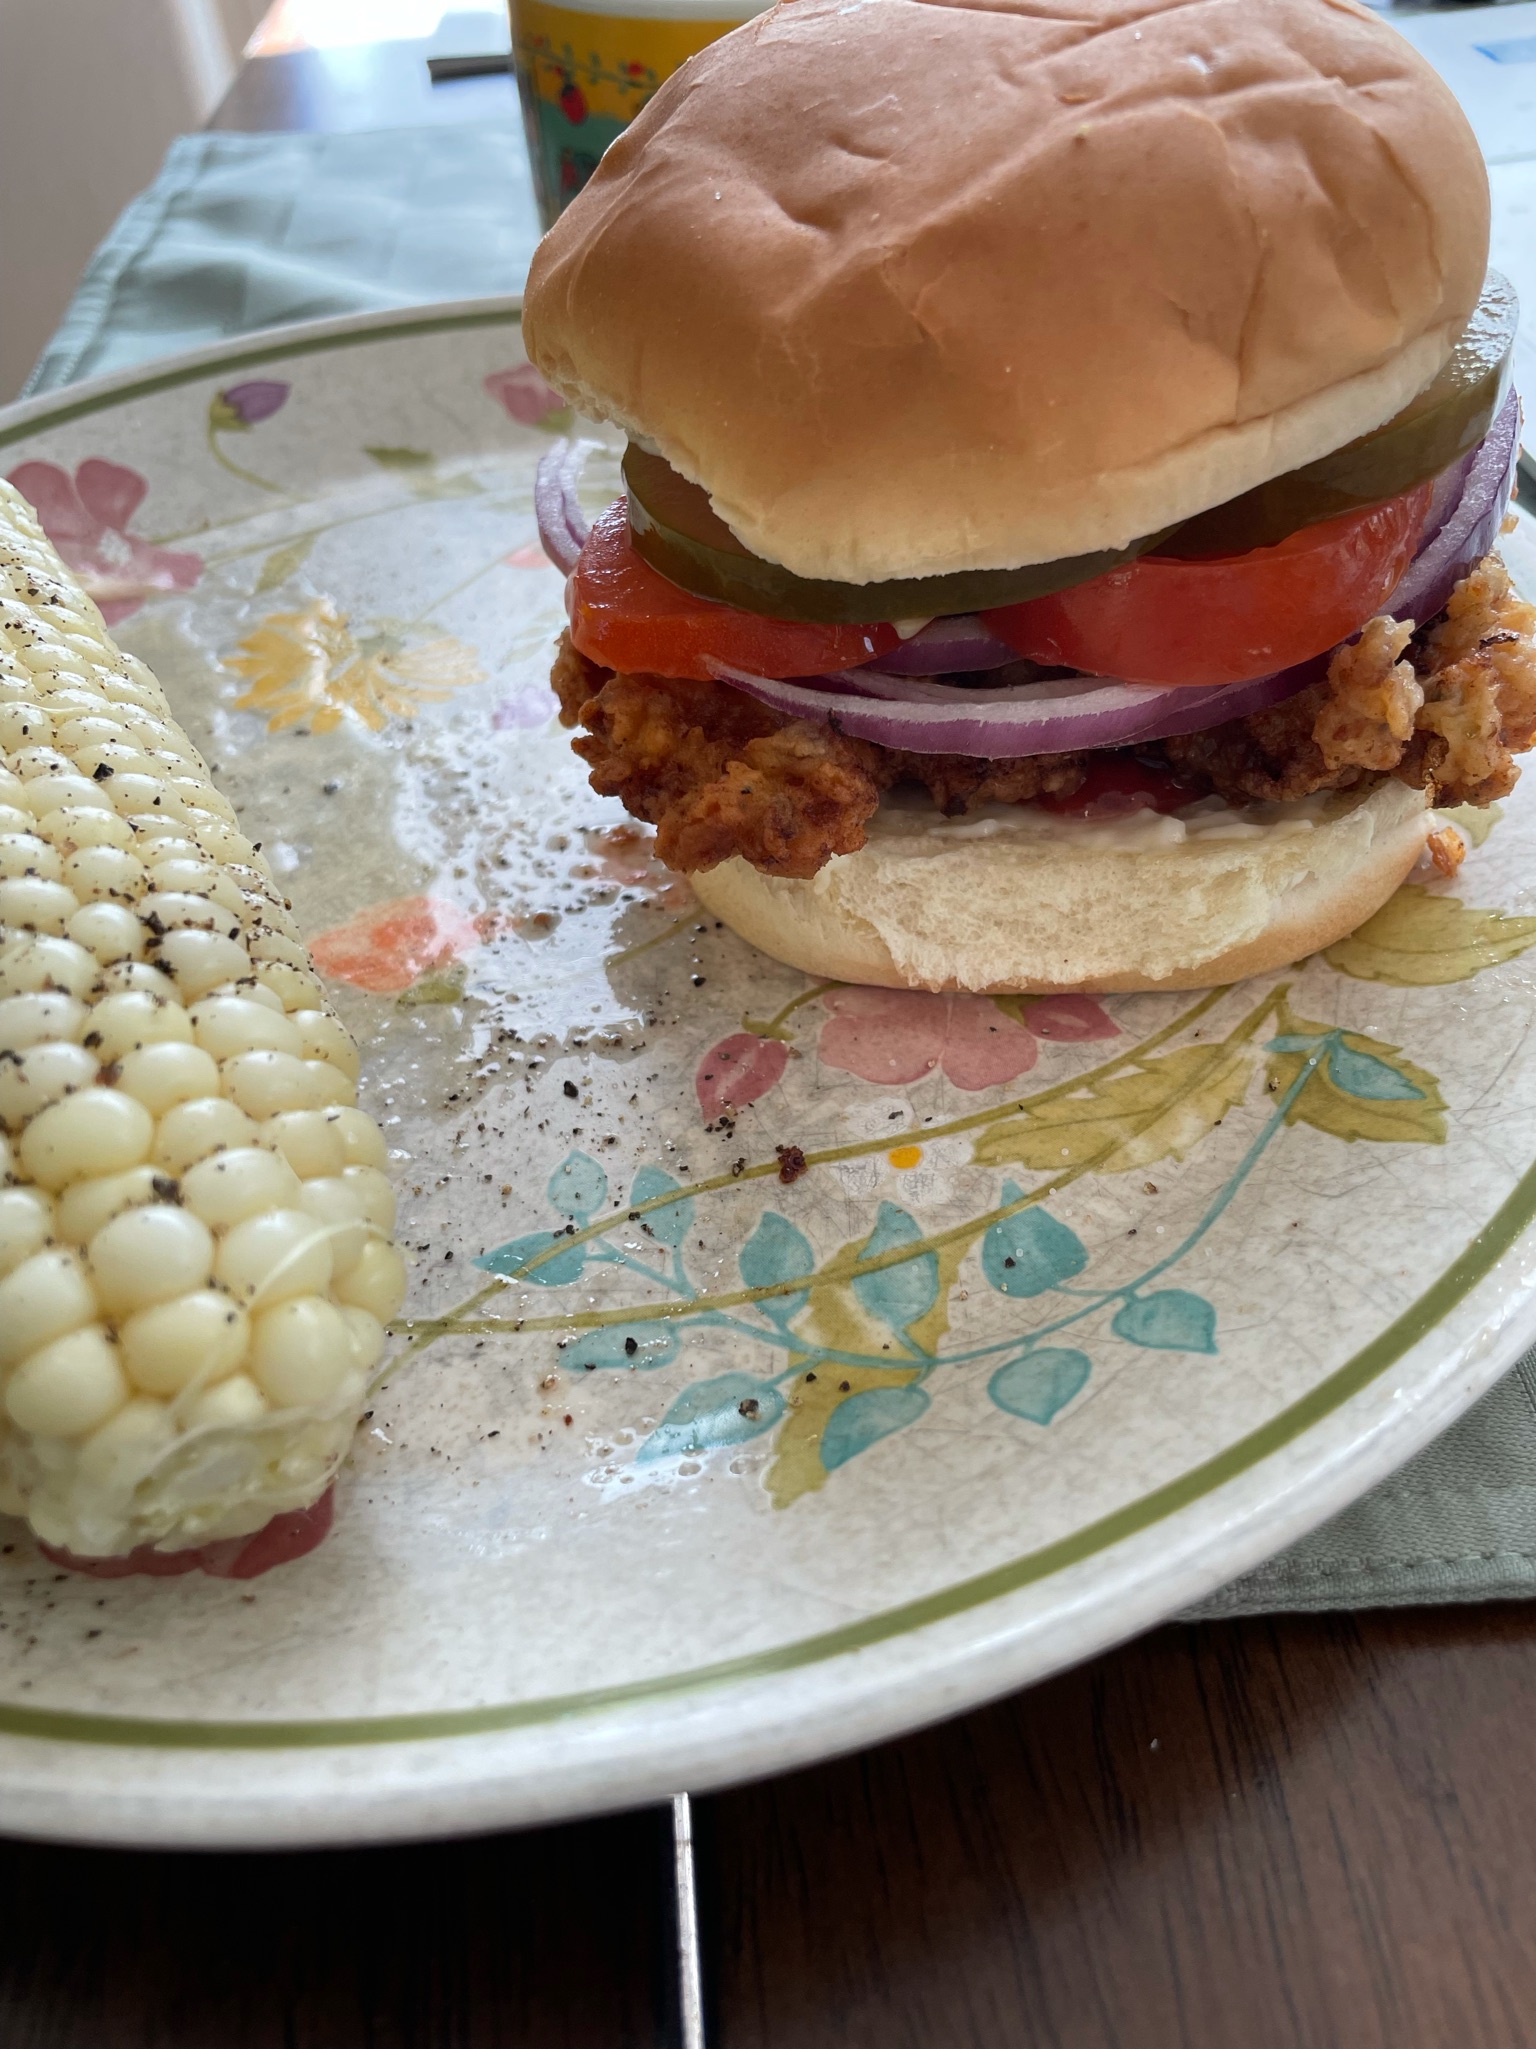
I have always enjoyed a good chicken sandwich, even more than a burger. This one is very flavorful. The recipe is based upon one found at buzzfeed.
- Marinade ingredients
- 1-1/2 cup buttermilk
- 1/2 tsp. Spanish smoked paprika
- 1/2 tsp. fresh-ground pepper
- 1/2 tsp. dried oregano
- 1/2 tsp. garlic powder
- 1 tsp. kosher salt
- 6-8 chicken thigh fillets (boneless, skinless thigh meat)
- Dredging ingredients
- 2 crushed chicken bouillon cubes (or 2 tsp powder)
- 1-1/2 cups flour
- 1/2 tsp. Spanish smoked paprika
- 1/2 tsp. fresh-ground pepper
- 1/2 tsp. dried oregano
- 1/2 tsp. garlic powder
- 1/2 tsp. salt
- Other ingredients
- Oil for frying
- Buns
- Sandwich fixin’s of your choice, potentials to include: mayonnaise, ketchup, dill pickle chips, fresh tomato slices, lettuce, coleslaw, sliced onion, etc.
At least an hour ahead, or overnight, mix the marinade in a plastic bag and drop in the chicken. Let sit under refrigeration until ready to begin the cooking process.
In a pie tin mix together the dredging ingredients. Heat oil to 350 degrees in a deep fryer or a skillet. I use a skillet with about 1/2″ oil in it.
Remove each chicken piece from the marinade and dredge through the flour mixture until VERY well coated. Keep running it through and pressing the flour so it sticks to the meat. Gently lower the chicken pieces into the oil. Do not crowd the pan. In my wide skillet, I fry three pieces at a time. Let it fry for about four minutes and then turn the chicken over and fry another 4 minutes.
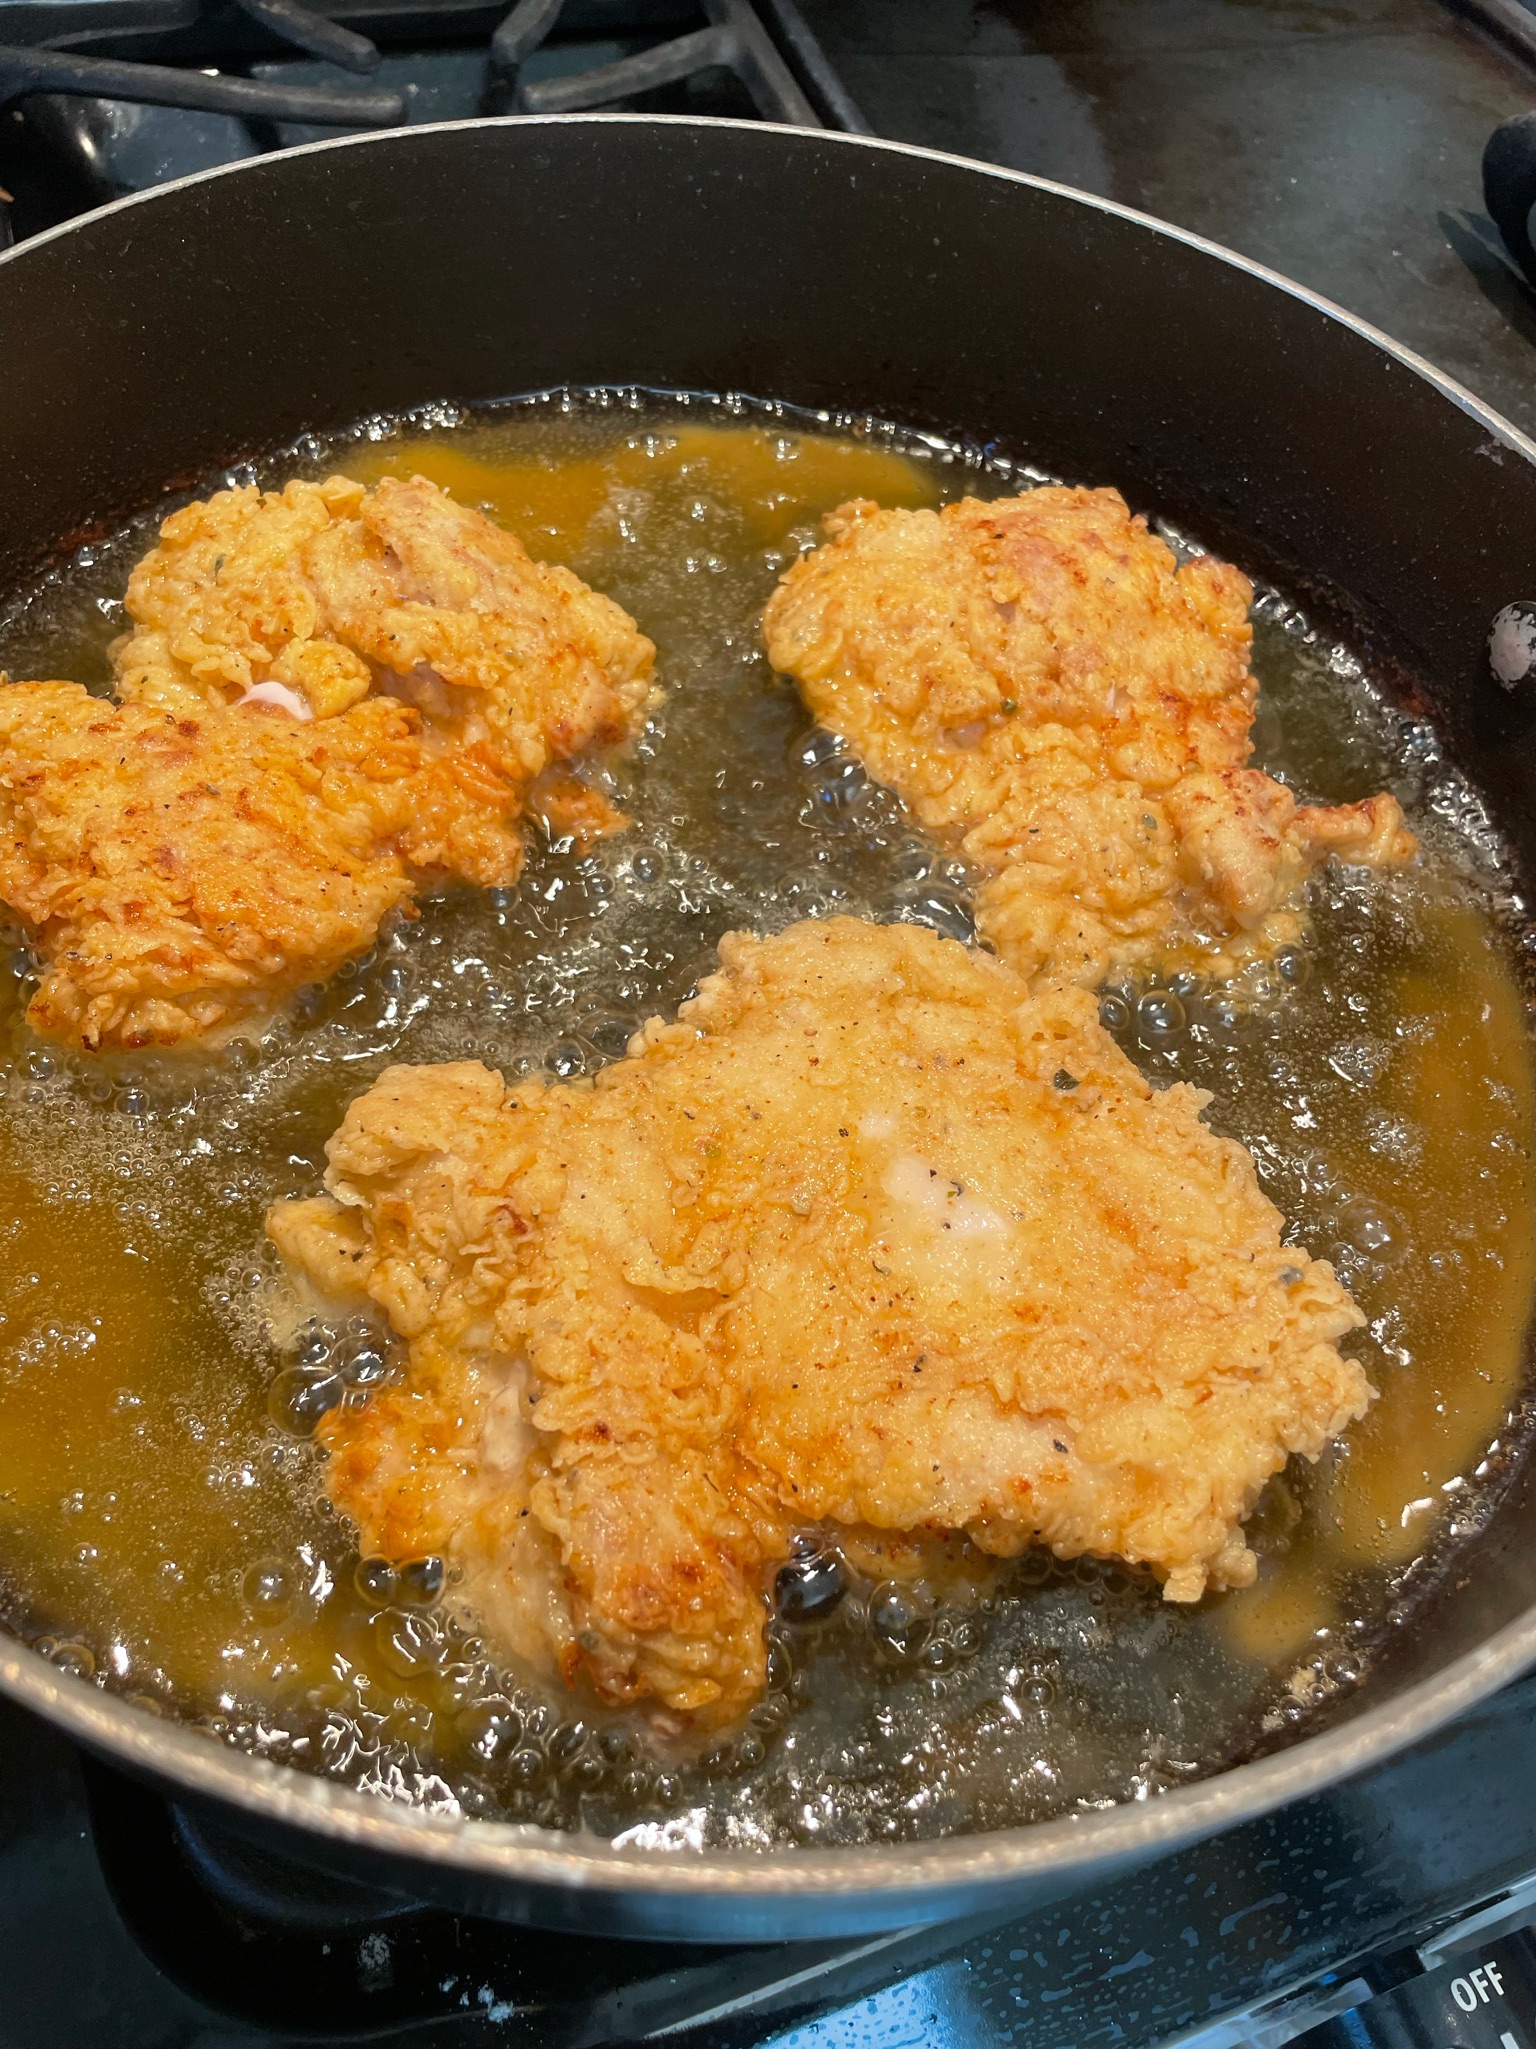
Remove from oil and lay on paper towels to absorb extra oil. Repeat until all the chicken has been cooked.
Make up the sandwiches. Serves 6-8 people.
Notes: The flavor from the bouillon cannot be overstated. It really makes a difference. I like using my homemade dill pickle chips as a condiment. Yeah! I haven’t tried this in Dad’s air fryer yet. Maybe next time I visit. I buy chicken thigh fillets from Costco and you can’t tell how many are in the package until you open them. This was two packages and it probably had ten fillets total. I didn’t run out of either buttermilk marinade or breading. I know in some places the chicken pieces are huge, so that might be a problem.
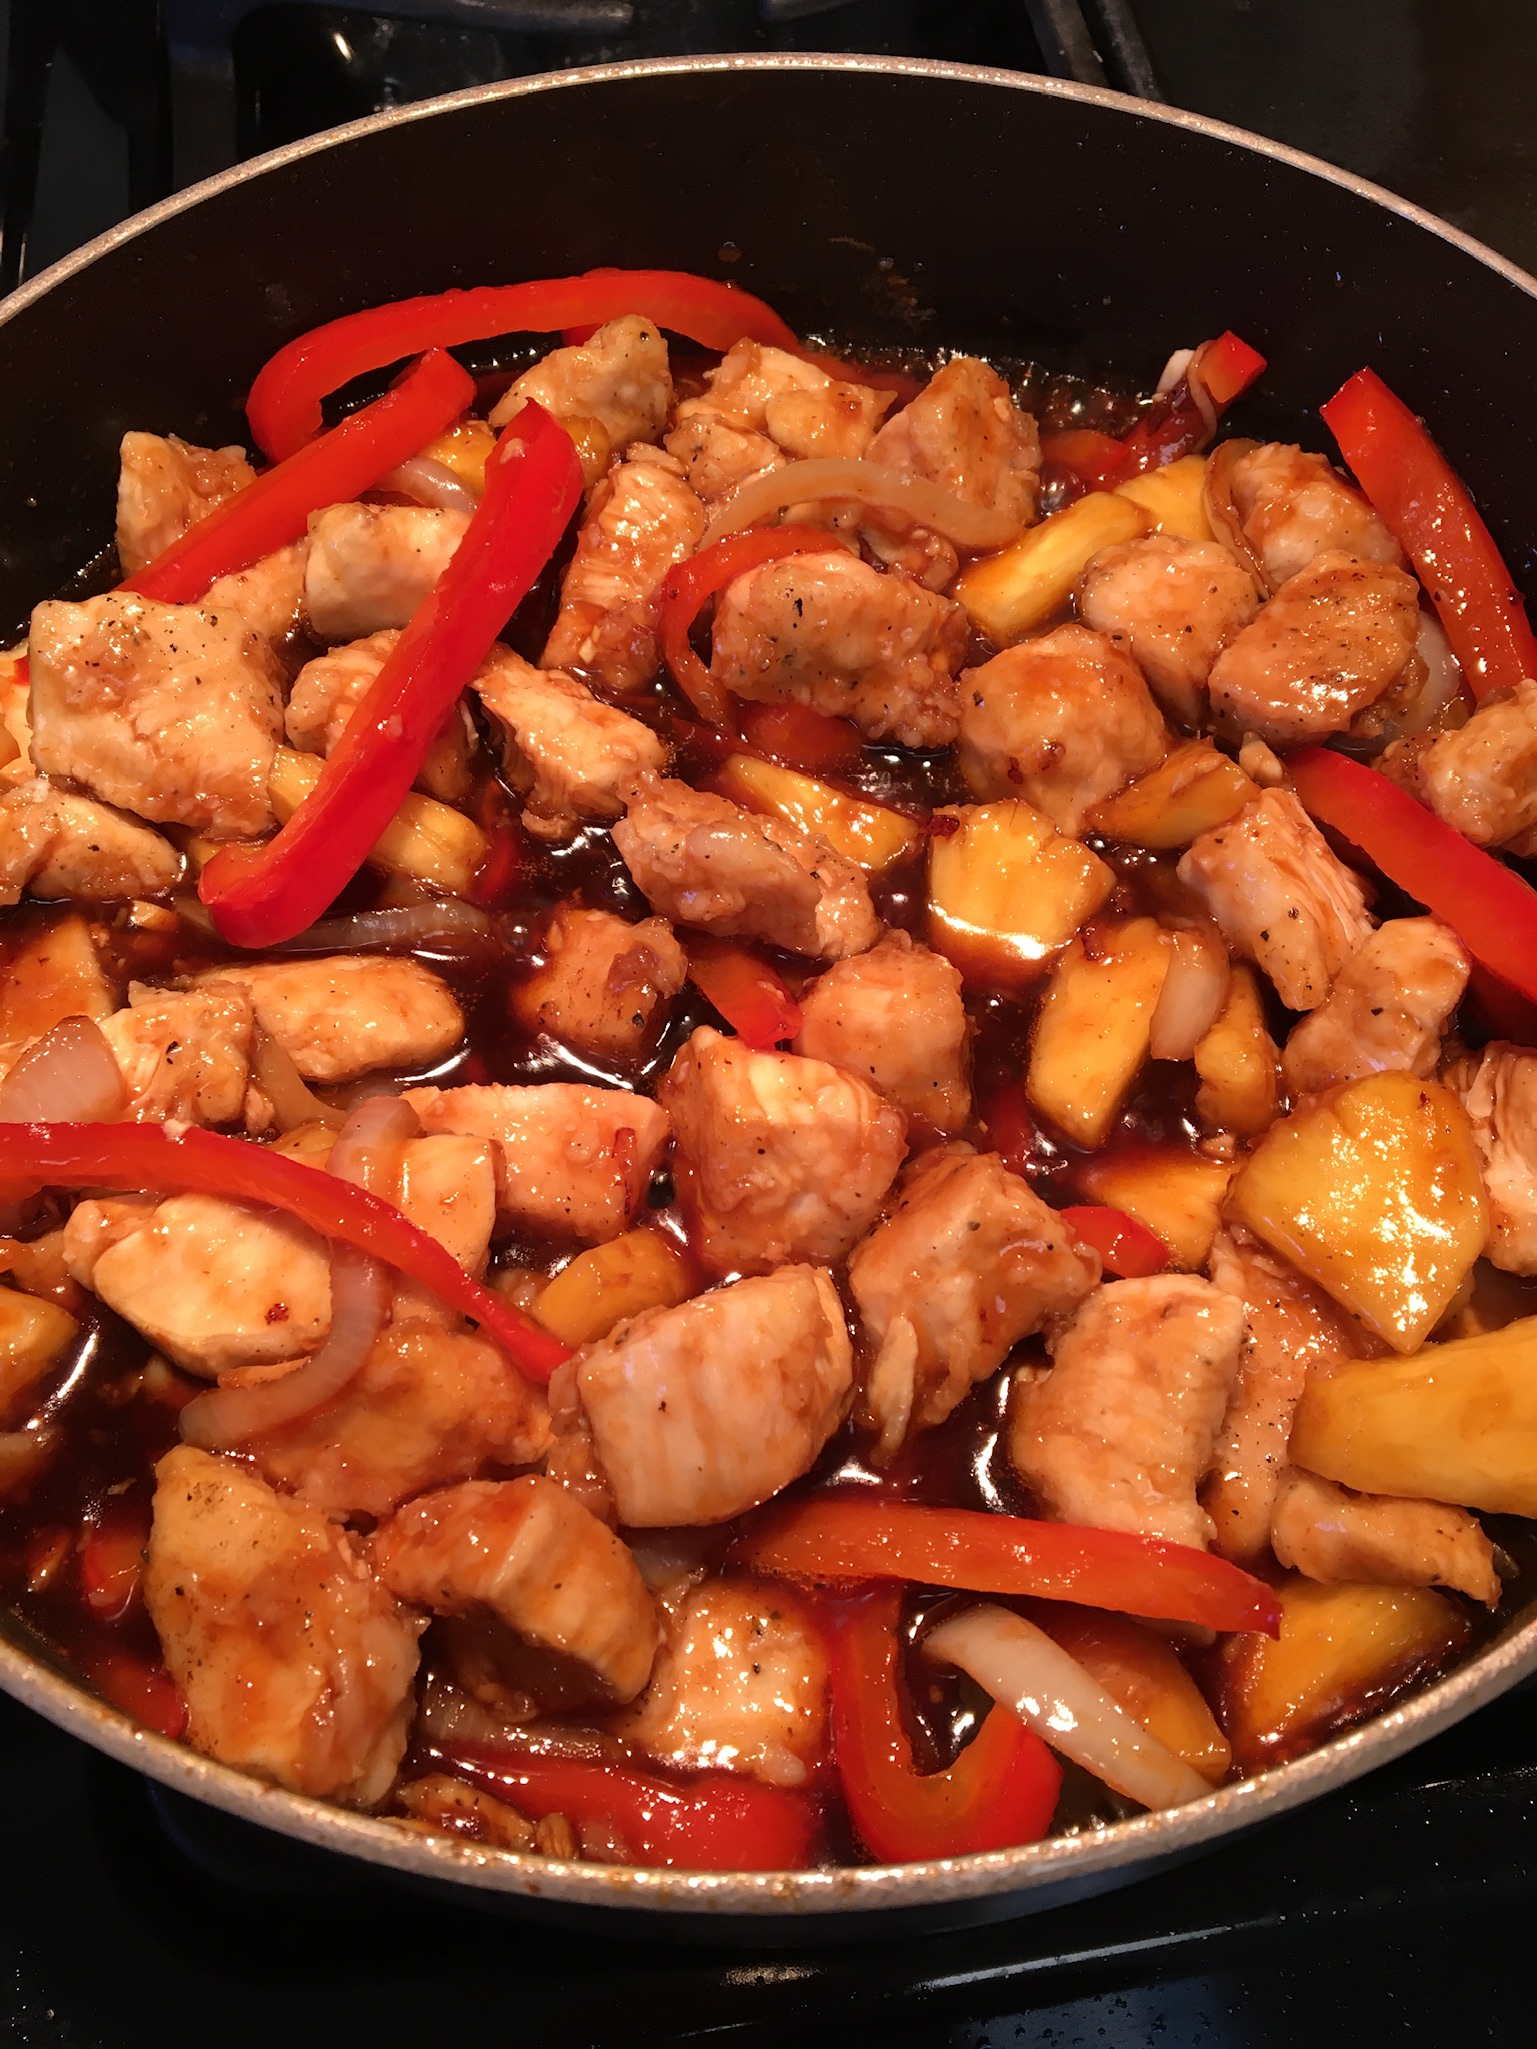
Let me start by saying I do not have an air fryer. But my dad does. In another region of the world. When I’m at Dad’s, he cooks the chicken pieces in his air fryer. When I’m home, I fry them. Simple. It’s gluten-free, but you must check your soy sauce and ketchup to be sure it’s in compliance. I’ve made this dish several times now and it’s super yummy. Don’t miss my instructions on making squash bowls below this recipe. Have fun!
- Ingredients
- 1# boneless chicken, breast or thigh meat, cut into apx. 1″ chunks (okay to substitute pork)
- Salt and pepper
- Corn starch
- Oil
- 1/3 cup sugar
- 1/4 cup rice vinegar
- 2 cloves minced garlic
- 2 Tbsp. soy sauce
- 1/4 cup ketchup
- 1 onion, cut into 1″ chunks
- 1 large bell pepper, sliced
- 1 cup fresh pineapple chunks
- Sliced green onions, optional garnish
Sprinkle salt and pepper over the chicken pieces and then dredge the pieces through corn starch. If you’re using an air fryer, then you won’t need oil in order to cook the chicken. If you’re frying, then you’ll need the oil in a skillet. Use just enough oil to pan-fry the chicken to cook it through. This is not deep-fried.
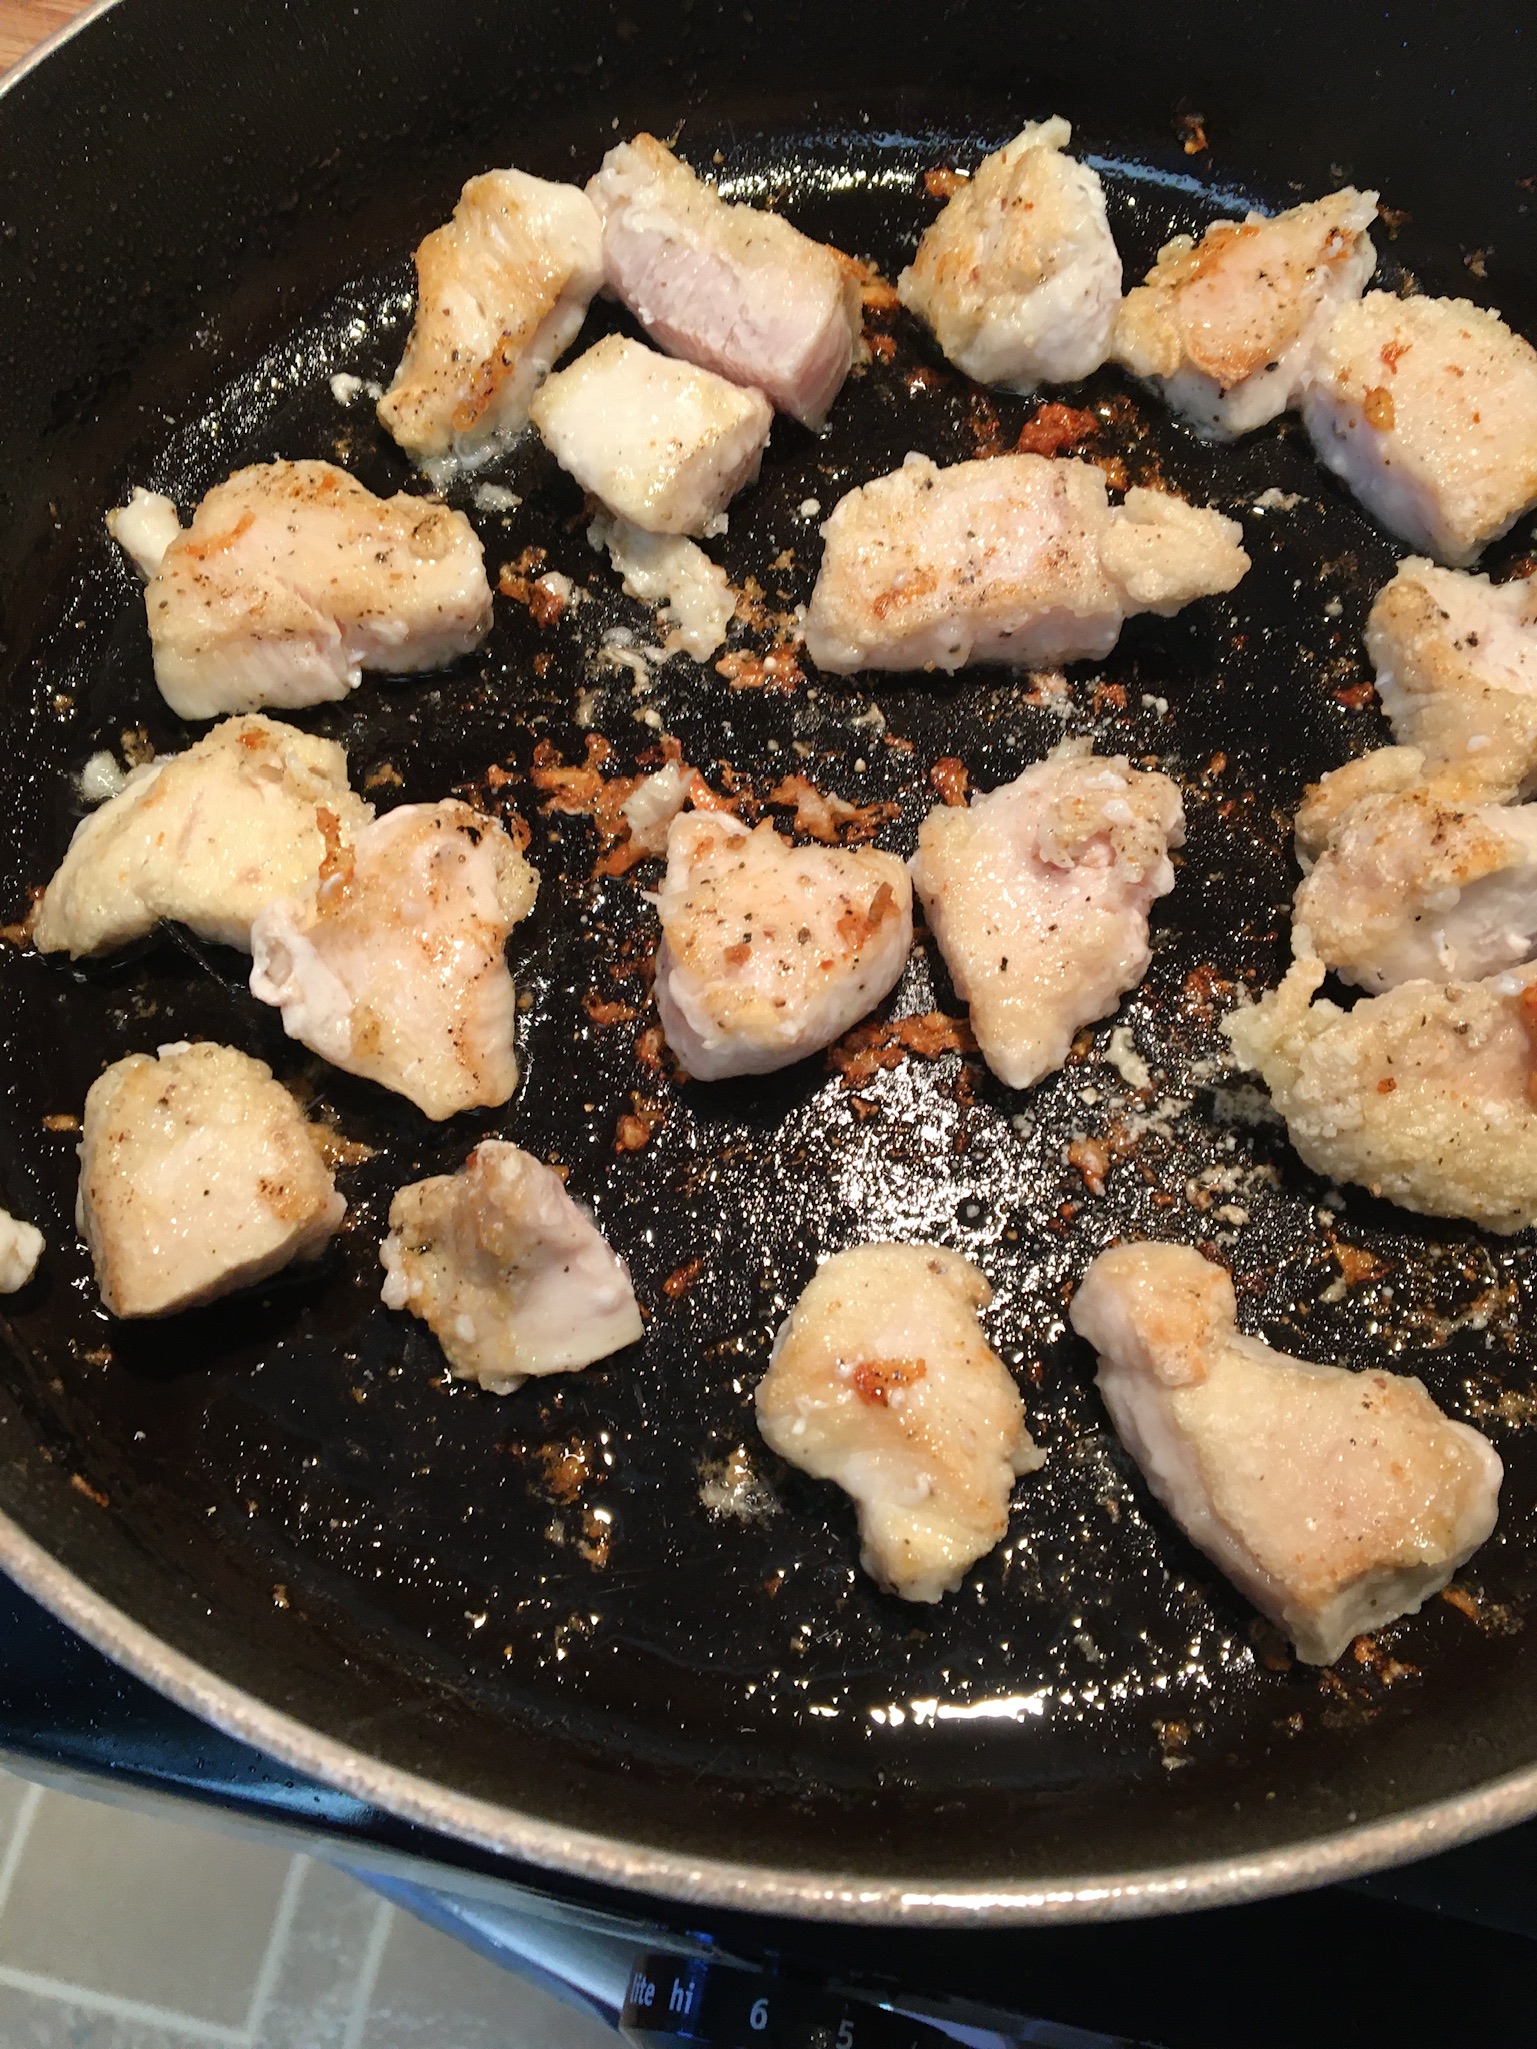
While the chicken is cooking, stir together in a small bowl: sugar, vinegar, garlic, soy sauce, and ketchup. Set aside.
In a skillet with a little bit of oil, or in the skillet you cooked your chicken in, stir fry the onion and bell pepper until it softens. Stir in the pineapple and let it heat through. Stir in the sauce you set aside. Let it heat through. Stir in the cooked chicken. Let it heat through. Remove skillet from heat and sprinkle with green onion slices, if desired. Serve warm over rice or in squash bowls or however you like it.
NOTES: My sauce has always come out the correct consistency, but if yours is runny for some reason, then make a slurry of corn starch and water, then stir the slurry into the skillet over heat until the consistency is corrected.
Squash Bowls

Preheat the oven to 400 degrees. Cut the bottom and the top off of an acorn squash, just so each side will sit upright on a baking dish after it’s sliced in half. Then slice the squash in half crosswise through the middle. Scoop out the seeds. Sprinkle a bit of olive oil on a baking dish. Rub each squash “bowl” with olive oil and set upright on the baking dish. Sprinkle each “bowl” with salt and pepper. I really like using the Hawaiian Volcano Sea Salt. It’s strong, but so is the squash. It works well. Sprinkle the “bowls” with a little more olive oil. Then, flip the “bowls” over so that the flesh is against the bottom of the dish and it’s skin-side up. Place in the oven, uncovered, for 45 minutes. Remove from heat, flip the bowls right side up, and check the flesh with a fork. It should be soft. Serve warm or cold. I usually roast mine in the afternoon and then let them sit, flesh side up, until time to serve with dinner. They fit right into a bowl and we fill them with Sweet and Sour Chicken or Pulled Pork or Chicken a la King or Egg Roll in a Bowl. Any kind of thick sauce should work.

The last few years I have been purchasing pork picnic roasts. Walmart had missed-priced them for about a year on the grocery pickup app, so one could buy the whole roast (about 8#) for under $2. Yeah, that’s not a typo. The whole roast was $1.98. Me and my family members kept a supply in our freezers. Once covid hit and nearly everyone started using the grocery pickup app, the store corrected their error and the price returned to about $19. After a year or so, I ran out of picnic roasts. Shopping in a local store, New Sagaya, I saw the same type of pork picnic roast on sale for about $10. I bought it and threw it into the freezer. I knew what to do with that. So, here for my convenience are the recipes for two pulled pork recipes: Cuban style and barbecue. The Cuban-style recipe started at bellyfull.net. The barbecue recipe is a hodge-podge of several recipes. I like each type of pulled pork equally as well and they are quite different from each other. The very nice thing about the pork picnic roasts are that you can make one recipe of each of these pulled pork with just the one roast. If you do decide to go the route of the picnic roast, know that it’s the upper part of a leg, so there’s bone-in and there’s a fatty skin layer. I remove as much skin and fat as possible, but I don’t worry about the rest of it. It keeps the pulled pork moist and delicious. If you have to cut the roast down to fit it into a pan that’s totally fine. If you do that, it will probably be ready at the three hour mark, rather than later. Last note here, I use the oven, but most people use a slow-cooker. Whatever.
Cuban Style
- Cuban-Style Ingredients
- 1/2 cup orange juice
- 1/2 cup lime juice
- 1-1/2 tsp. salt
- 1 tsp. cumin
- 1 tsp. oregano
- 1/4 tsp. red pepper flakes
- Several grinds pepper
- 7 cloves garlic, peeled and smashed
- 1 small sweet onion, sliced
- 1 bay leaf
- 3-4 pounds pork roast
- 3 Tbsp. olive oil
Preheat oven to 300 degrees F. In a Dutch oven or roasting pan, stir together all the ingredients except the roast and the olive oil. Coat the pork roast with olive oil and place into the pan, turning to coat. Cover the pan and place into the oven. Bake at 300 degrees F for three hours. Remove from oven and use a couple forks to see if it pulls apart easily. If it does, use the forks to shred the meat and stir it into the sauce until it’s all well incorporated. If it’s not quite ready to shred, return to the oven and check it again in a half hour or so. If the bone is in, it may take closer to 4 hours.
I like the Cuban-style pulled pork served over baked sweet potatoes or rice or as a filling for plantain cups or poblanos. It’s a wonderfully flavorful dish. This makes about 8 servings. I typically freeze what I don’t use the first day.
Barbecue Style
- Barbecue-Style Ingredients
- 1 12-oz. can Coke (cannot be diet Coke)
- 1 cup barbecue sauce (try the SBJ sauce here)
- 1 Tbsp. paprika
- 1/4 tsp. cayenne
- Many grinds of black pepper
- 1 tsp. salt
- 1/2 tsp. garlic powder
- 1/2 tsp. onion powder
- 3-4 lb. pork roast
Preheat oven to 300 degrees F. In a Dutch oven or roasting pan, stir together all ingredients except the pork roast. Add the pork roast and turn it to coat all sides. Cover the pan and bake at 300 degrees F for 3-4 hours. Check it at 3 hours to see if you can shred the meat easily with a couple forks. If yes, then shred the meat into the sauce until all is well incorporated. If no, then return to the oven for another half hour to hour or so, whatever it takes. If it’s bone-in, then it will take longer.
The other day I made this and I didn’t have Coke, so I used wine instead. And my most current batch of SBJ barbecue sauce is mouth-on-fire flaming hot, so I used a half-cup of that and a half-cup of a sweeter store-bought barbecue sauce. Still a delicious pulled pork. All of this is just to tell you it’s hard to go wrong.
I like to serve this type of pulled pork over sandwich buns (recipe here) or over baked sweet potatoes. It makes about 8 servings. I usually freeze whatever I don’t use the first day.
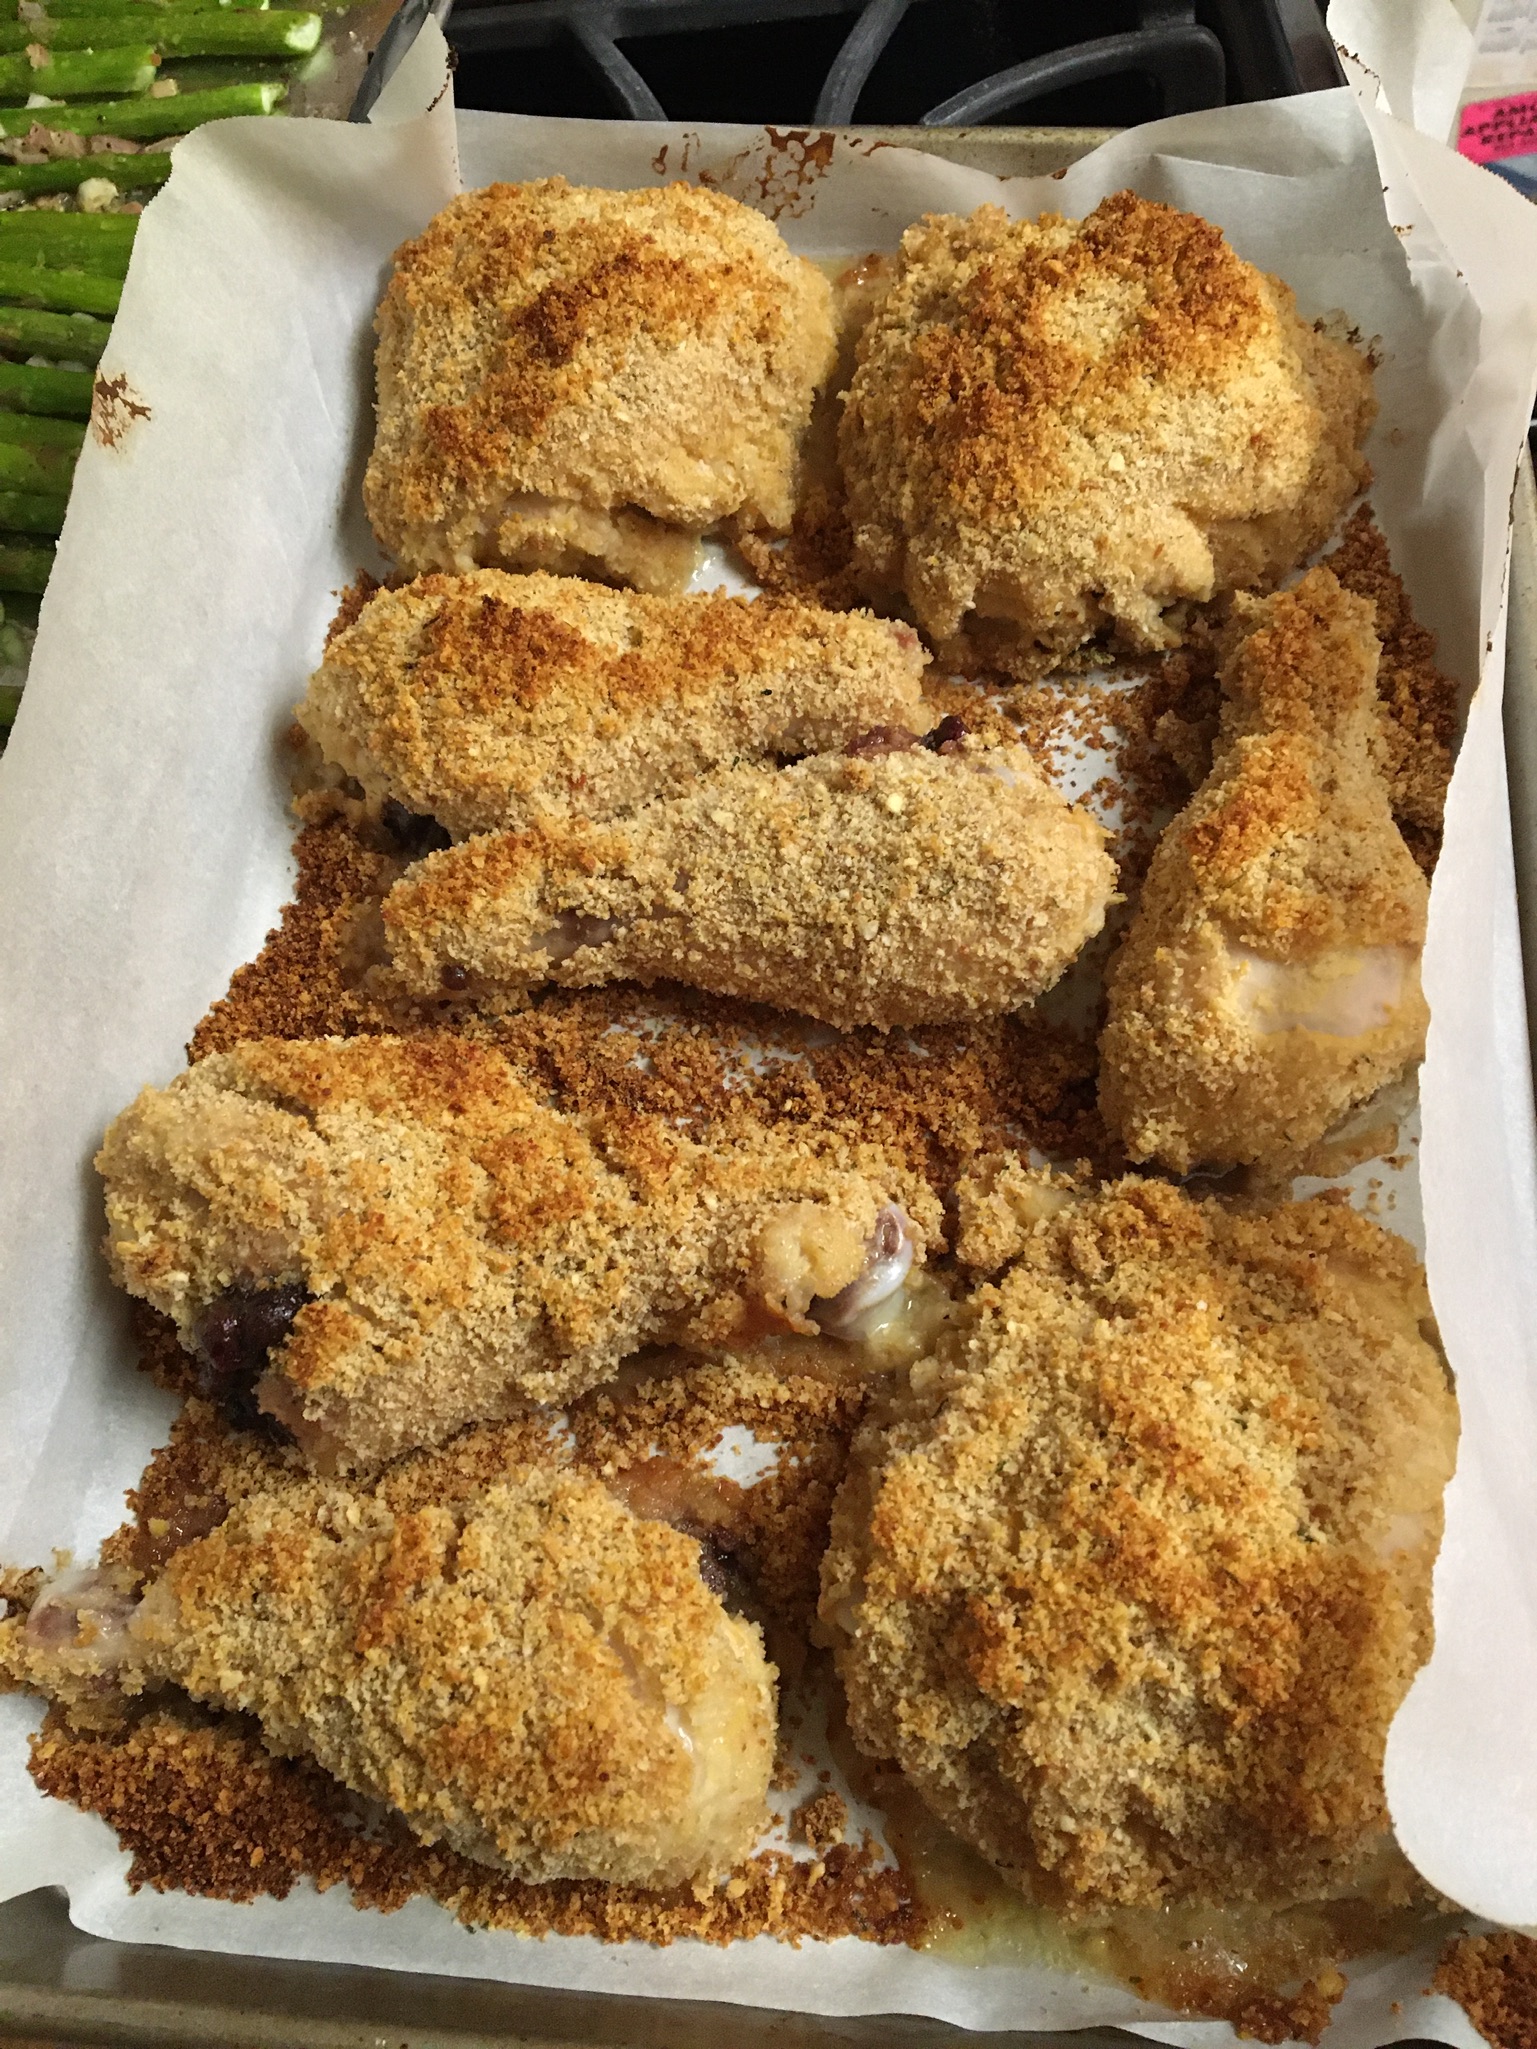
I think this originated as an Ina Garten recipe and it morphed from there. I have made it many, many times tweaking a little each time. I hate to run out of bread crumbs before I’m finished breading the chicken, but usually end up throwing some away. I guess it just depends upon how large and what type of chicken pieces you use.
- Marinade Ingredients
- 4 Chicken thighs and 4 Chicken drumsticks
- 1/3 cup buttermilk
- 1/3 cup Dijon mustard
- 1-1/2 tsp. salt
- Breading Ingredients
- 4 garlic cloves
- Zest of one lemon
- Small handful fresh thyme or about 1-1/2 tsp. dried
- 1 tsp. kosher salt
- Several grinds of freshly ground pepper
- 1-1/2 cups fine bread crumbs
- 3 Tbsp. olive oil
Anytime up until roasting, mix the buttermilk, Dijon, and salt. Coat the chicken with the marinade and let it sit under refrigeration until it’s time to roast. I try to do this part before lunch.
Preheat oven to 400 degrees F. Prepare a rimmed baking sheet with parchment paper.
In a small food processor (maybe a blender would work?), place the garlic cloves, lemon zest, thyme, salt and pepper. Process until the garlic is very fine. Add the bread crumbs and process to mix it all together. Drizzle the olive oil in, wetting the bread crumbs. [I do this by pouring the oil onto the top of my mini food processor which has little holes to drizzle liquids into the bowl — it works very well.]
Pour the bread crumb mixture into a pie tin or other flat container. Withdraw the chicken from the marinade, one piece at a time and dip in the bread crumbs. The bottoms need only be very thinly coated, if at all. The tops of the chicken should get the bulk of the bread crumb mixture. Place onto the prepared baking sheet.

Bake at 400 degrees for 40-50 minutes. Test for doneness. It may take more time. Remove from oven and let rest for 5-10 minutes.
This is incredibly tasty! And it tastes great for lunch the next day. Yeah!
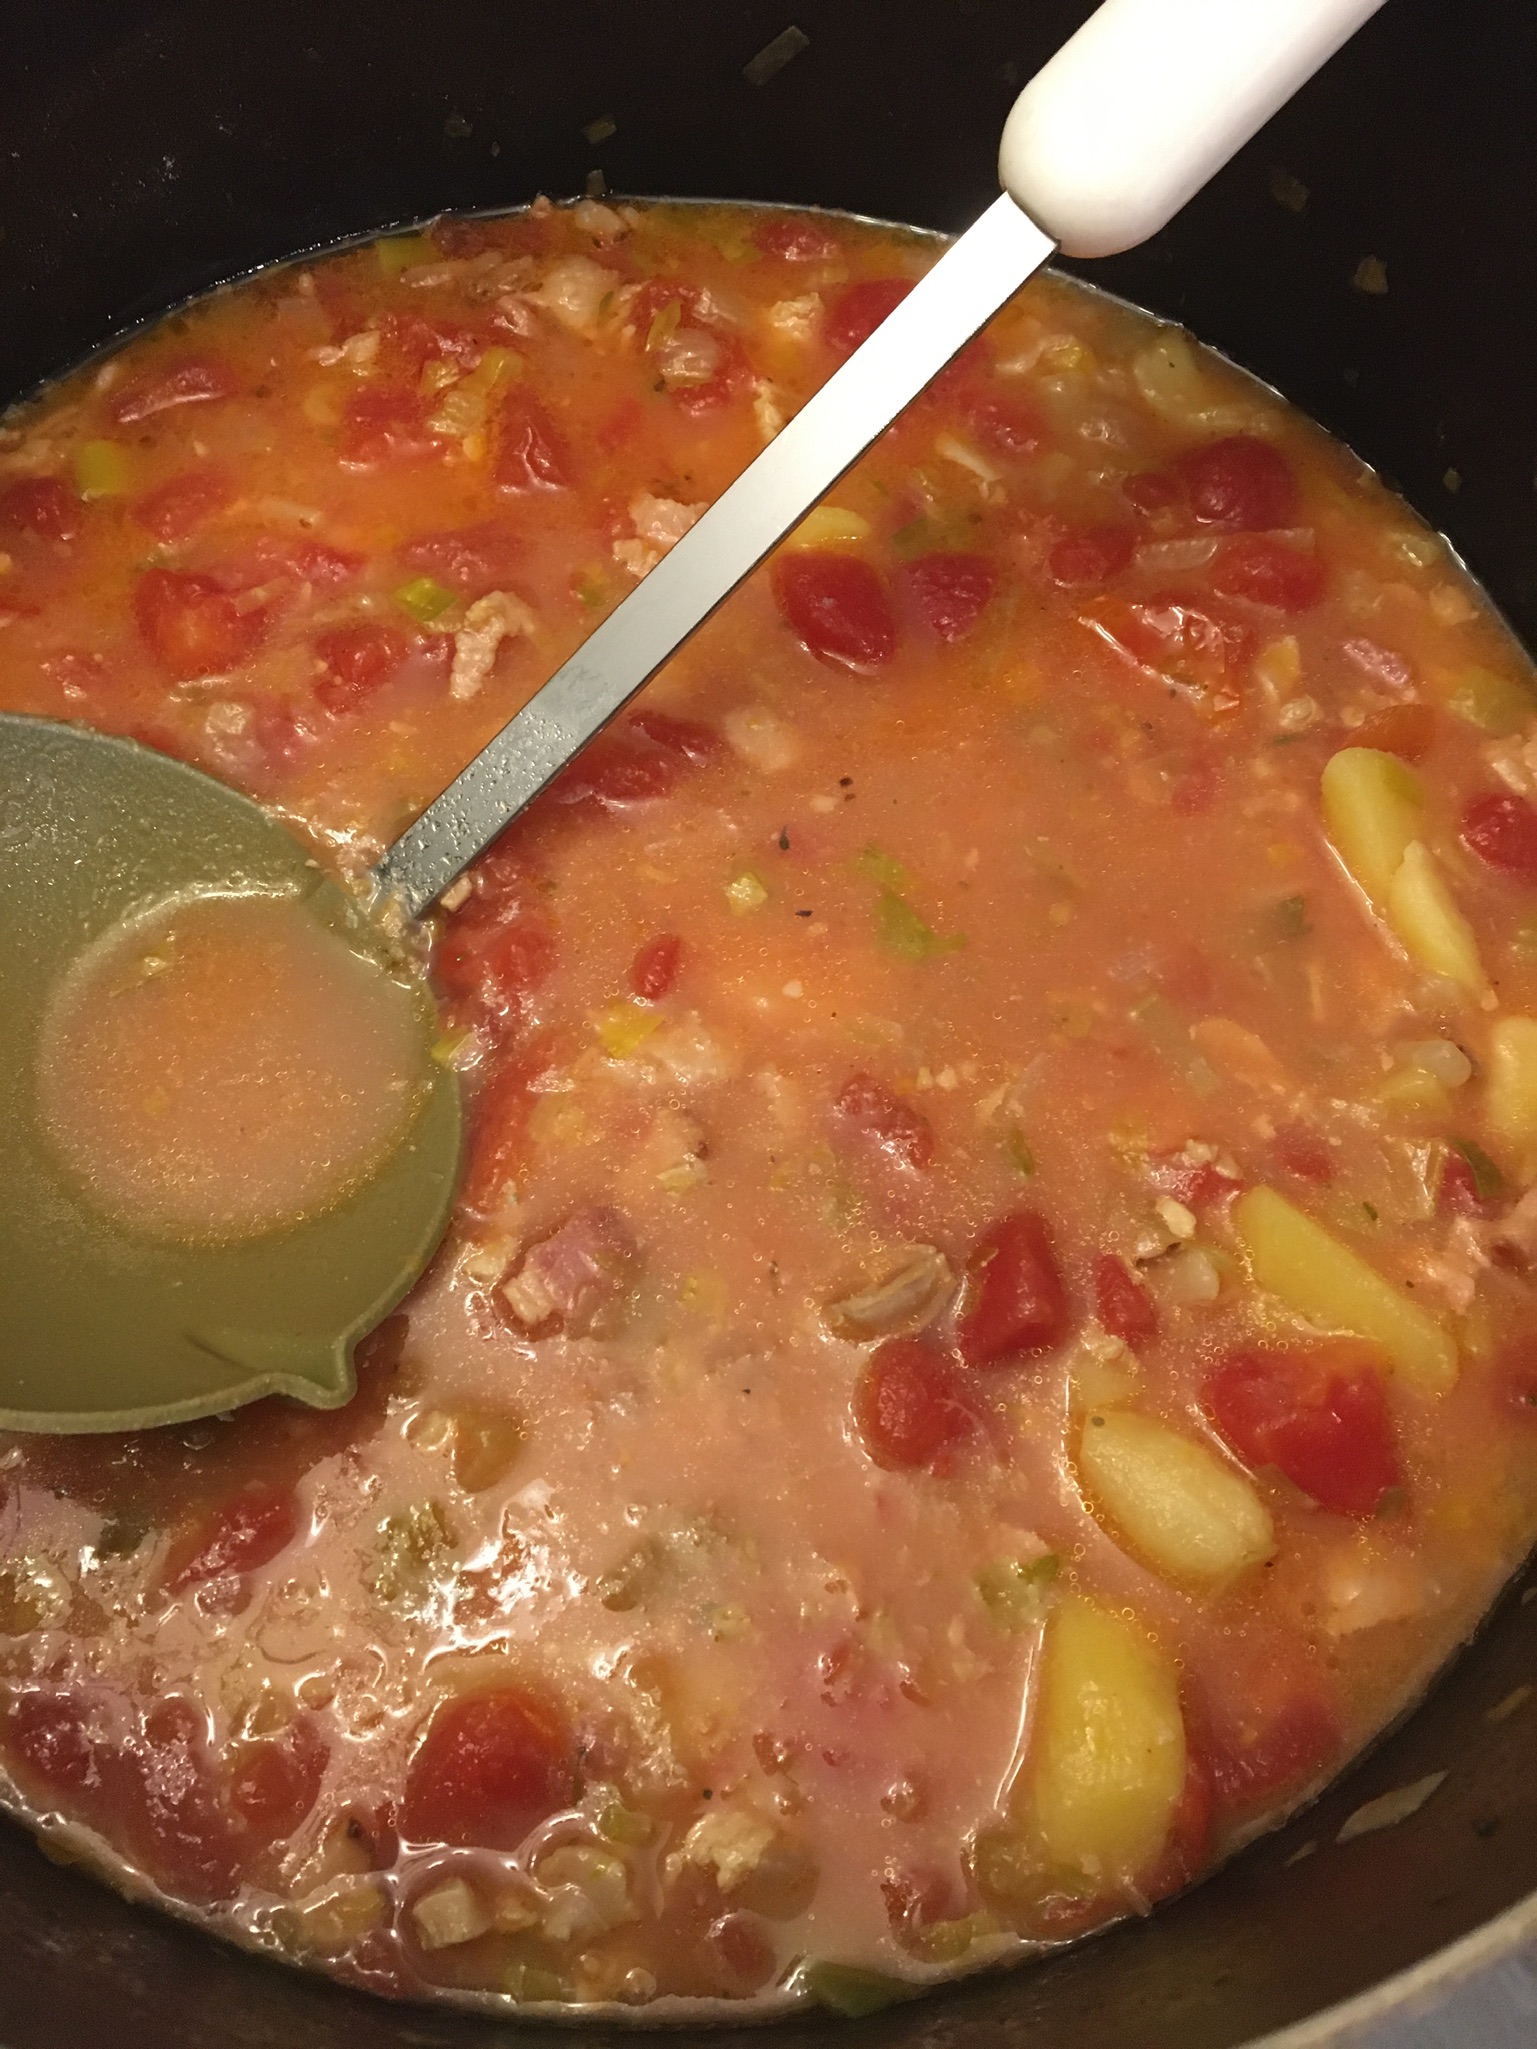
I worked at the King Ko Inn in King Salmon, Alaska during my teenage years in the mid-1970s. Most of that time I was a maid, but for a few months in my senior year of high school I was a waitress. The clientele were German sport fishermen and road laborers working on the upgrade of the road to Naknek. The inn’s manager was this mountainous rough woman named Bea. She was all seeing, all knowing. She cruised through the inn like a giant tanker, trailing a wake of fear behind her. She was fiercely protective, however, of her young employees. One thing you could count on when Bea was cooking on Fridays was her Manhattan Clam Chowder. Most places, in the western United States at least, serve clam chowder on Fridays, but it is New England style. Bea’s Manhattan Clam Chowder is so memorable that I have been trying to duplicate it ever since. I finally found it here at Food 52 a few years ago.
- Ingredients
- 16 oz. (2-8 oz. bottles) clam juice
- 12 oz. (2- 6 oz. cans) chopped clams, drained, reserve juice
- 4 oz. diced bacon
- 1-1/2 cups small dice onion
- 1/2 cup chopped leeks (white part only)
- 1 cup small dice celery
- 2 tsp. minced garlic
- 1/8 heaping tsp. celery seed
- 1/2 tsp. oregano
- 1 tsp. dried thyme
- 1/2 tsp. red pepper flakes
- Salt and pepper
- 2 cups 1/2″ dice peeled potatoes
- 28 oz. chopped canned tomatoes
- 1/2 tsp. horseradish sauce
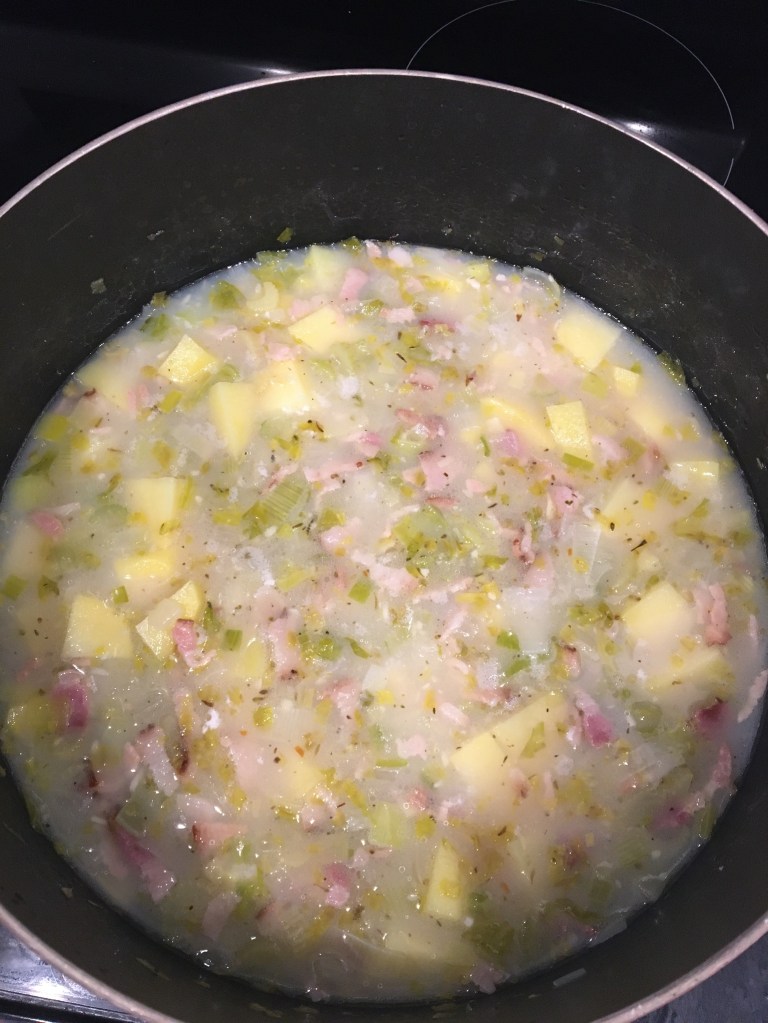
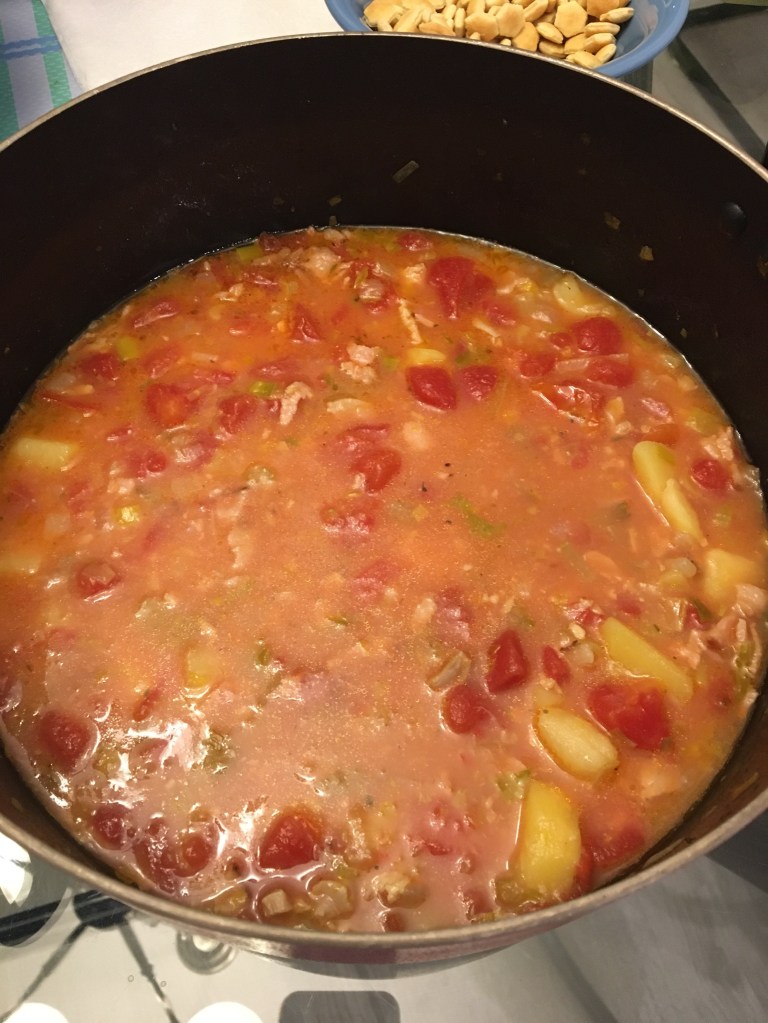
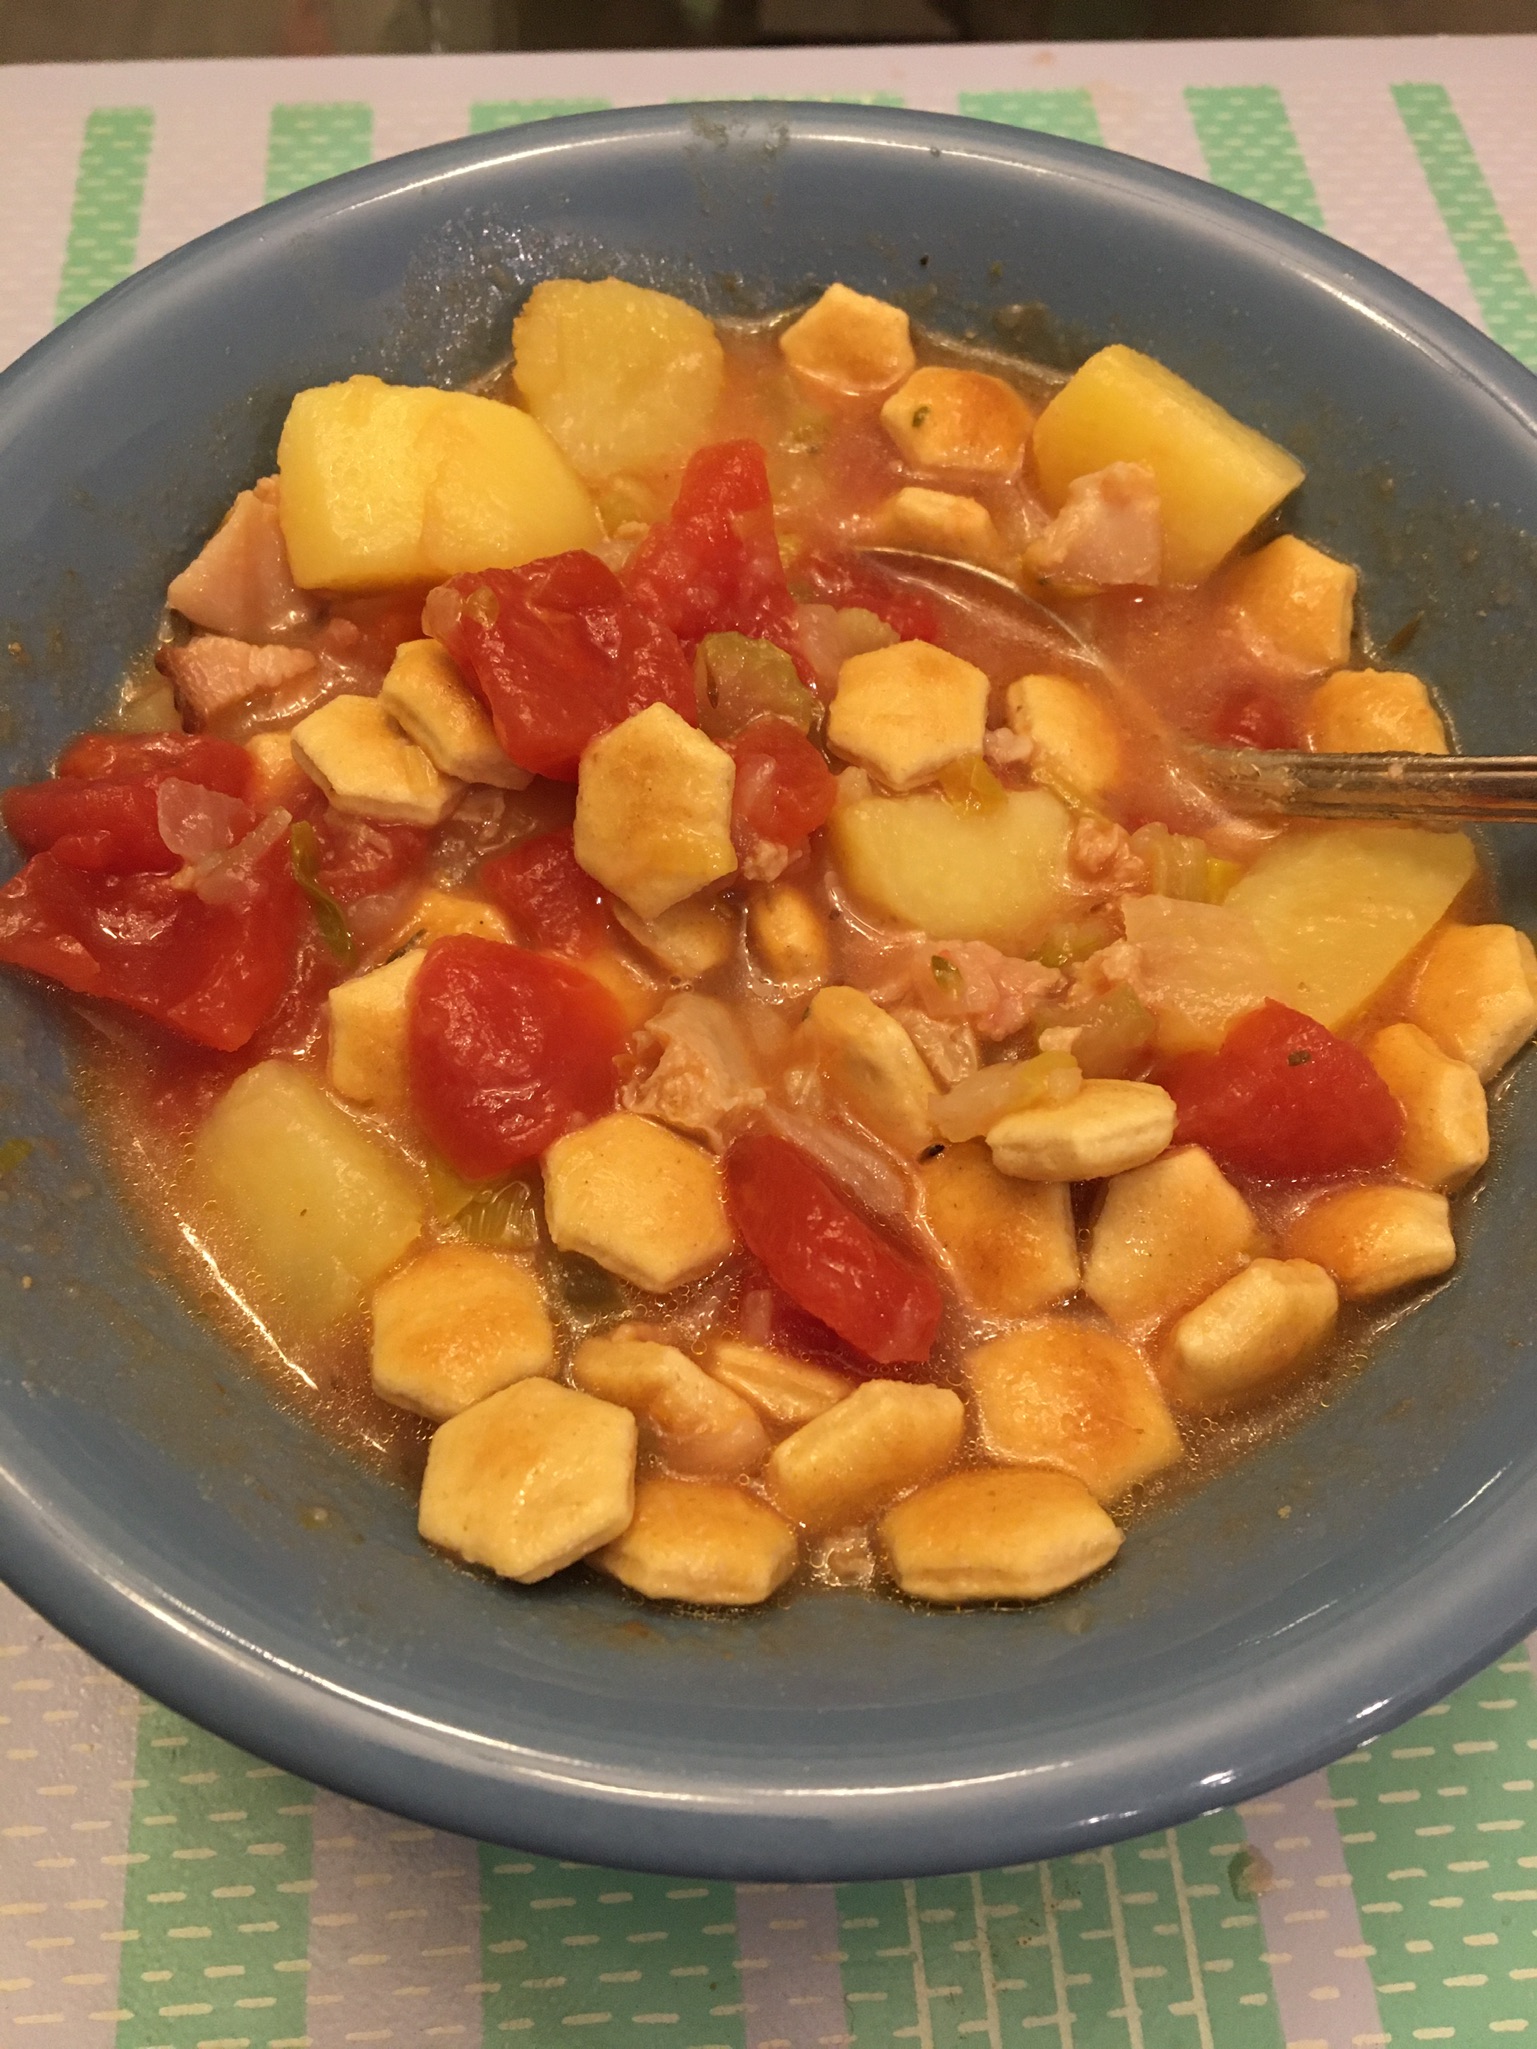
In a large pan, fry bacon until nearly crisp. Stir in vegetables and saute until soft. Stir in spices. Stir in clam juice and reserved clam juice, salt, pepper, and potatoes. Bring to a boil, reduce heat, and let simmer until potatoes are cooked through. Stir in tomatoes and clams. Bring to a boil. Remove from heat. Stir in horseradish sauce. Serve. Oh, yum!!!
Notes: This will serve 4 easily. I like to serve with a crusty bread or oyster crackers. If you’ve never used leeks before, make sure you clean them appropriately. I slice mine in half lengthwise and then run under cold water while I flip the layers of leek, like pages of a book. Leeks hide sand and bugs and have to be cleaned well. Then I chop them up. This is a gluten-free dish.
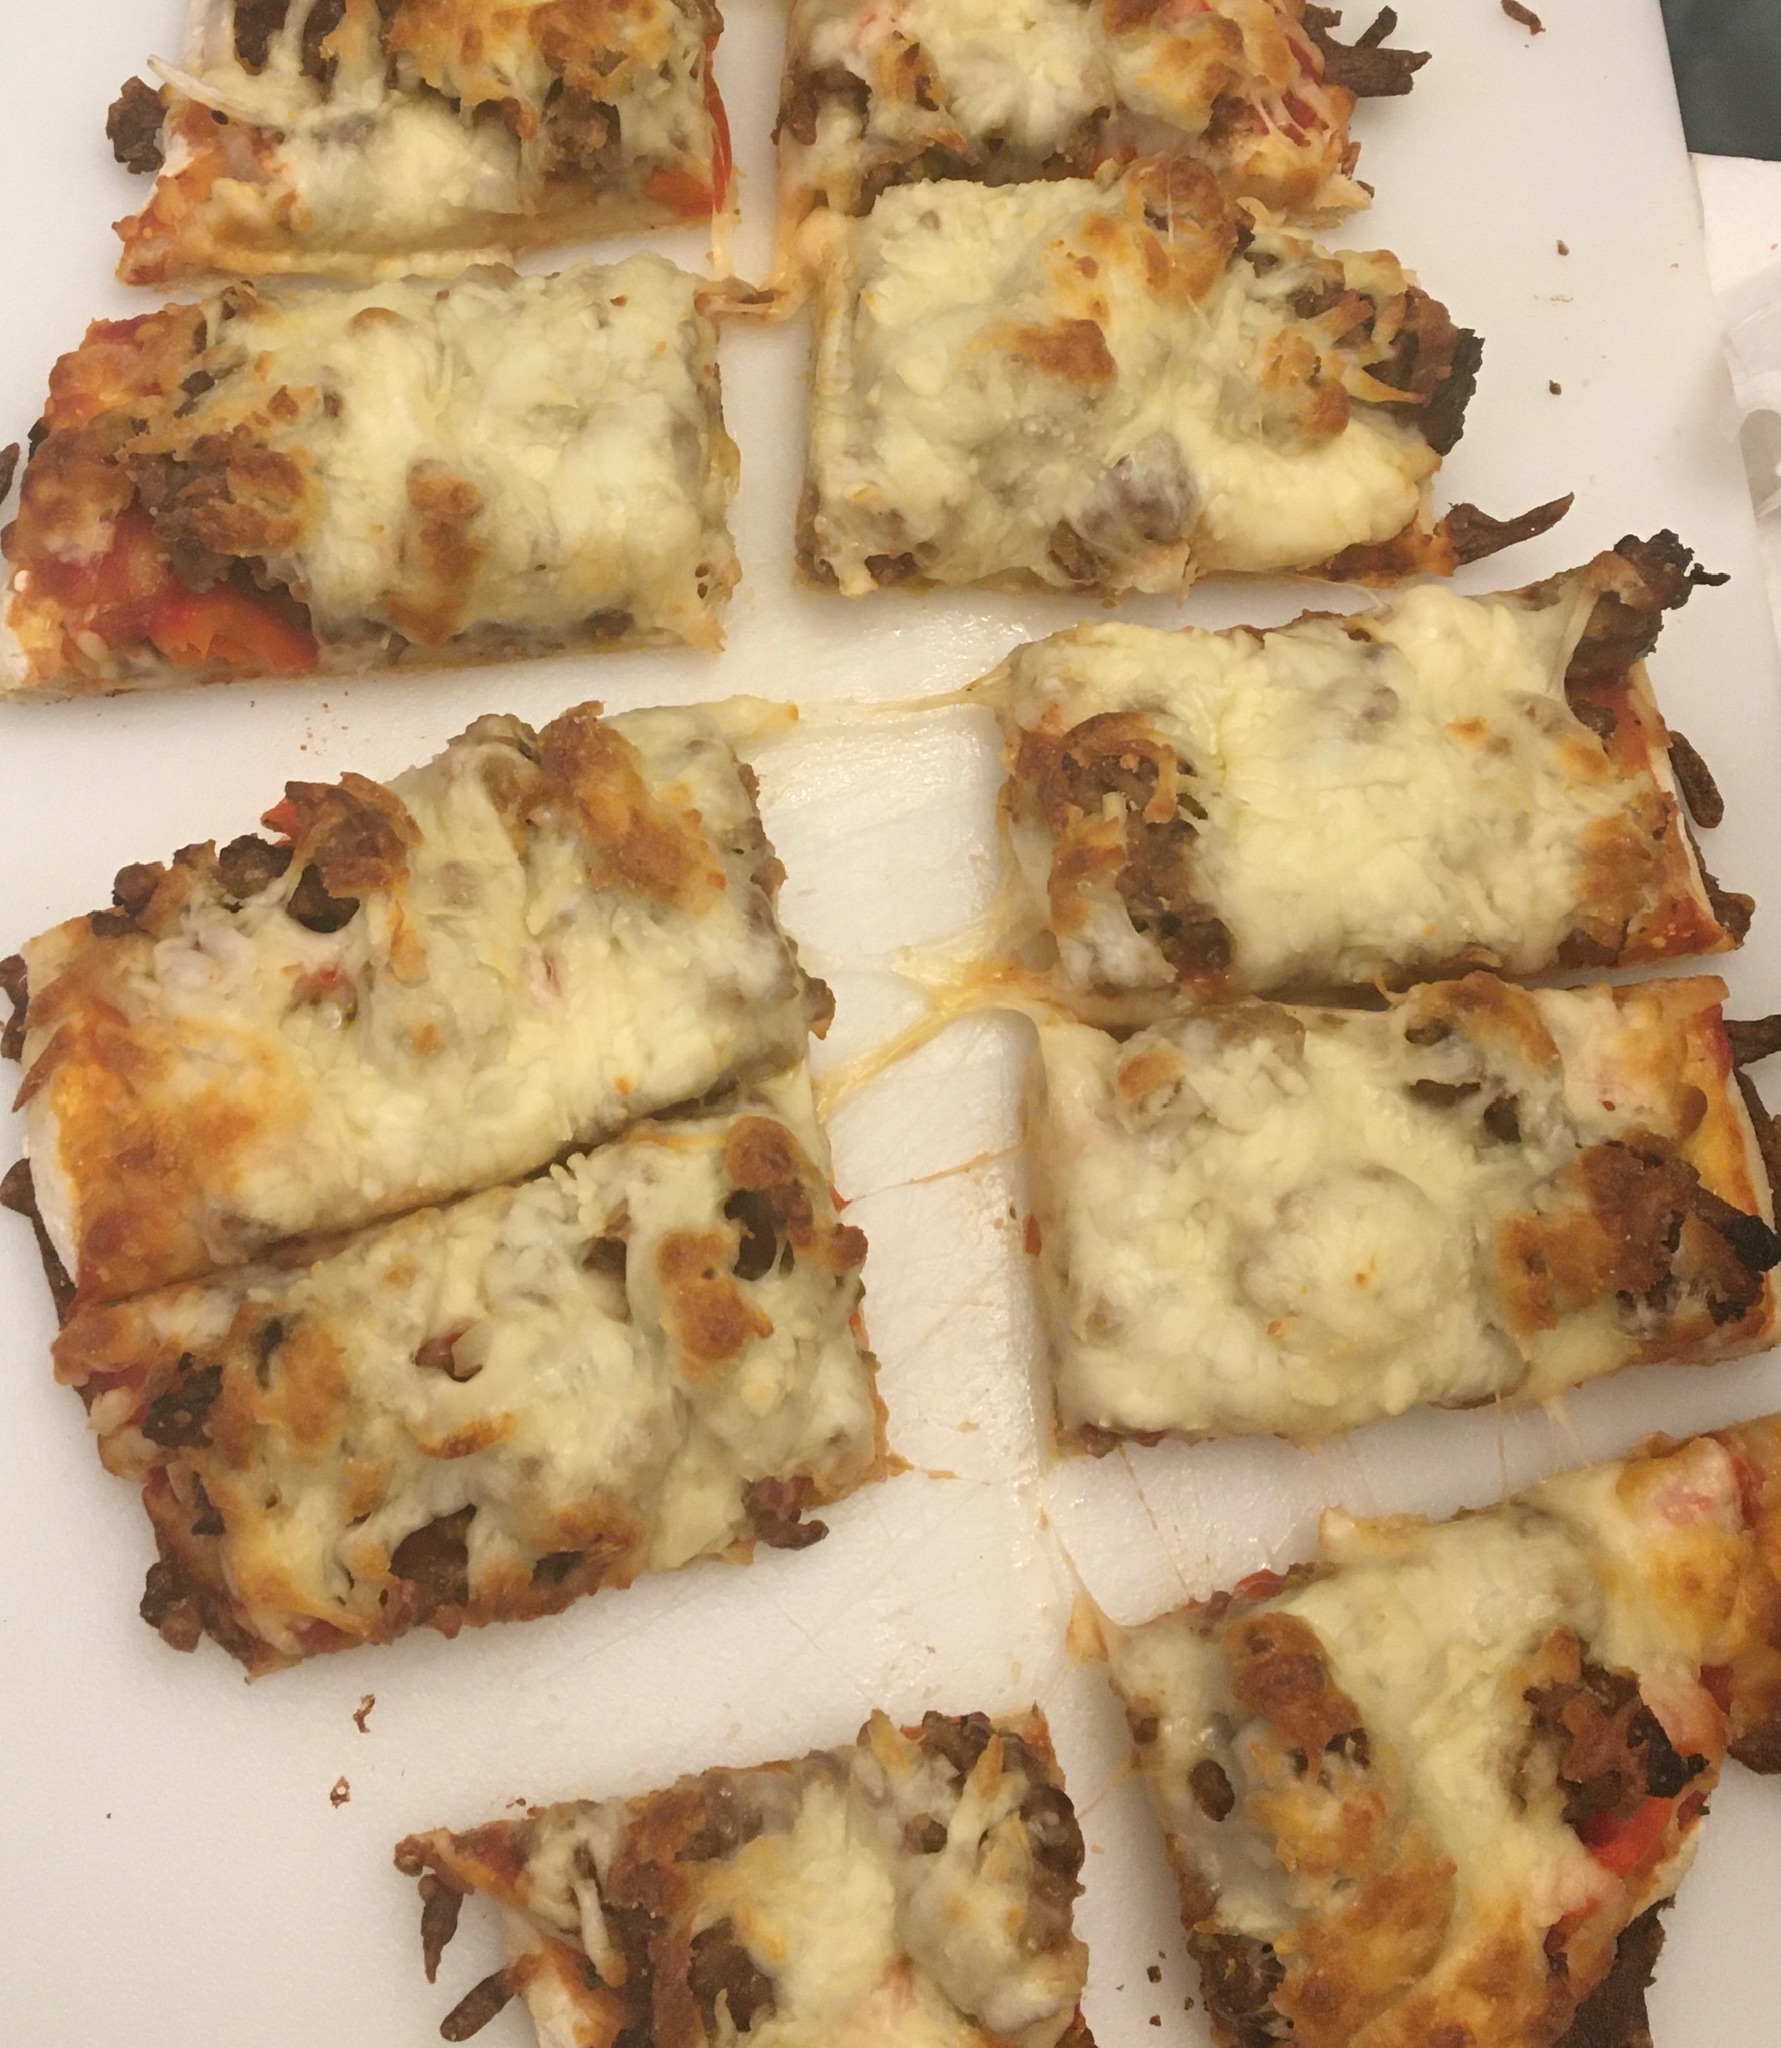
This is my new favorite pizza dough recipe. I’m not a pizza crust connoisseur by any means, but this crust made me pause and ask, “Where have you been all my life?” The recipe originates at babysavers.com.
- Ingredients
- 1/4 cup warm beer
- 3/4 cup warm water
- 1 package (2-1/4 tsp.) active dry yeast
- 1 Tbsp. sugar
- 1 tsp. salt
- 1 Tbsp. olive oil, plus more for drizzle
- 2-1/2 to 3-1/2 cups flour (I have used both bread flour and all-purpose to great effect)
- Favorite toppings
This recipe makes one 16″ pie or a couple smaller ones.
Mix beer, water, yeast and sugar together and let sit until foamy. Stir in salt and olive oil and 1 cup flour. Stir and stir and stir to build the gluten. Stir in more flour in half-cup increments until it’s a bit shaggy. If you’re using a stand mixer, keep mixing and adding smidges of flour until the the dough is smooth. If you’re doing this by hand, turn it out onto a floured surface and knead for 6-8 minutes until the dough is smooth. Place the dough ball into a lightly oiled bowl and drizzle more olive oil over the top. Cover with a damp cloth and let rise in a warm spot for 45 minutes or so.
Preheat oven to 425 degrees F. Prepare your pan(s) by covering with parchment paper or lightly greasing or oiling or spraying with non-stick spray. Prepare your toppings.
Roll the dough out to about 1/4″ and set on your prepared pan(s). BAKE FOR 4-5 MINUTES (PARBAKE)!
Remove the parbaked crusts from the oven and sprinkle with your favorite toppings. Return to the oven and bake 8-12 minutes or until crust is golden and toppings melted.
Notes: What I liked about this was the flavor coming off of the beer. I heat my beer in the microwave until it’s warm to the touch, but not scalding hot. Don’t want to kill the yeast. The beer makes for a deeply flavored crust. My 89-year-old dad said it was the best pizza he ever had, so that’s saying something. The last time I made this I increased the ingredients a little bit because I didn’t think there would be enough pizza. I was wrong because we ended up with leftovers, but it turned out well, so now I know it works. I just eyeballed and added about a third more of everything and then made one pizza on a very large baking sheet and the other one on a smaller baking sheet. I think the key is the parbaking. It means the sauce doesn’t cause the crust to get soggy or worse, remain raw.
The topping ideas are endless: Italian sausage, pepperoni, chicken, mushroom, mozzarella cheese, parmesan cheese, tomato sauce, pesto sauce, Canadian bacon, pineapple (euw), bacon, peppers, tomatoes, onion. I remember eating a kabab pizza in Sweden, but I can’t remember what constituted the kabab. It was yummy, though. Some kind of meat with some kind of white sauce drizzled over. I really love a spicy Thai pizza with chicken and sweet chile sauce and peanuts and bean sprouts. This is making me hungry.
