
You are currently browsing the monthly archive for March 2019.
Late last year I tried a modified version of a Texas Chili Con Carne recipe that used dried chiles. It was my first time working with dried chiles. I had seen them in the grocery store, but had not known what to do with them. The chili turned out really, REALLY good. The flavor was deep, smoky, and rich. Early this year I bought a couple more packages of dried chiles and yesterday thought I’d make a sauce to bind my pulled pork in the stuffing for Stuffed Poblanos. I make pulled pork quite often, but with only two of us, always have a lot left over. I confess that I do not have a crockpot. Nowhere to store it. I’ve got a big Dutch-oven style cooking pot so I use that at a low heat to make pulled pork in the oven.
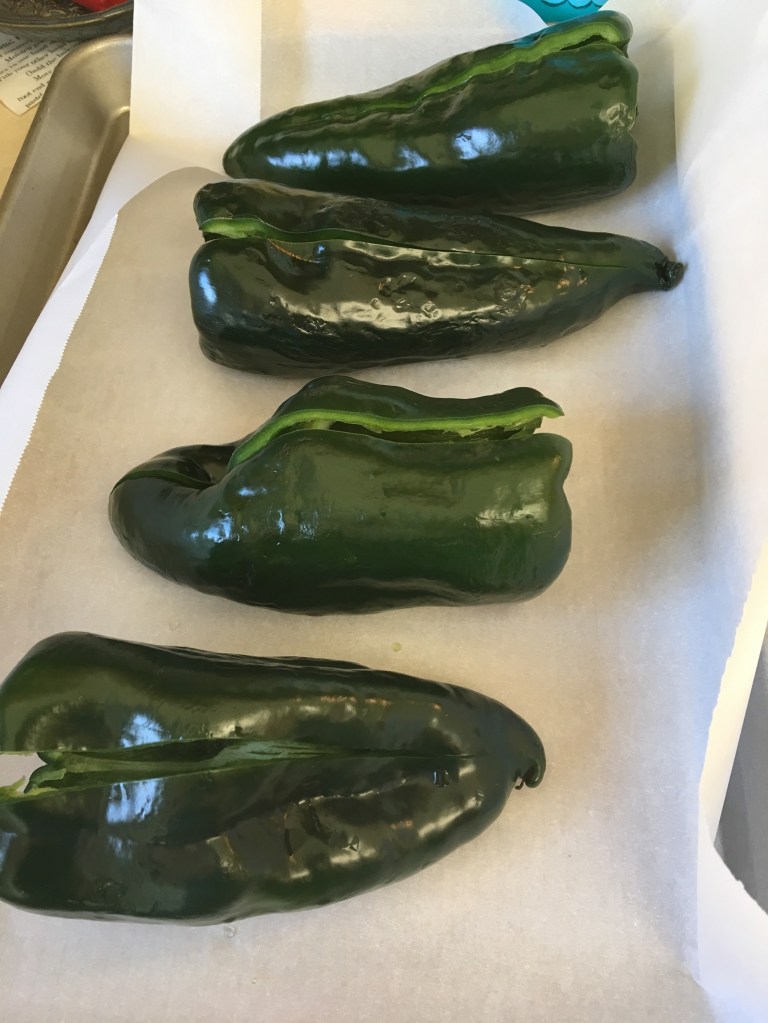
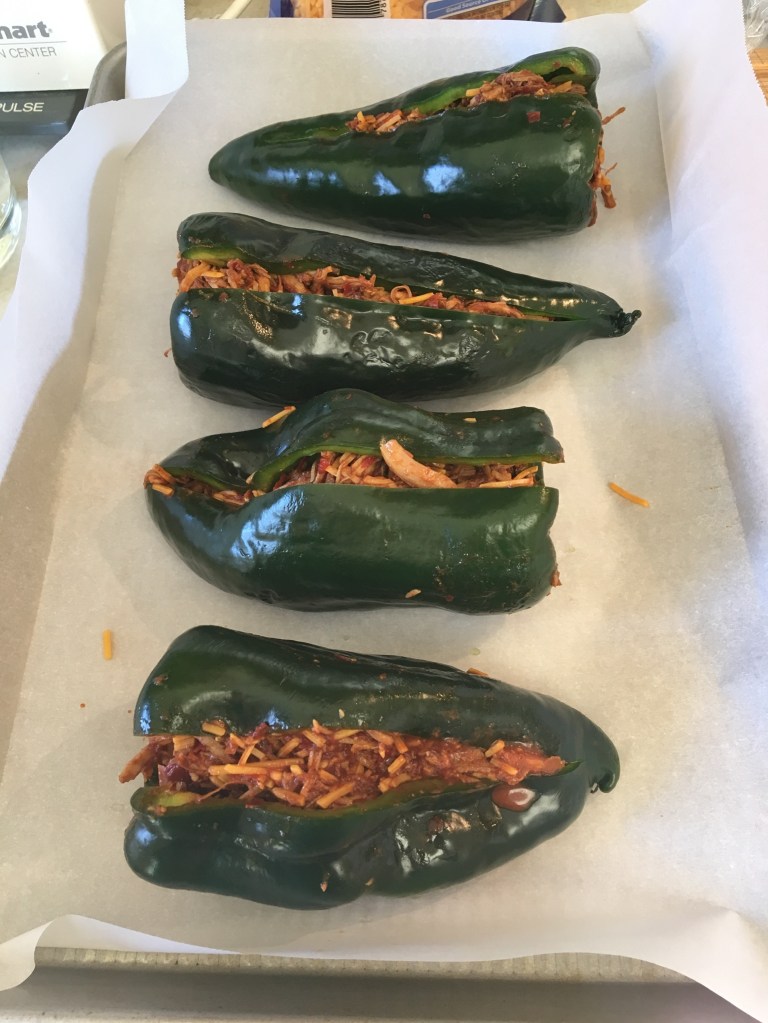
Various ways I’ve used my pulled pork is to add sauce and make sandwiches, top baked sweet potatoes, fill sopes or enchiladas, and to stuff poblanos. The poblanos are a real low-carb option. If you’re unfamiliar with poblanos, they’re a large chile with a very mild flavor once they’re stemmed and seeded. Once in awhile I’ve had one that’s got a kick at the stem end. I use gloves to stem and seed them.
The basis for the enchilada sauce is from foodiecrush.com. Heidi at foodiecrush.com called for 2 oz. of dried guajillo chiles and 1 oz. of New Mexico chiles. I just happened to have a 6 oz. package of guajillos and a 3 oz. package of New Mexicos. Hmmm. Do the math. Because I find stemming and seeding dried chiles quite tedious, I decided to make a triple batch and freeze the unused sauce, so I wouldn’t have to do it again anytime soon.
I wore gloves to stem and seed the chiles. It took me about 50 minutes hunched over my garbage can to stem and seed them. Like I said, tedious.
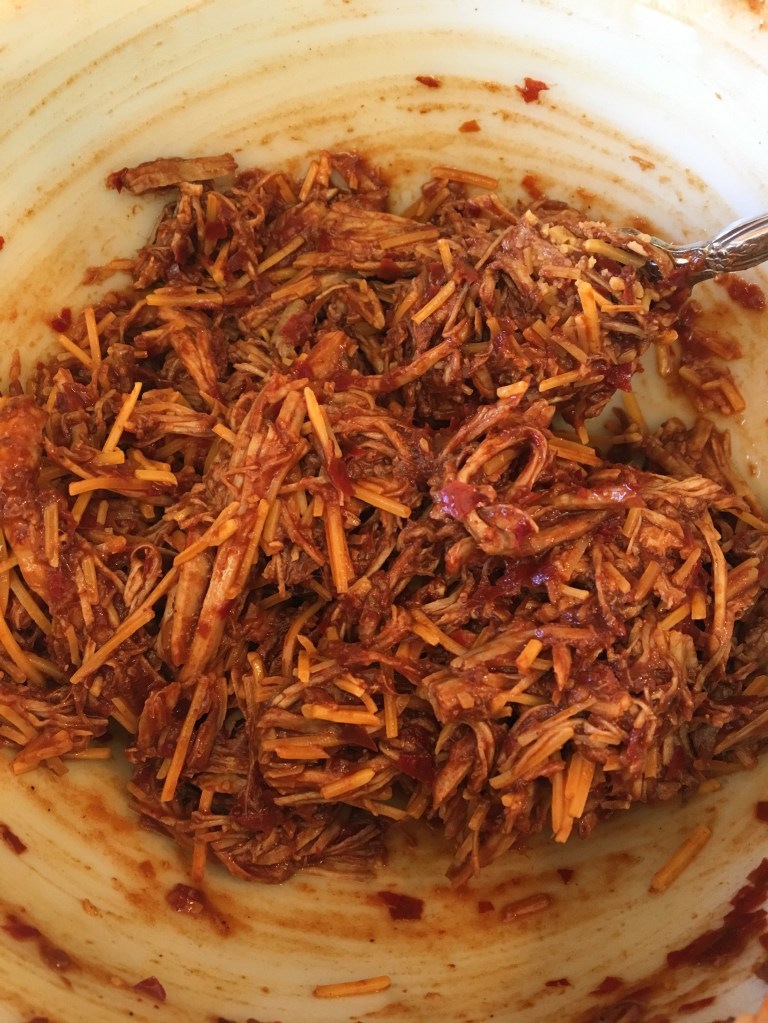
I’m a lazy cook when it comes to presentation, so I don’t strain my sauce. I really don’t see what difference it makes since enchilada sauce is usually added over, under, or with stuffed tortillas. Who cares if it’s not smooth?
- GF Enchilada Sauce
- 6 oz. dried guajillo chiles, stemmed and seeded
- 3 oz. dried New Mexico chiles, stemmed and seeded
- 9 cups water
- Olive oil
- 3/4 cup chopped onion
- 1-1/2 cups chopped tomato (I used grape tomatoes)
- 3 large garlic cloves, chopped
- 3 tsp. kosher salt
- 1-1/2 tsp. dried oregano
- 1-1/2 tsp. smoked paprika
- 3/4 tsp. ground cumin
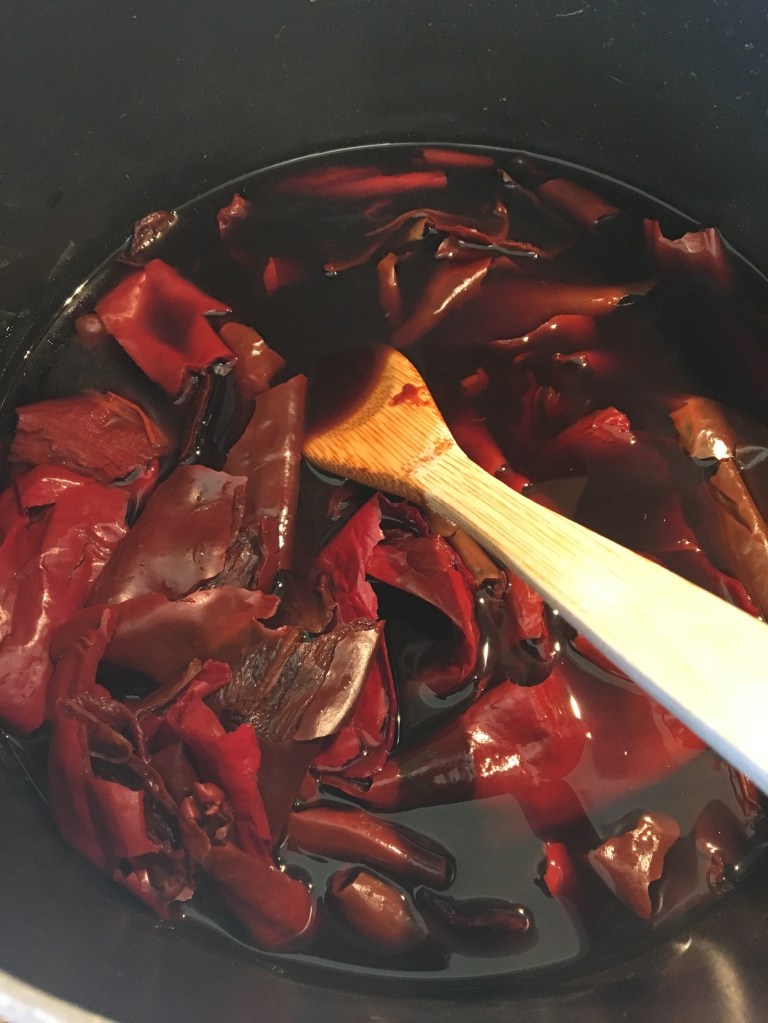
In a very large cooking pot, place the dried chiles and water. Bring to a boil and then let simmer, covered, for thirty minutes. Remove from heat and strain the chiles out of the cooking water. SAVE THE COOKING WATER! Set aside the chiles and the water.
In a medium skillet over medium heat, swazz the olive oil and then add the onions. Let them cook until translucent. Add the tomatoes, garlic, salt, oregano, paprika, and cumin. Let it cook down until it’s thick and pasty.
Scrape the onion-tomato mixture into a very large food processor and add the chiles and a bit of the chile-cooking water. Let it process, adding chile-water as necessary to get a sauce consistency that is to your liking. I tried to get my consistency as smooth as possible in the processor because I didn’t want to strain it afterward. Don’t throw out the remaining chile water! More to come.
Pour the processed mixture back into the large cooking pot. I rinsed my skillet out with a little chile-water and added that to the cooking pot, too. Bring to a boil and then let simmer, uncovered, for ten or fifteen minutes. Add more chile-water as necessary. Don’t skip the cooking step, it really creates the flavor.
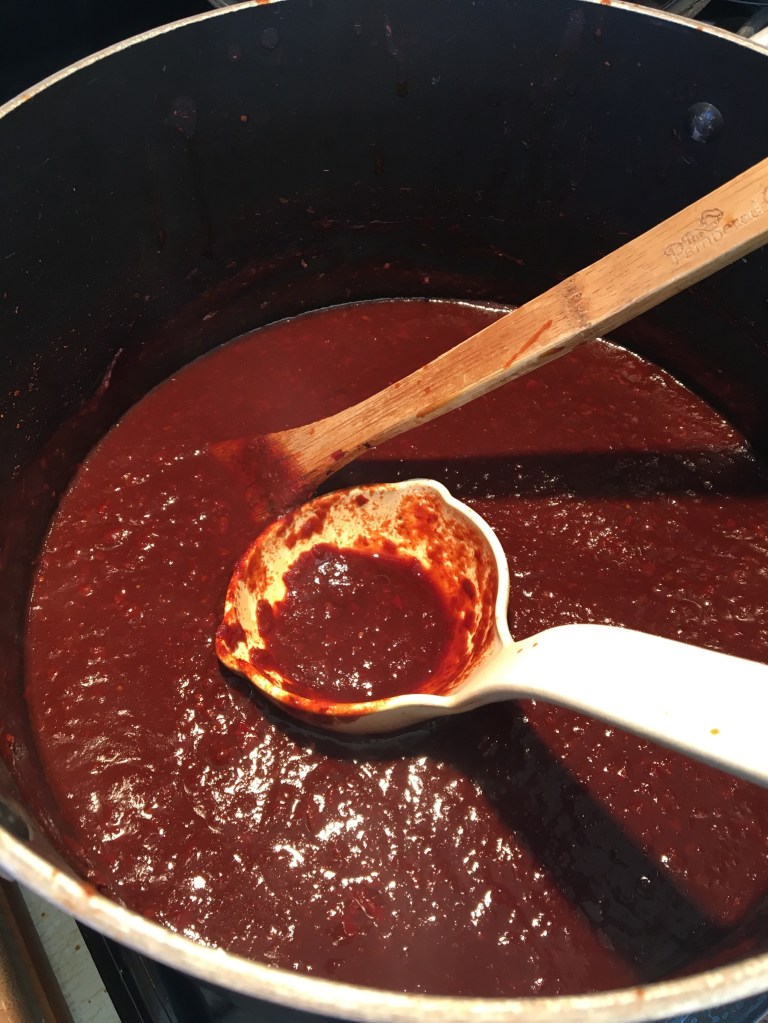
My yield was about 6-1/2 cups. I stirred 1/2 cup into my pulled pork at that time and then saved the sauce and the leftover chile-water in the refrigerator until the next morning. The next morning, the sauce had thickened a bit, so I stirred in more of the chilled chile-water. In the end I froze three 2-cup portions in vacuum-sealed bags. I discarded about 2 cups of remaining chile-water. Another note on this recipe: I’ve read that the flavor REALLY comes out if you roast your dried chiles on a skillet first, but that’s a step too far for me.
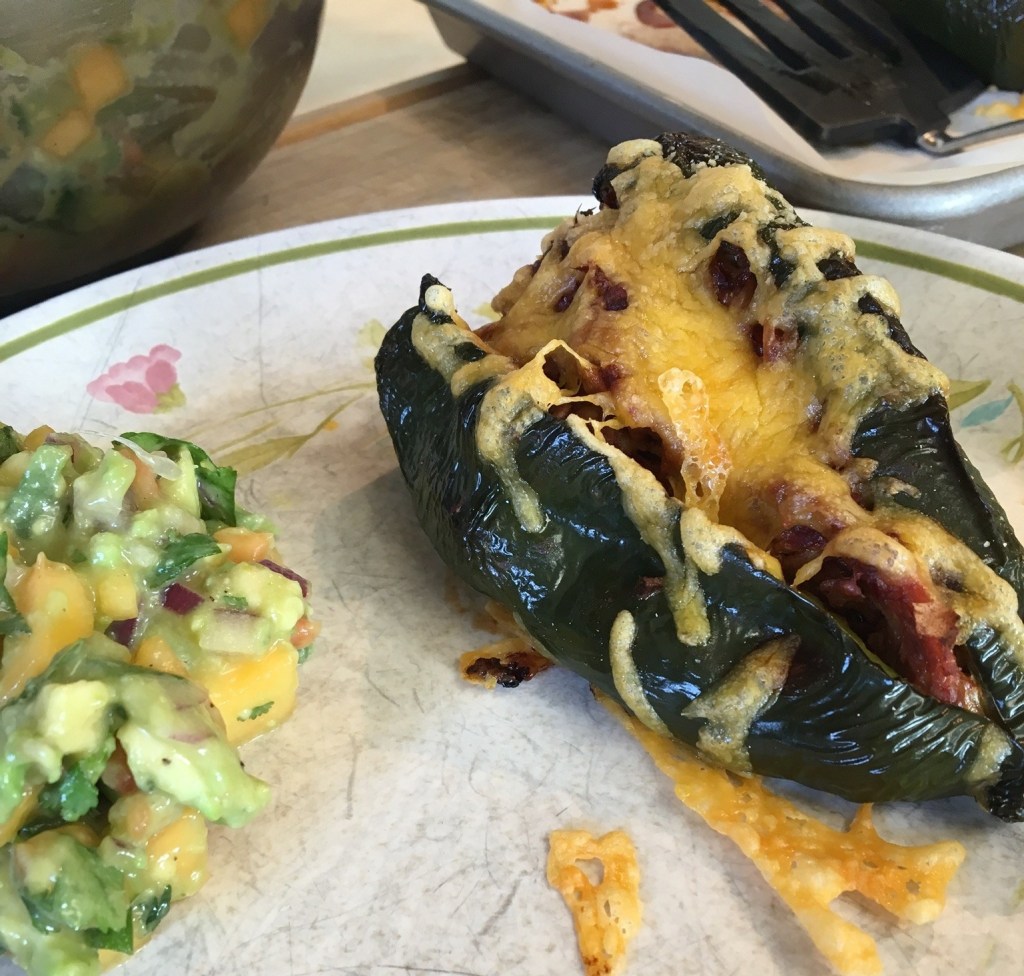
- Stuffed Poblanos
- 4 fresh poblano chiles
- 2-1/2 cups spiced shredded pork or chicken
- 1/2 cup enchilada sauce
- 1 cup shredded sharp cheddar cheese
Prepare a baking sheet with parchment paper. Preheat the oven to 400 degrees F. Cut the stem-end out of the poblano chiles and cut a slit down one side. Remove the seeds carefully. Place the chiles onto the baking sheet, slit side up.
Stir enchilada sauce into the meat and then stir in about 2/3 cup of the shredded cheese. All these quantities are approximate. I eyeballed the amount of shredded pork, sauce, and cheese that I would need. No worries, it’s a forgiving recipe, hard to go wrong.
Stuff the chiles. I use a fork and my hands to try to get filling all the way into the tips of the chiles.
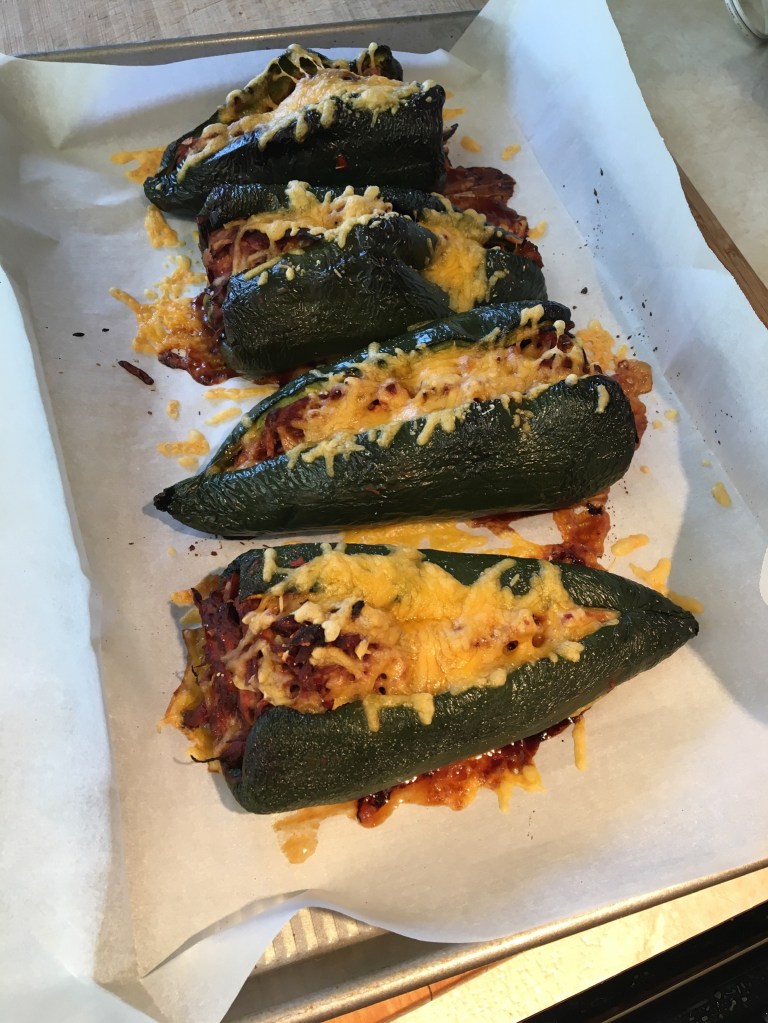
Bake at 400 degrees for thirty minutes. Remove from heat and sprinkle shredded cheese over each chile. Return to the oven for another 5-10 minutes.
Just so you know, I’ve made stuffed poblanos with all kinds of filling: ground turkey, ground beef, beans, shredded chicken, etc. It doesn’t really matter as long as it holds together. You can use tomato sauce, fresh tomatoes, refried beans, whatever you want as a binder. There are several recipes on Pinterest that give good ideas of various fillings you can use. There is no reason to pre-cook the chiles, just stuff and bake!
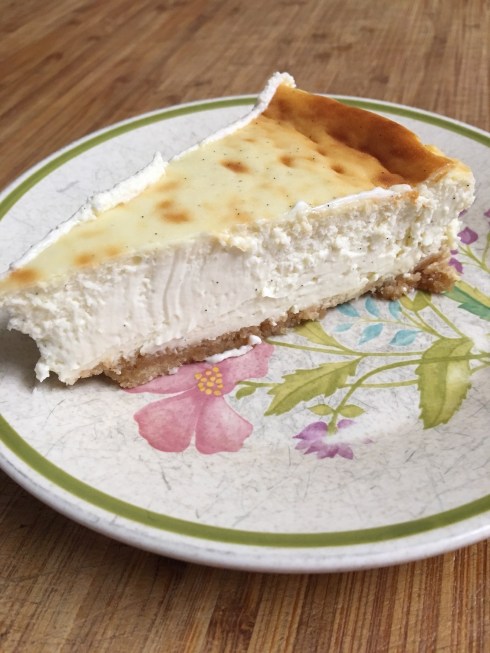
My husband LOVES cheesecake. We were in New York City in October (my first time) and every day he ordered cheesecake at a bakery in the subway terminal to take back to the hotel room. When we’re eating out, he always orders cheesecake for dessert. I have made varying kinds of cheesecake; chocolate, baked, unbaked, etc. and this recipe is the most authentic and best, in my opinion. It’s also a super simple recipe. I should make it more often, but it’s so, so rich! This recipe comes from The Frugal Gourmet: On Our Immigrant Ancestors by Jeff Smith (1990, William Morrow and Company, Inc.).
- Ingredients
- 1 cup graham cracker crumbs
- 1/4 cup sugar (for crust)
- 1/4 cup melted butter (for crust)
- 1-1/2 cups sour cream (I used light sour cream)
- 1/2 cup sugar (for filling)
- 2 eggs
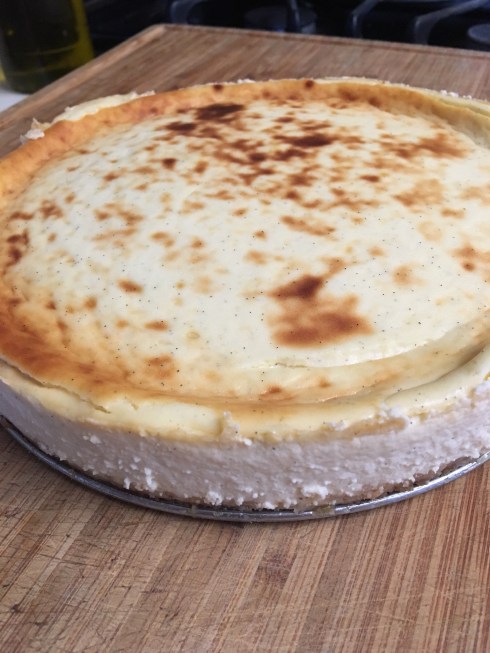
- 2 tsp. vanilla (I used vanilla paste, thus the specks of brown in the cheesecake)
- 1 lb. cream cheese, broken into small pieces
- 2 Tbsp. melted butter (for filling)
Preheat oven to 325 degrees F.
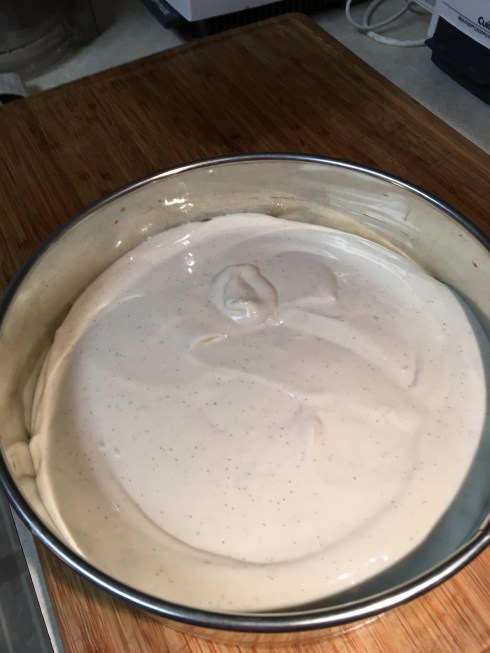
Mix together the graham cracker crumbs, 1/4 cup sugar, and 1/4 cup melted butter. Press into the bottom of an ungreased 8-inch or 9-inch springform pan. I use an 8.5″ pan (since my 9″ broke about fifteen years ago and I haven’t replaced it). [A side note: I cut a round of parchment paper and placed it in the bottom of my springform pan, then pressed in the crumbs mixture. At the end, I was able, using a very large spatula, to slide the entire cheesecake onto a plate while at the same time peeling off the parchment paper. This was really an unnecessary step, but I just wanted to get it out and off the springform bottom. It worked splendidly, but could have so easily gone awry.]
In a food processor, blend the sour cream, 1/2 cup sugar, 2 eggs, and vanilla until it is very smooth and well blended. Add the cream cheese and process until it is smooth, scraping down the bowl a time or two. While blending, pour the 2 Tbsp. melted butter through the top of the machine. Pour mixture over the top of the graham crust.
Bake at 325 degrees F for 45-55 minutes. I give mine a little shake to see if the center is overly soft. It’s hard to tell, just do your best. Turn your broiler on and broil the cheesecake just until the top begins to have attractive spots of brown. I think I left mine a few seconds too long for “attractive.” Oh, well.

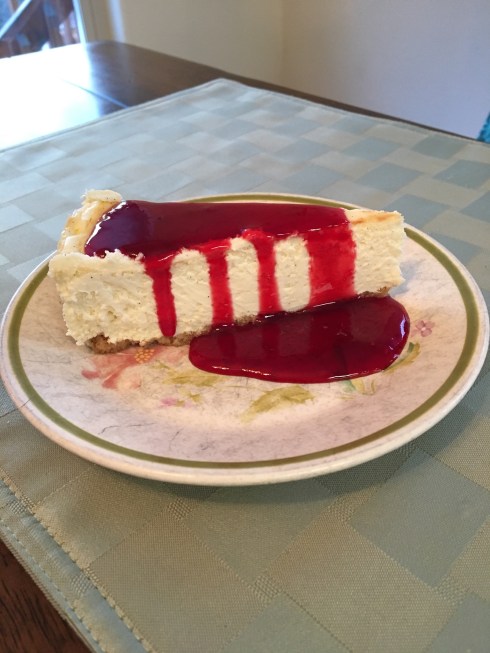
- Optional Raspberry Sauce
- 1-1/2 cups raspberry juice/pulp
- 3/4 cup sugar
- Boil together for about 5-10 minutes or until it’s slightly thickened, but not to jelly stage.
The cheesecake stands very well alone, but because I have a lot of frozen raspberries, I made a raspberry sauce to go with this deliciousness. I’m not a fan of raspberry seeds so I pressed my home-frozen package of thawed raspberries through a sieve and came up with 1-1/2 cups of juice/pulp. These type of sauces are not fussy so you can do your own thing regarding amounts. I was looking for something that would remain a semi-thick liquid when brought down to room temperature. I didn’t want a hot sauce to melt my cheesecake slices. At the same time I wanted the sauce to pour when I was ready for it. This worked very well. I gave the sauce a stir right before serving. I used a gravy boat to store and pour.

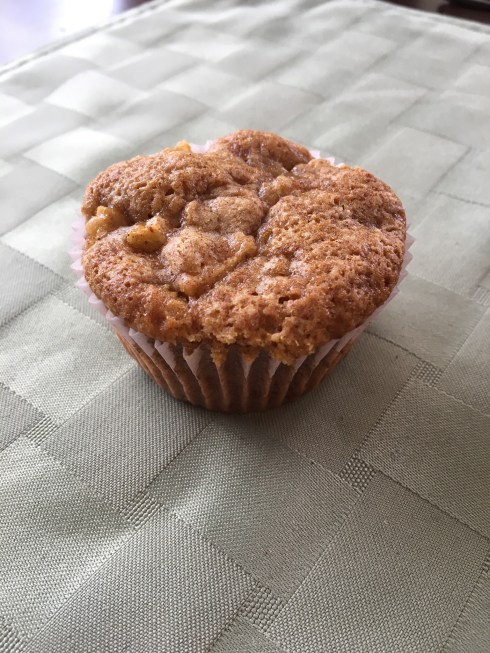
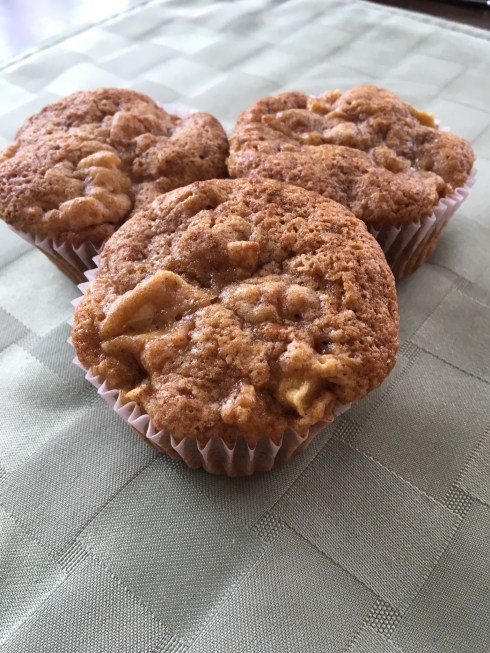
I have made these for many years. The recipe is based on one found in an old Bear Valley Elementary School cookbook: Bear Fare 1993-1994. The original recipe calls for a streusel topping, but I’ve never added that. Too much fuss. Mostly, I make these and toss them into the freezer to eat later. The other day I had about a cup of leftover sweet potatoes, a couple old wrinkled apples, and two leftover egg yolks. I’ll give you this substitute recipe at the end, but just know that’s what’s pictured here.
- Ingredients
- 2-1/2 cups flour
- 2 cups sugar
- 1 Tbsp. pumpkin pie spice (I used 1 tsp. cinnamon, 1/2 tsp. ground cloves, 1/4 tsp. allspice, 1/4 tsp. ground ginger, 1/4 tsp. ground cardamom)
- 1 tsp. baking soda
- 1/2 tsp. salt
- 2 eggs, lightly beaten
- 1 cup cooked and mashed or solid-pack canned pumpkin
- 1/2 cup vegetable oil
- 2 cups peeled and finely chopped apples
- Cinnamon for sprinkling (optional)
Prepare 18-24 muffin cups with paper liners or by greasing. Preheat oven to 350 degrees F.
Combine dry ingredients in a large bowl and set aside. In a smaller bowl combine the eggs, pumpkin, and vegetable oil. Add these liquid ingredients to the large bowl of dry ingredients and stir until just moistened. Fold in the apples. Spoon batter into prepared muffin tins. Sprinkle with cinnamon (optional). Bake 25-35 minutes until muffin tops spring back when lightly pressed with a finger.
Substituting sweet potatoes: I used approximately a cup of mashed sweet potato instead of pumpkin. I tried using 1 egg and 2 egg yolks, but the batter was not completely moistened, so I added a second whole egg. I’m not sure if this was because sweet potato is drier than pumpkin or what. Next time I’ll use 3 whole eggs.

Legs tired, we chose an outside table at a restaurant in Old San Juan, Puerto Rico and collapsed into chairs, ordering dos cervezas. It was a pleasant afternoon on the plaza, watching the world go by. We asked the waitress what was good to eat and she recommended Plantain Cups. They really hit the spot that day. Once home, I tried to recreate the dish because of how delicious they are. Plantains are readily available here, but I’ve never cooked with them before. I found a recipe at SimpleByClara on her Dominican Cooking website and used her basics of how to make the cups. They are really yummy and quite easy to make. I’m still not sure how to select a plantain at the grocery store and I suspect what I’m choosing are not as good as they could be, but it’s a work in progress.
- Ingredients for Cups
- 3 large (or 4 medium) ripe plantains, peeled
- 1 tsp. salt
- Oil for basting
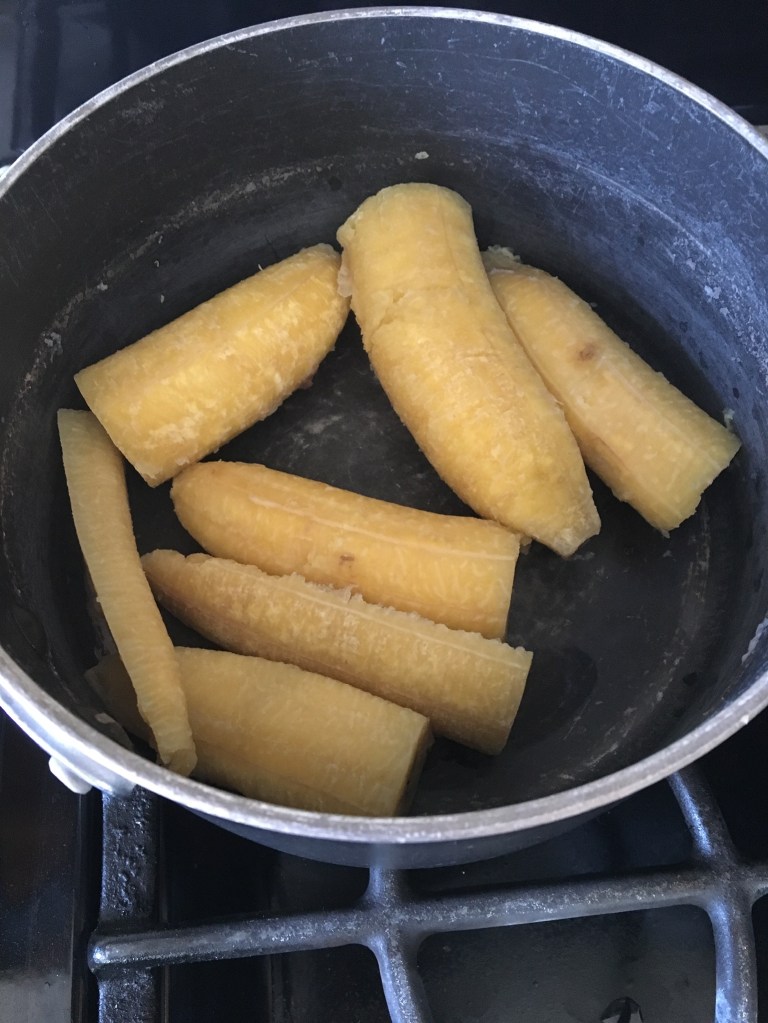
Cut the plantains in half and place into a large saucepan. Try to disabuse yourself of the notion that these are bananas. They’re not. They’re more like potatoes. Add water to cover and add salt. Bring to a boil, reduce heat and let simmer until plantains are soft, about 15 minutes. Remove plantains from water and let cool a little. Mash the plantains. I always end up using a food processor, which works well. I’m not sure if it’s because I’m not cooking them long enough or if they’re old plantains. In any event, mine are always too hard to mash by hand, but the food processor works great.

Prepare a muffin tin by spraying or greasing. Preheat the oven to 425 degrees F.
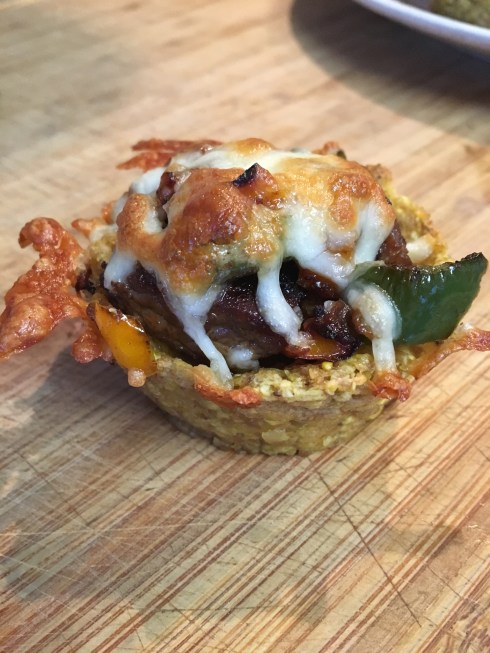
Mashed plantains are sticky, and so it’s easy to form the cups. Grab a handful of mashed plantain and press it into a muffin cup. Make them very compacted. I got 10 plantain cups last time. Brush oil lightly over each cup. I used olive oil, but any type of oil should work.
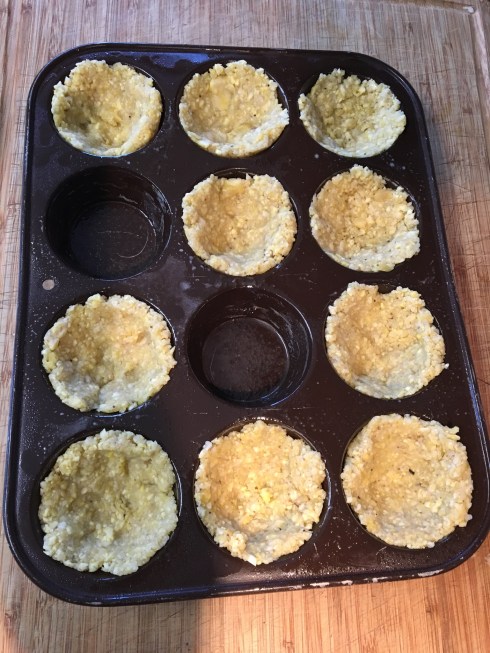
Bake at 425 degrees for about 18-20 minutes.
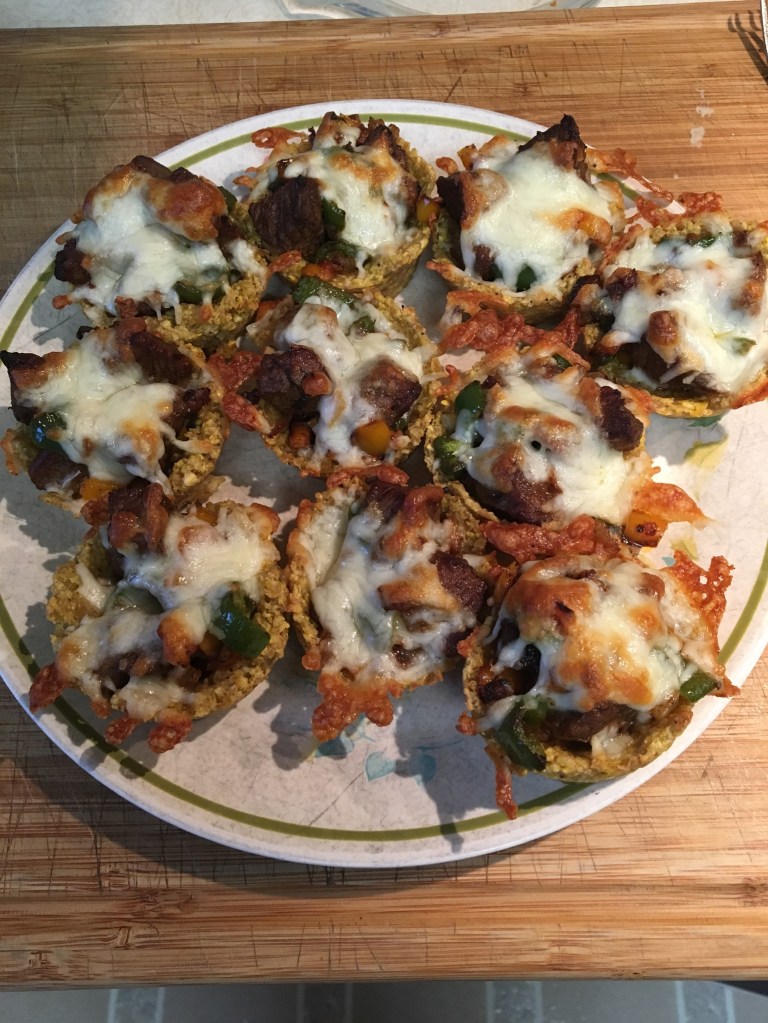
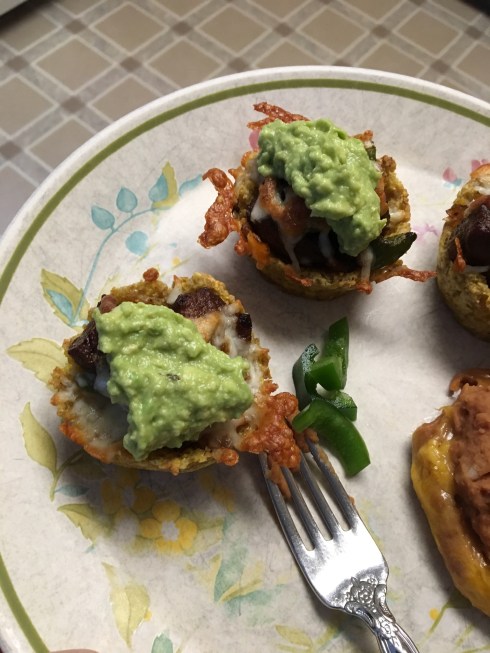
Remove from oven and fill with your favorite topping.
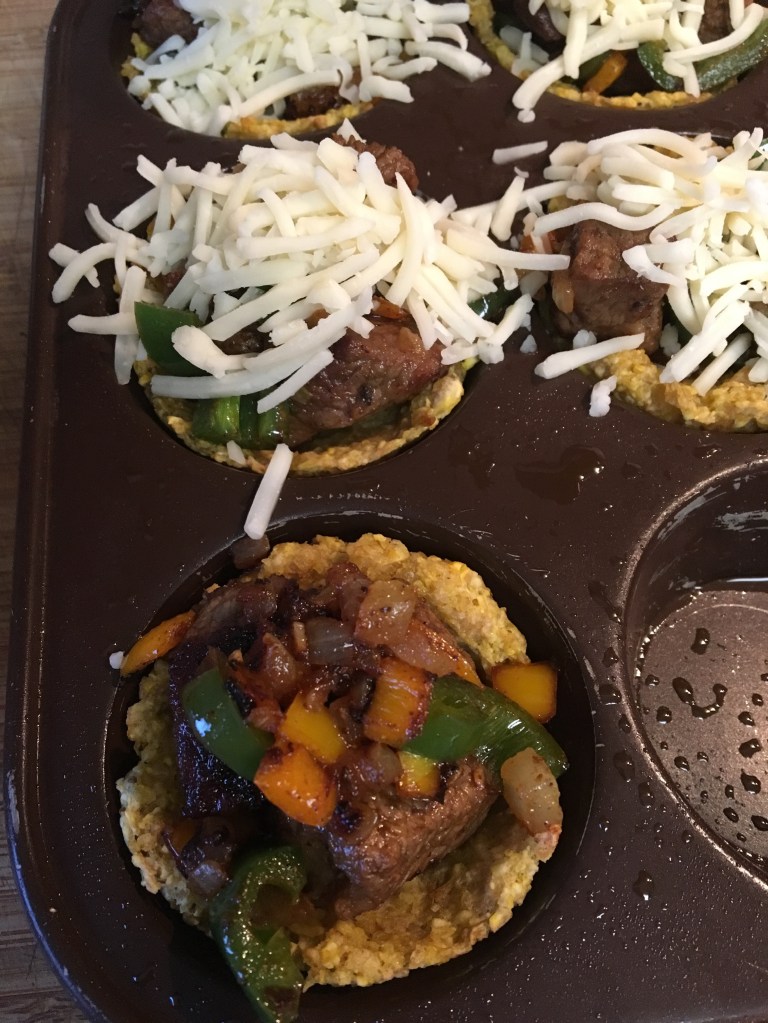
The ones we had in Puerto Rico were filled with little tidbits of spiced beef and a tasty sauce. Here is what and how I did what’s pictured (they were delicious), but I’ll probably never make these the same way twice.
I cut beef Tri-Tip Steak strips into 1″ cubes. I sprinkled taco seasoning over the meat. I preheated a skillet on high heat and added a bit of olive oil. I added the meat to the pan and seared it on all sides as well as possible. I removed the meat from the pan and set it aside. To the skillet I added diced onion, diced sweet mini peppers, and diced garlic. I let it saute until the onion was translucent, then I added some chopped jalapeno peppers. I stirred the beef back into the pan and cooked a bit longer. I scooped a little bit of the filling into each plantain cup, then sprinkled with Monterey Jack cheese. I baked at 425 degrees F for about 10 minutes. I served these topped with mashed avocado, fresh jalapeno slices, and salsa. Umm, umm, good!
Alternative fillings would be spiced chicken, cheddar cheese, beans and/or corn. Whatever you want to do will be great.
Another reason I like these is that it takes the place of wheat or gluten foods at dinner time. It’s something I can feed my relative with the wheat allergy.
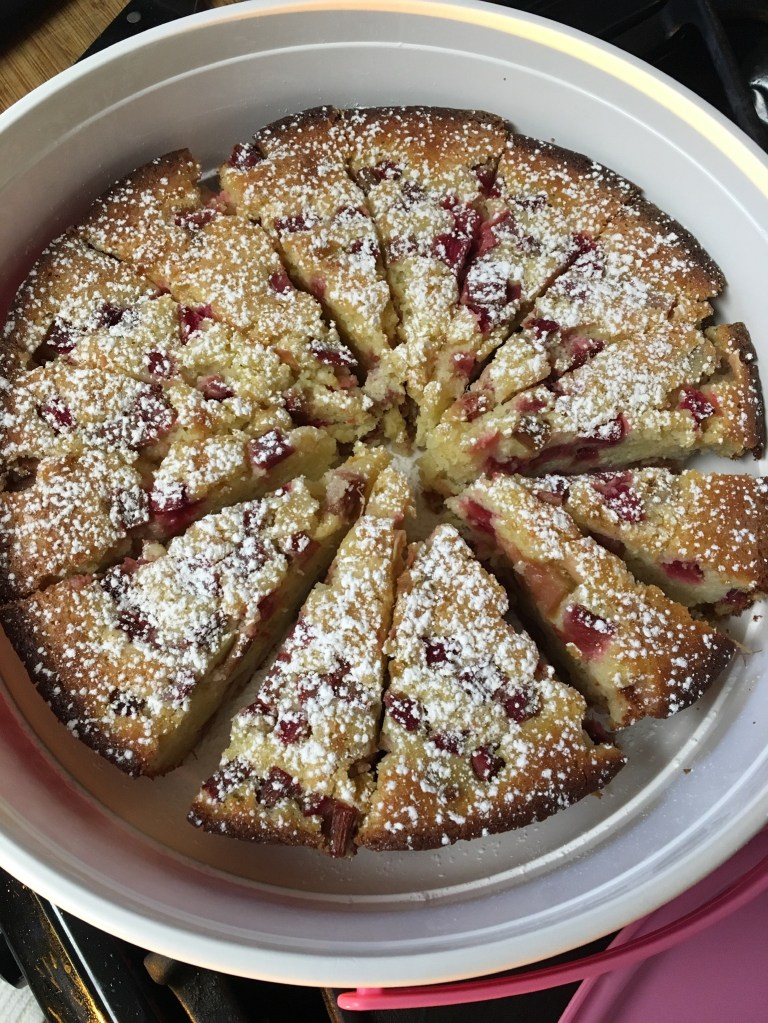
I made this last week and there was none left after the meeting. Yummy! Since it is March now, I used previously frozen rhubarb. Last summer I picked rhubarb and froze only small, tender stalks. The bigger stalks I used while fresh and did not freeze. It seems to have made a difference for the frozen rhubarb. It baked well and was not stringy.
The recipe was based upon one from LizTheChef. My cake batter did not spill out of the cake pan, but it did puff up to the extent that the edges were not inside the pan. This made it a little tricky to get out. Also, I felt it could have stayed in the oven another five minutes for the center to be completely done. Not everyone who ate it agreed with that assessment. And like I said, it was gone . . . fast!
- Ingredients
- 1-1/2 cups flour
- 1 cup sugar
- 2 tsp. baking powder
- 1/4 tsp. kosher salt
- 3 large eggs, room temperature
- 1-1/2 cups ricotta, room temperature
- 1/2 tsp. vanilla extract or paste
- 1 tsp. grated orange peel
- 1/2 cup (1 stick) melted butter
- 1-1/2 cups chopped rhubarb, fresh or frozen and thawed (if using thawed, let it drain completely — do not press it)
- 2 Tbsp. sugar
- Confectioner’s sugar for sprinkling
Preheat oven to 350 degrees. Prepare a 9″ cake pan by spraying or greasing, then laying a circle of parchment paper into the bottom of the pan. Spray lightly again.
In a large bowl whisk together the flour, sugar, baking powder, and salt. In a medium bowl stir together the eggs, ricotta, vanilla, and orange peel. Fold into the dry ingredients until just blended. Stir in the melted butter. Stir in 1 cup of the rhubarb.
Pour into the prepared pan. Sprinkle the top with the remaining 1/2 cup rhubarb, try to lightly press them into the batter. Sprinkle the top with 2 Tbsp. sugar. Bake 50-55 minutes or until cake tester comes out clean. Cool 20 minutes and then turn out onto rack, remove parchment, and invert so sugary crust is topside. Let cool completely then sprinkle with confectioner’s sugar. Serve. Prepare to be wowed.
NOTE: June 1, 2021: So many of you are looking at this recipe that I was inspired to make this my first rhubarb dish of the year. Yay! It sure turned out pretty! I made my own ricotta for the recipe. And one thing led to another so I made a no-churn rhubarb ice cream to go with it. Stay tuned!

