
You are currently browsing the category archive for the ‘Main Dish’ category.
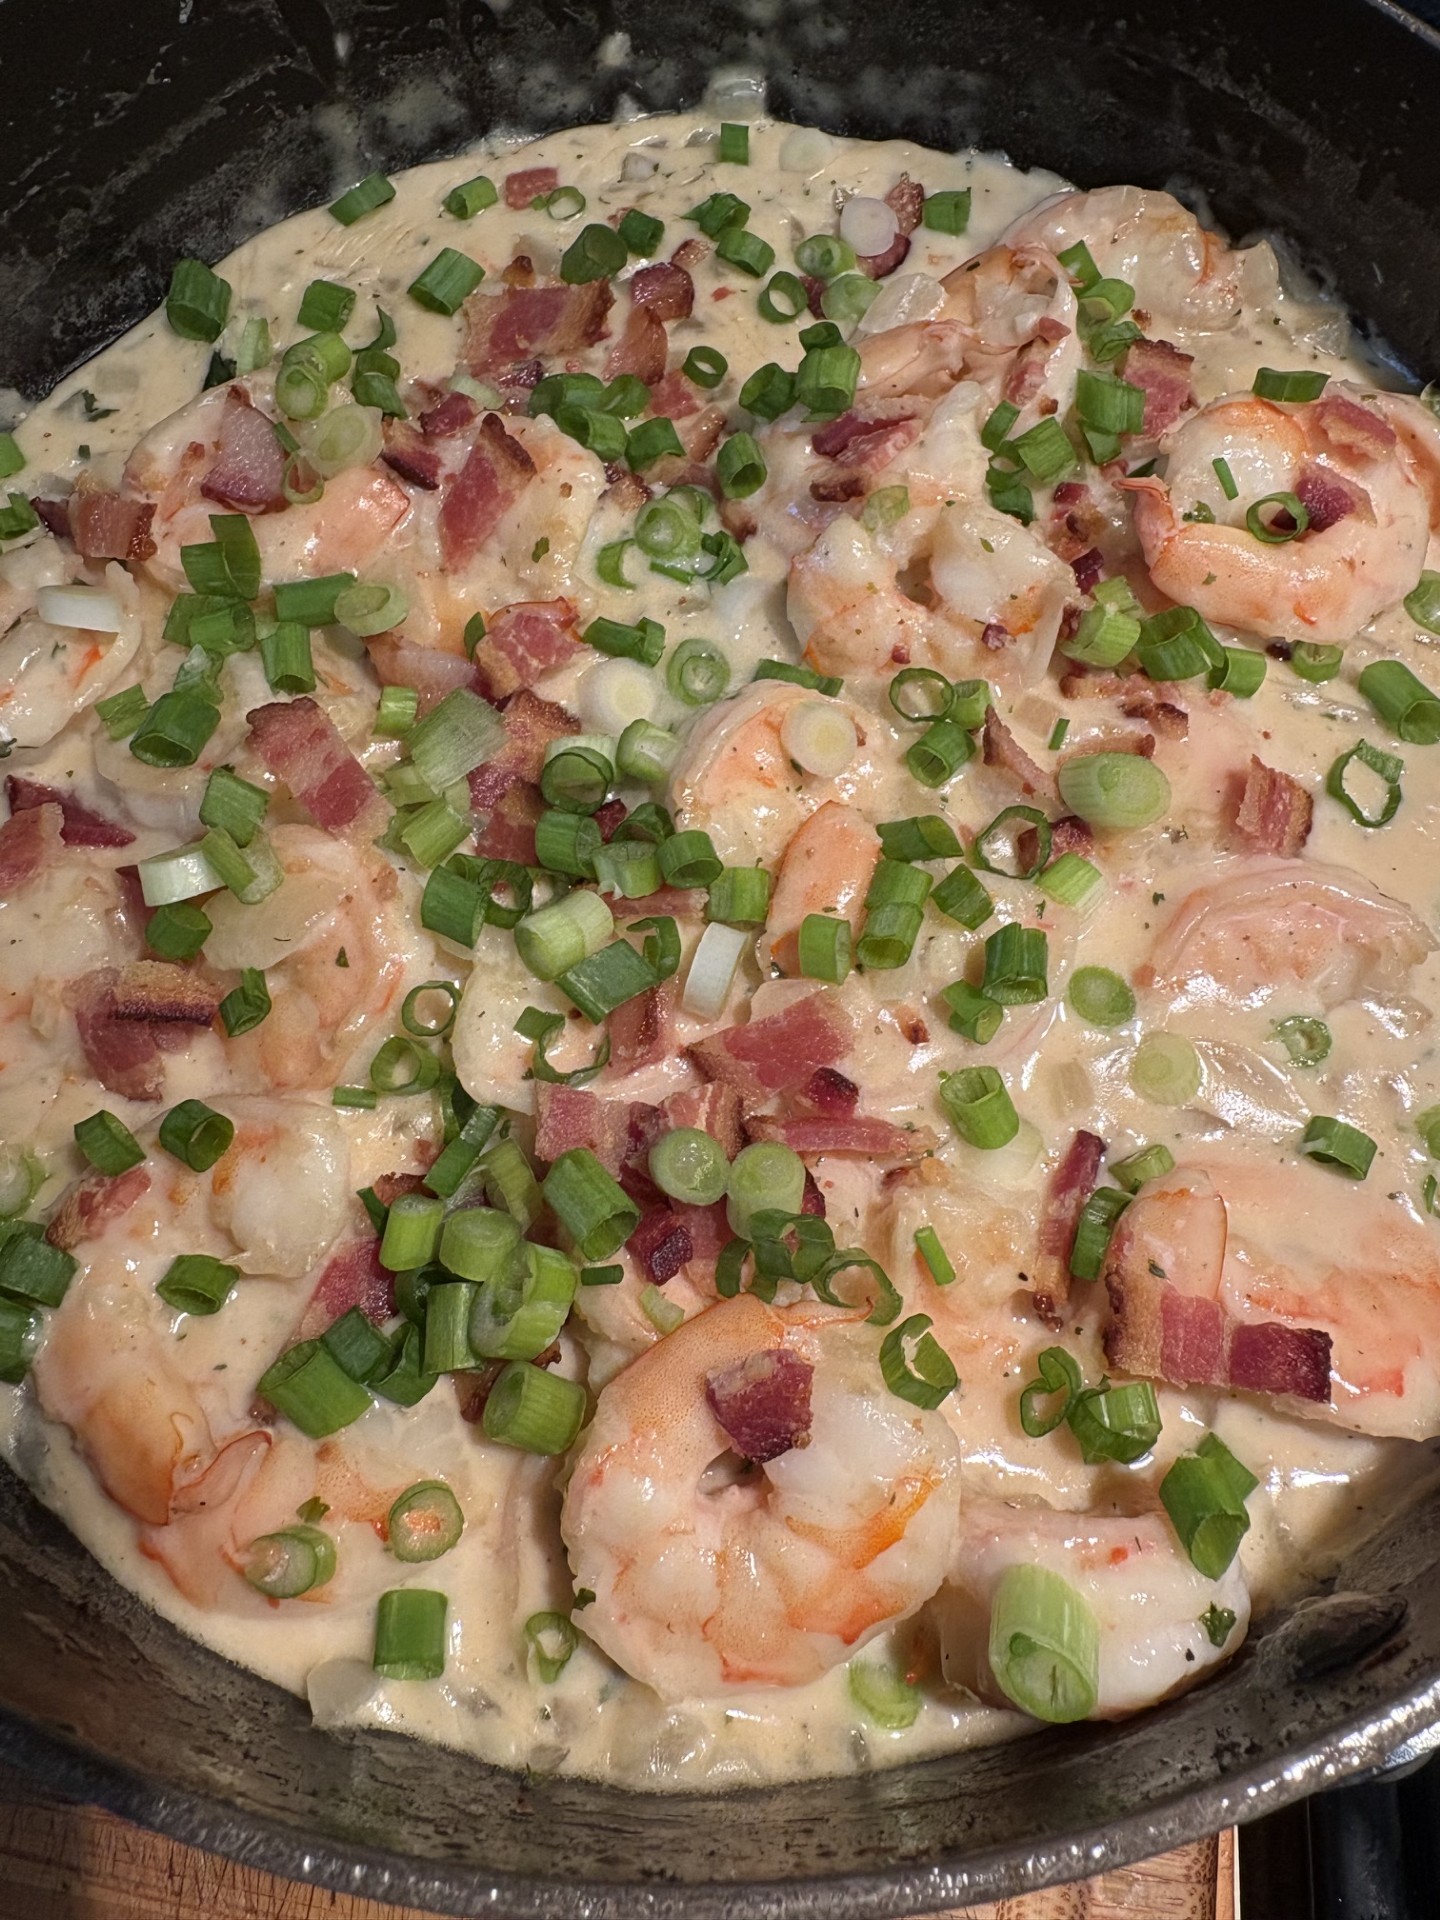
- Ingredients
- 4 slices bacon, chopped
- 1-1/2 cups chopped onion
- 3 garlic cloves, minced
- 3 Tbsp. cornstarch
- 1-1/2 cups chicken broth
- 1 cup heavy cream
- 1 Tbsp. butter
- Dash cayenne pepper
- Splash hot sauce (Tabasco)
- 1/2 tsp. salt
- Dash pepper
- 1-1/2 lbs. raw large shrimp, shelled and deveined
- Cheese polenta (or cheese grits)
- 1/2 cup chopped green onions
- 1/4 cup chopped parsley
In large skillet fry bacon until crisp. Remove from pan onto absorbent paper towel. Return skillet to medium heat and stir fry onion in bacon grease until onion is translucent. Stir in garlic and stir fry for a minute or so until fragrant. Stir in cornstarch until everything is evenly coated. Stir in chicken broth and stir over medium heat until it starts to thicken. Stir in cream, butter, cayenne, hot sauce, salt, and pepper. Continue stirring until it thickens. Stir in shrimp and let it cook until the shrimp turns orange or pink. Stir in bacon. Remove from heat and serve like gravy over cheese polenta (or cheese grits). Sprinkle green onion and parsley over all. Serves 4.
Notes: The sauce is from recipegirl.com and I’ve made it for many years. I use my Creamy Cheesy Baked Polenta recipe, but often will change it up by using half water and half milk and handfuls of sharp cheddar instead of parmesan. I also have used instant grits. It’s probably the bacon that makes this such a smash hit, or maybe the green onions at the end. This is a really warm and wonderful dish.
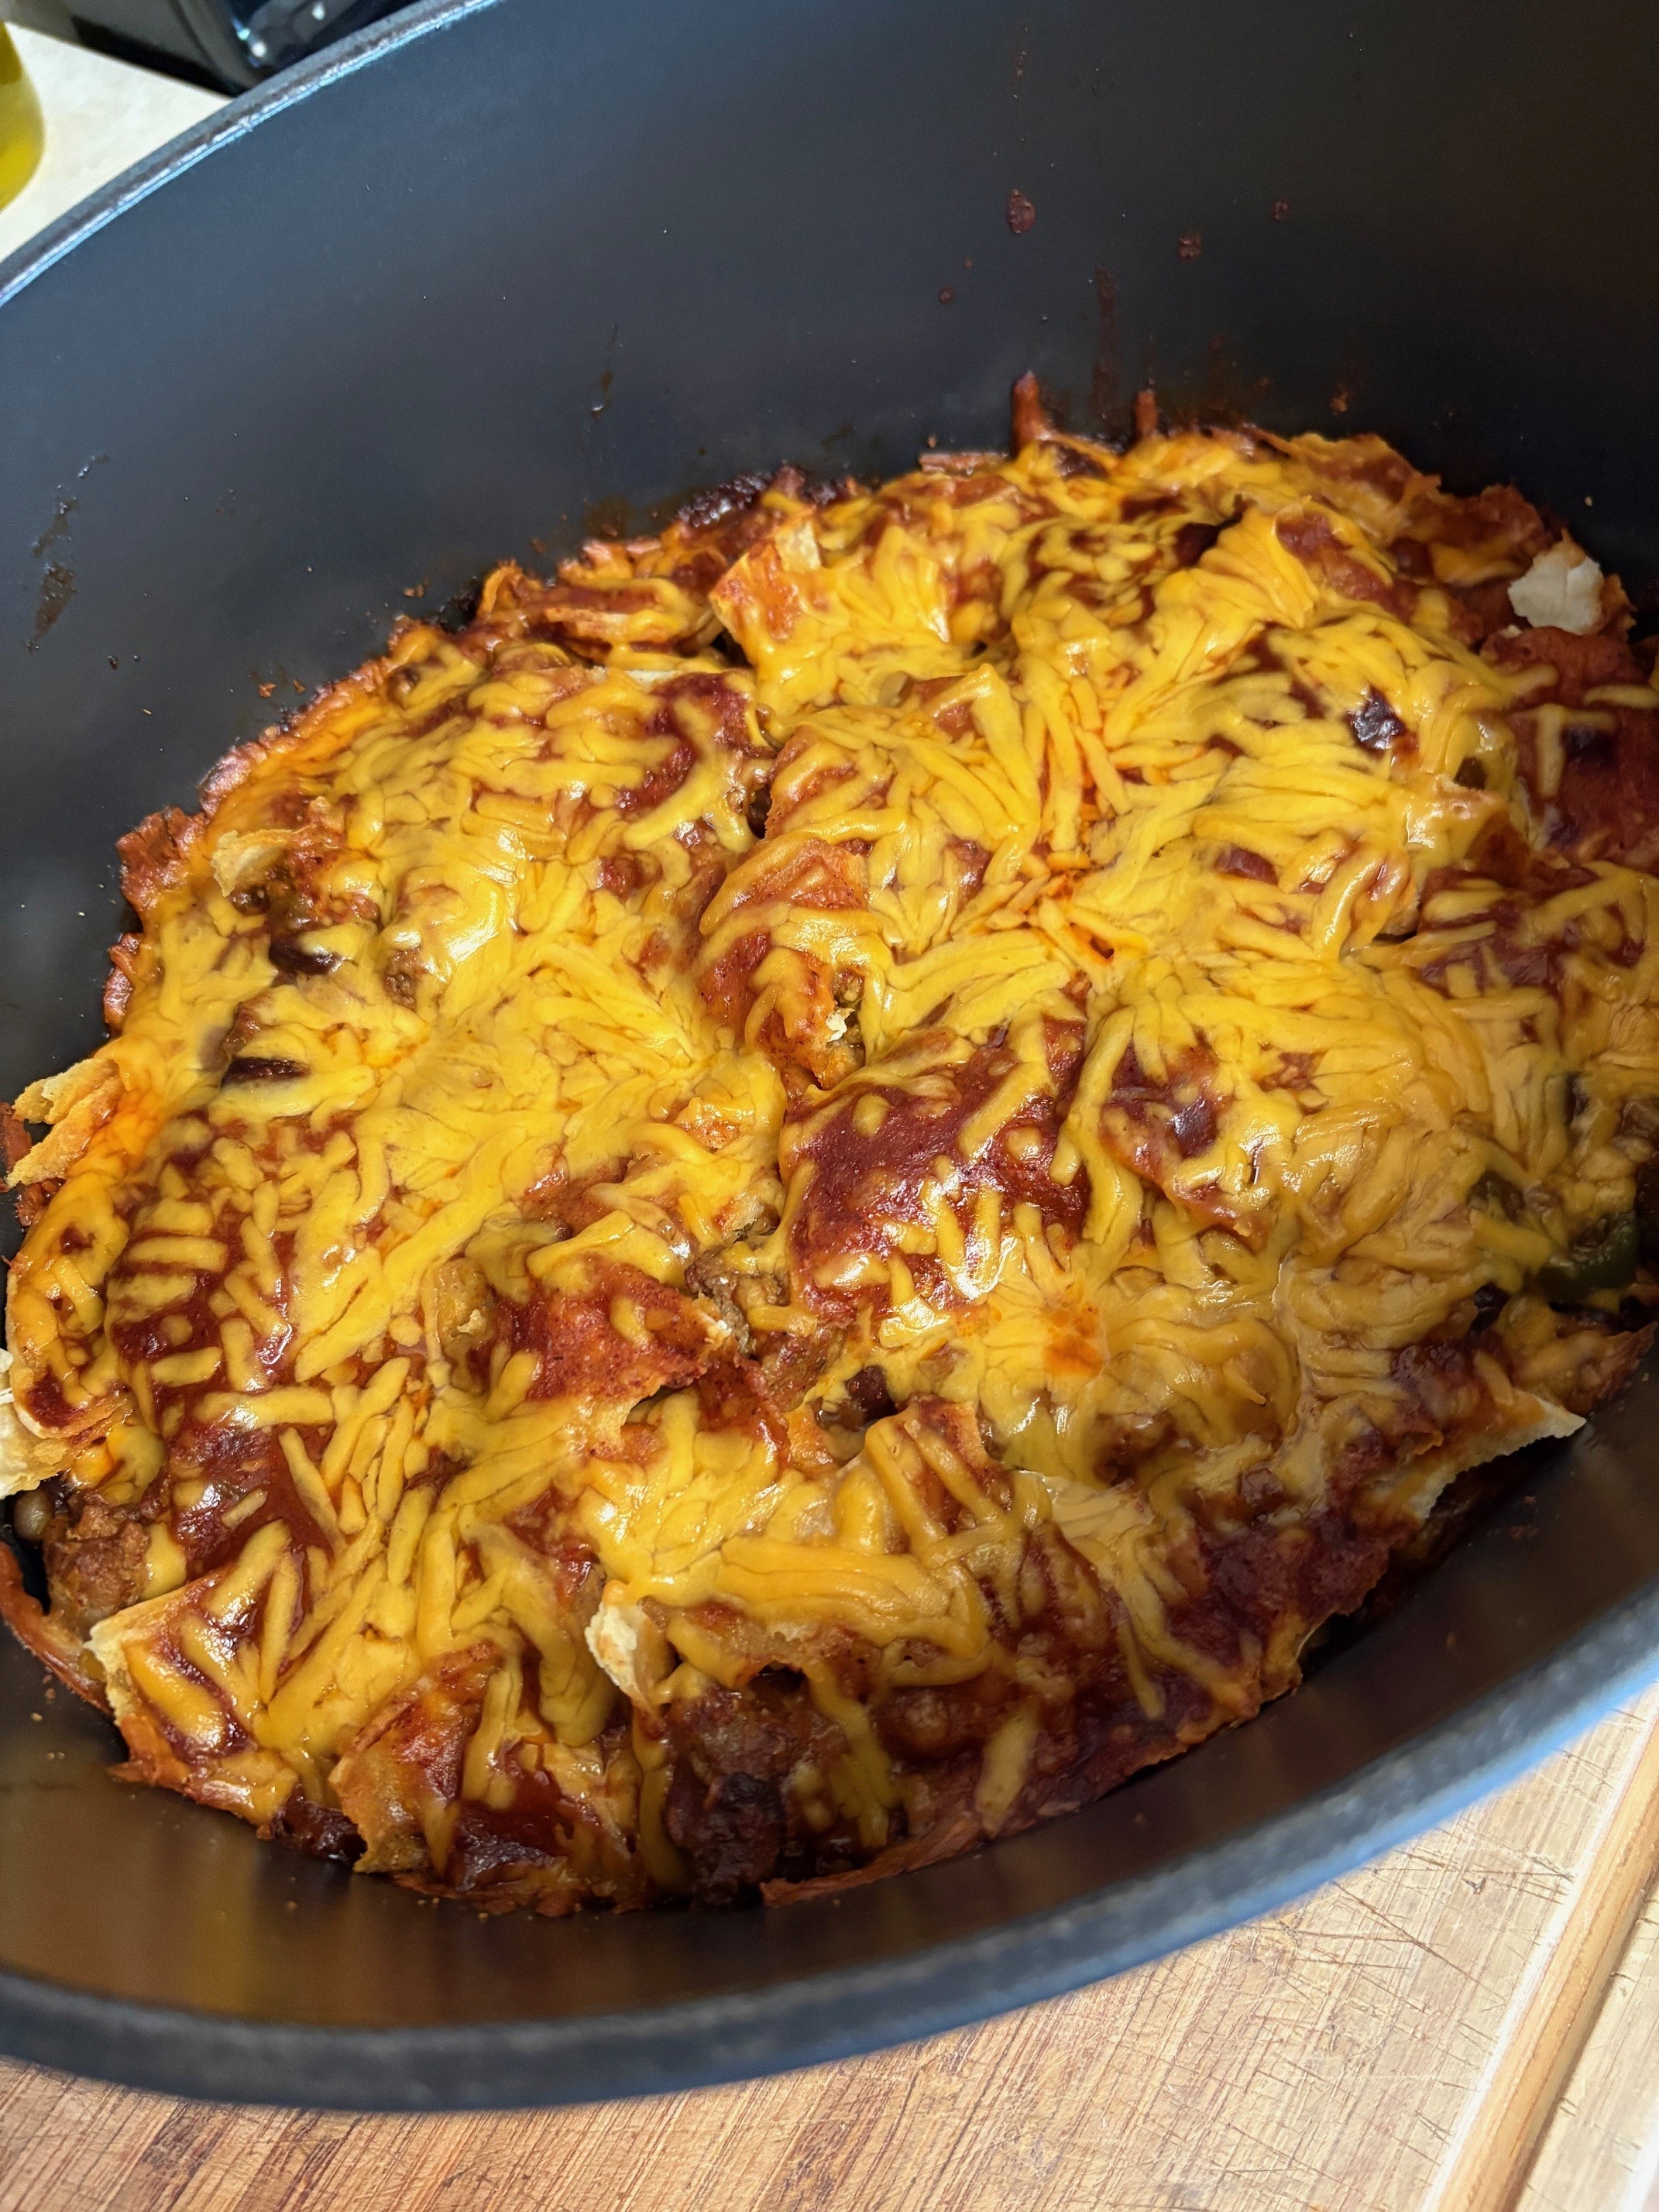
- Ingredients:
- 1# ground beef, or other meat
- 1/2 onion, diced
- 2 cloves garlic, minced
- 4-oz. can diced green chiles
- 2 cups enchilada sauce (use recipe that follows, or purchase ready-made), divided
- 1 15-oz. can black beans
- 12 corn tortillas
- 2-1/2 cups shredded cheese
- Toppings, optional (avocado, cilantro, scallion, etc)
Preheat oven to 350 degrees F.
Brown ground beef in a skillet. Just before beef is finished cooking, stir in the onion and continue cooking until onion is translucent. Stir in garlic cloves and continue to cook for a couple minutes. Stir in chiles, 1 cup enchilada sauce, and beans. Remove from heat.
In the bottom of a Dutch oven or other large baking dish, spread around a couple tablespoons of enchilada sauce. Tear 3 tortillas into pieces and sprinkle them across the enchilada sauce. Spread one third of the beef mixture across the tortilla pieces. Sprinkle shredded cheese over all. Repeat tortilla, meat, cheese layers two more times. Sprinkle the last three tortillas over the top. Pour the remaining enchilada sauce over all. Sprinkle cheese over the top. Cover and bake at 350 degrees 30-35 minutes. Remove cover and bake an additional 5 minutes. Sprinkle with toppings, if desired. Serves 4 hungry people.
- Enchilada Sauce Ingredients
- 2 Tbsp. olive oil
- 2 Tbsp. flour (gluten free should work just fine)
- 1/4 cup chili powder
- 1/2 tsp. garlic powder
- 1/2 tsp. ground cumin
- 2 cups broth
- Salt, to taste
In a saucepan, heat olive oil. Stir in flour and mix with olive oil, over heat, until well incorporated. Stir in spices and mix very well over heat. It will be like sand. Stir in broth and salt. Mix it very well until no lumps remain. Bring to a boil and then reduce heat to let simmer until sauce has thickened slightly. Remove from heat. Ready to serve. Makes about 2 cups (enough for the casserole recipe).
NOTES: The enchilada sauce recipe is from GimmeSomeOven. It is quick and super easy. I use Ancho Chile Powder for my chili powder.
Regarding the casserole recipe. I’ve been making this for a long time now because working with corn tortillas to make regular enchiladas can involve a lot of finagling so they do not crack. That is probably because I do not use freshly made tortillas. I sure miss Cardenas. Making a casserole with the tortillas torn up is WAY easier than the finagling. MANY things can be substituted in this dish. I have used half chorizo and half ground beef. Any kind of ground meat should work. I added a chopped fresh jalapeno to the beef mixture. You could stir in some corn, too. When I was growing up, my mother would make a chicken enchilada casserole that was out of this world. It had quite a bit of concentrated soup in it and I don’t do that too much anymore, but I may give a chicken version of this recipe a whirl. I mean, after all, I made my own salsa verde so I have a nice base. Hmmm. I digress. Use any kind of toppings you wish for the casserole: avocado, jalapeno, sour cream, salsa, cilantro, green onion to name a few. My favorite thing about this is that it is SO WARM out of the oven. The ultimate comfort food.

- Gravy Ingredients
- 2 cups salmon stock (or other broth)
- 2 Tbsp. oyster sauce
- 3 Tbsp. soy sauce
- 1-2 Tbsp. sesame oil
- 1/2″ fresh ginger, minced
- 2 cloves garlic, minced
- 2 Tbsp. cornstarch
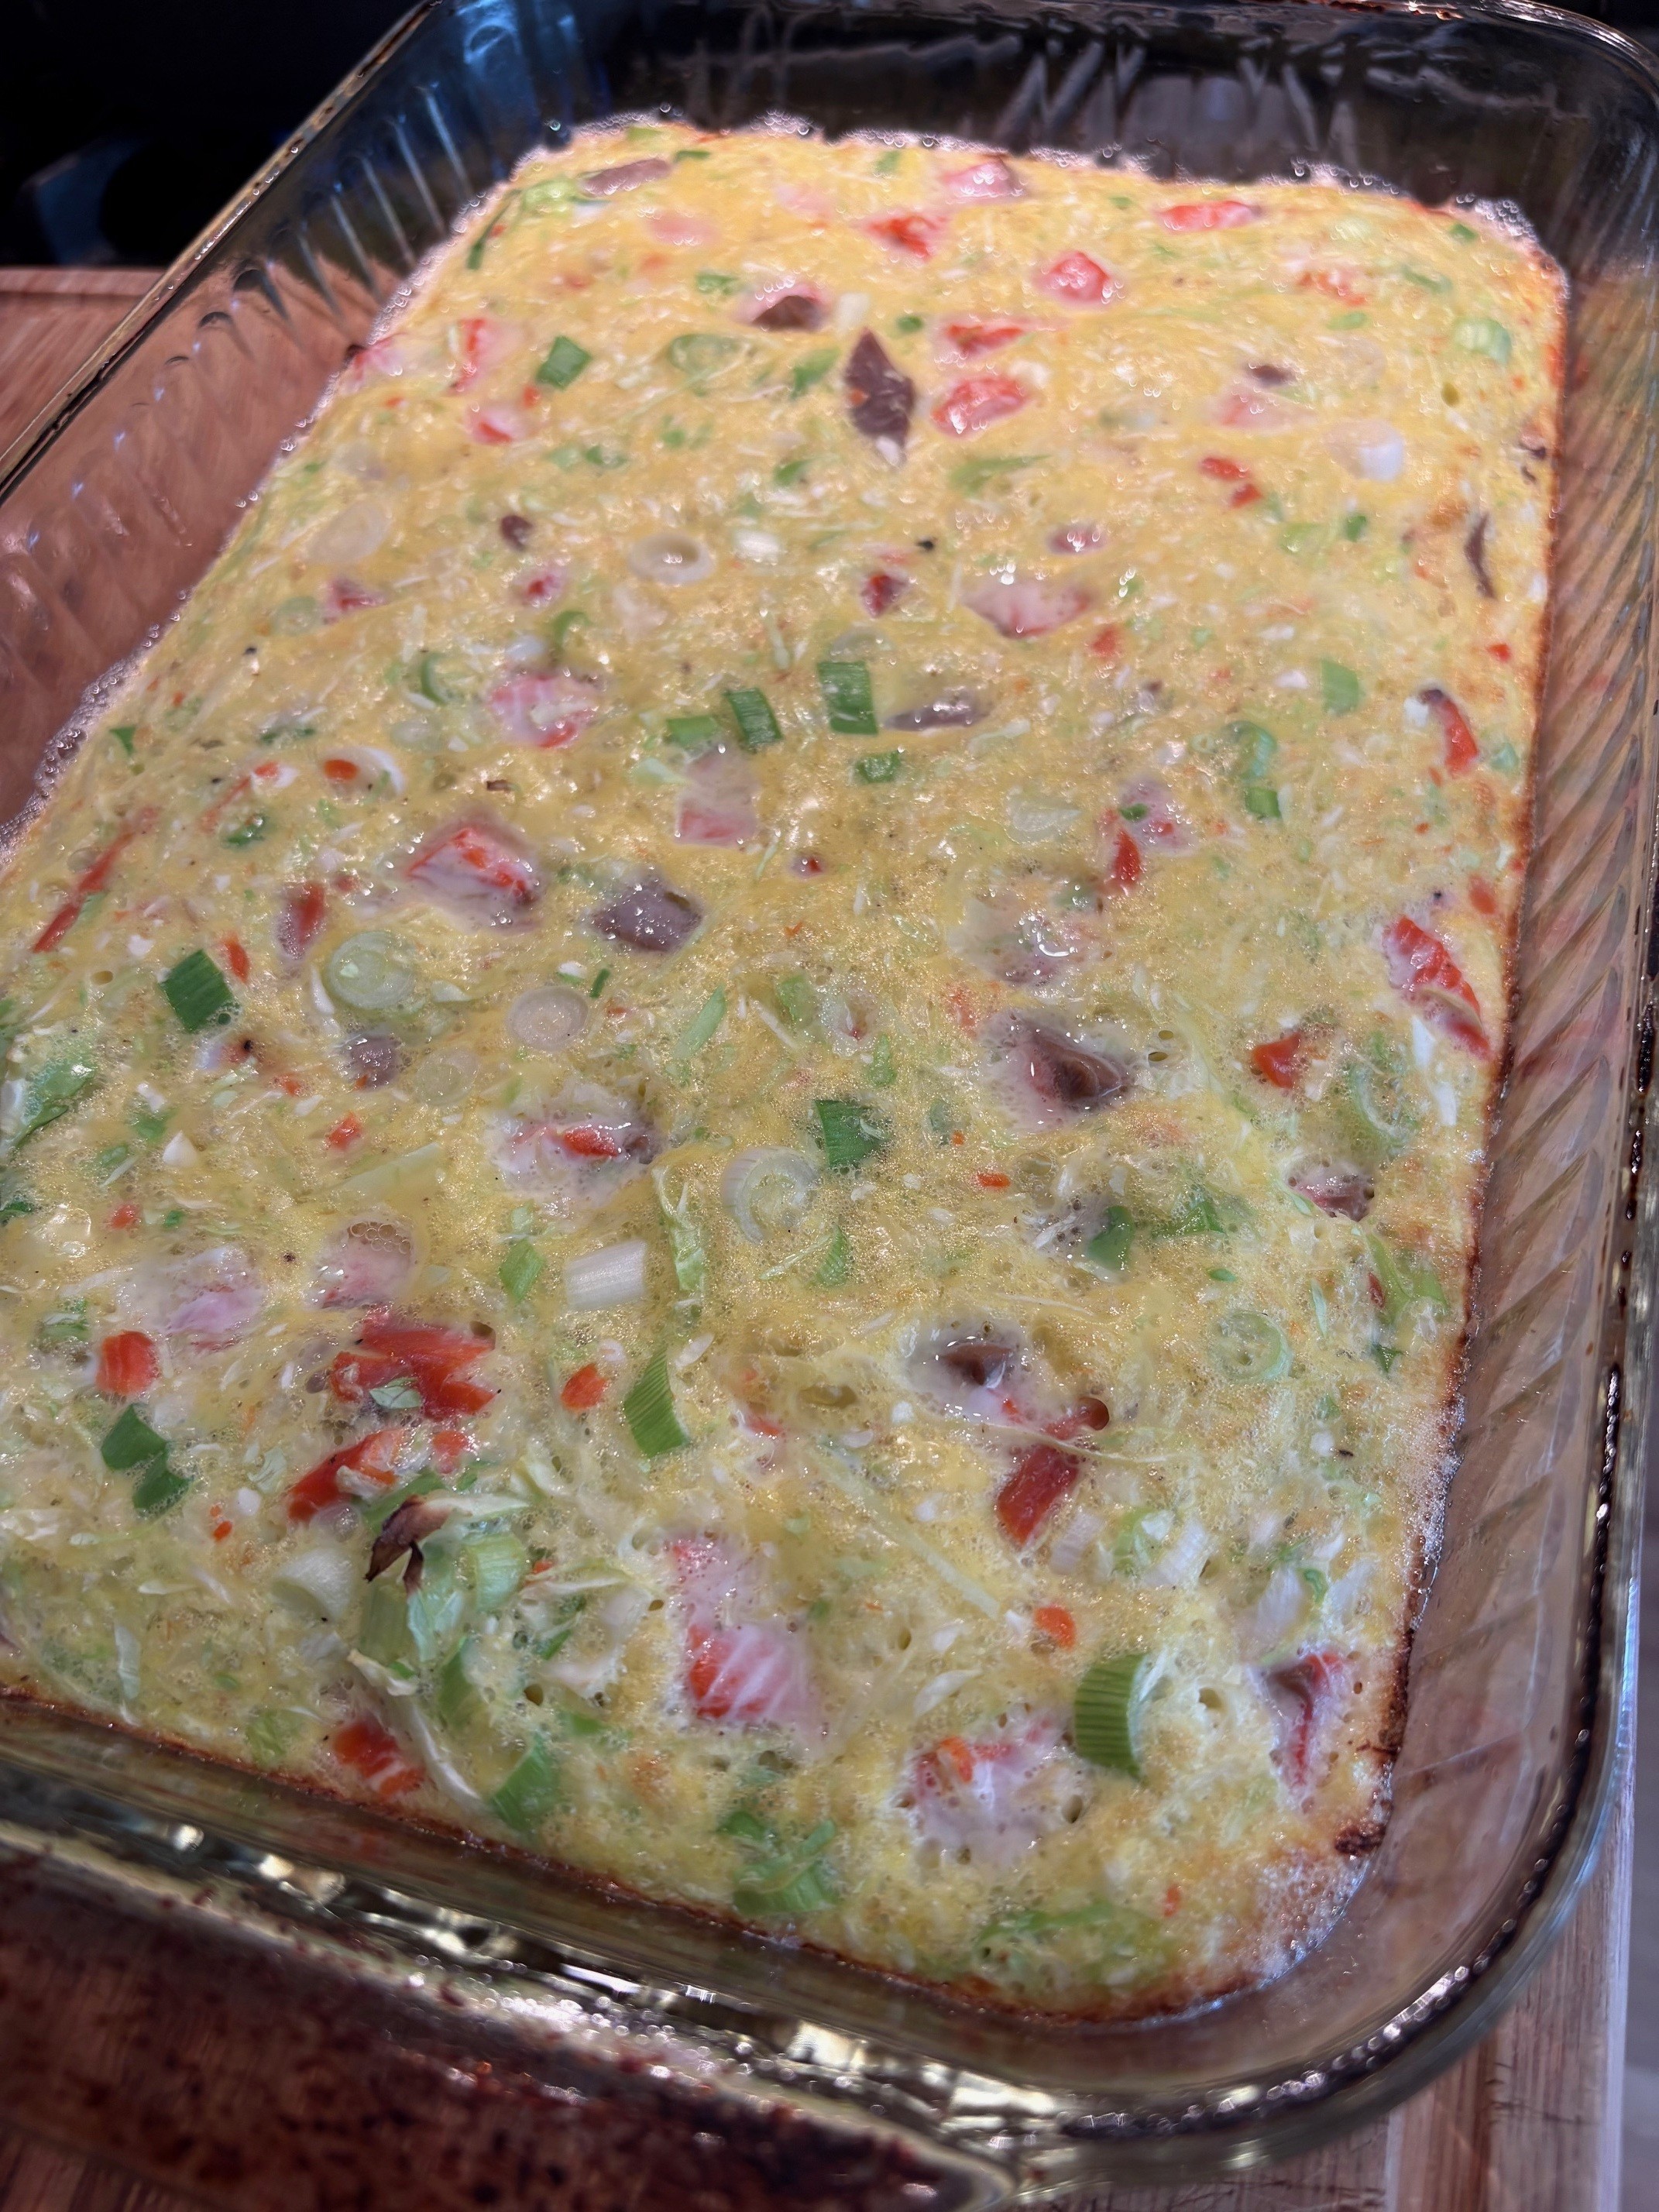
- Omelet Ingredients
- 2 cups shredded cabbage
- 1 bunch green onions, chopped
- 2 strips smoked salmon, flaked (about 1/3 cup)
- 6 oz. salmon, diced (about a cup)
- Pepper
- 8 eggs, beaten
- 2 Tbsp. water or stock
- 2 Tbsp. cornstarch
Prepare a 9×13″ baking dish with non-stick spray. Preheat oven to 425 degrees F.
In a bowl or measuring cup, stir together salmon stock, oyster sauce, and soy sauce. Set aside. In a saucepan, heat the sesame oil and then stir-fry the ginger and garlic in it, just for a minute or two. Add half of the stock/sauce mixture. Bring to a boil, stirring occasionally, and then let it simmer for a few minutes. Remove from heat and let stand. Into the other half stock/sauce mixture that is set aside, stir 2 Tbsp. cornstarch. Set aside again.
In a large bowl, combine cabbage, onions, smoked salmon, salmon, and pepper to taste.
In a small bowl, stir together 2 Tbsp. water and 2 Tbsp. cornstarch until smooth. Mix the cornstarch/water into the eggs until well combined. Pour the eggs into the cabbage mixture and stir very well. Pour it into the prepared baking dish. Bake at 425 degrees for 12-15 minutes, until set.
While the eggs are baking, stir up the remaining stock and cornstarch mixture that had been set aside so that it is smooth, and add it to the gravy saucepan. Bring the gravy to a boil and then simmer for a minute or so.
Remove eggs from oven. Cut into serving pieces and serve with gravy. Serves 4.
NOTES: To make Salmon Stock: I put salmon scraps (skin, bones, etc) and onion, celery, carrots, parsley, salt and pepper (or other seasonings) in a saucepan and cover by at least 2″ water. Bring to a boil and simmer, covered, for at least an hour. Pour the stock through a strainer. I then freeze mine in 3-cup containers to use as needed later. The stock makes a flavorful base for Seafood Stew and Curry and Salmon Chowder.
I like how the omelet is baked rather than fried. It really simplifies preparation. You can find my smoked salmon recipe on this blog. The stock and smoked salmon are the two things that you may have difficulty acquiring if you’re outside of Alaska. Feel free to substitute, that’s how I ended up with this recipe. I substituted smoked salmon for bacon and salmon for shrimp. I would think you could make any number of substitutions to this recipe, using a variety of different vegetables and protein.

- Ingredients
- 1 Tbsp. olive oil
- 2 garlic cloves, minced
- Seasoned salt
- 6 oz. salmon, cut into 1″ chunks
- 1 small tomato, small dice
- 1 zucchini, diced
- 1 tsp. dried dill weed, or a handful of fresh, minced
- 6 oz. cream cheese
- 2-4 Tbsp. salmon broth, or other broth
- 8 oz. frozen tortellini
- 1/3 cup shredded mozzarella
In a large pot, or Dutch oven, heat olive oil. Add garlic and stir around for a few seconds. Sprinkle salmon chunks with seasoned salt. Add salmon, tomato, zucchini, and dill to the pot. Let it cook, covered, without stirring, for a couple minutes. Stir gently. Let it cook some more, covered, until the zucchini is softened and salmon is nearly cooked. Gently stir in cream cheese and enough broth to make a sauce. Add frozen tortellini, and possibly more broth. Stir gently. Cover and let simmer over heat until tortellini are cooked (3-4 minutes), stirring as necessary. Sprinkle mozzarella over the top and cover. Heat until cheese is melted. Serve.
NOTES: My grandson was so proud of the salmon he caught on the Kenai. He presented half of it to me with the biggest smile ever. I split the filet in half and used the tail-end in this recipe. The dish is quick and really easy to make.

- Ingredients
- 2 Tbsp. olive oil
- 1 lb. beef round steak, cut into thin strips
- Ground pepper, to taste
- 1 clove garlic, minced
- 3 Tbsp. soy sauce
- 2 cups beef broth, divided
- 1 bell pepper, cut into 1″ pieces
- 1/2 onion, chopped
- 1/2 cup celery, chopped
- 2 Tbsp. corn starch
- Salt to taste
- 2 tomatoes, each cut into 8 wedges
Heat olive oil in skillet. Stir in steak and stir fry until it’s browned. Sprinkle with ground pepper. Stir in garlic and let cook for a minute or so until the garlic is fragrant. Stir in soy sauce and 1/2 cup beef broth. Simmer, covered, over low heat until the beef is tender. Stir in bell pepper, onion, celery, and 1 cup beef broth. Simmer, covered, over medium heat until the vegetables are cooked to your liking.
In a small bowl, whisk together the corn starch and remaining 1/2 cup beef broth. Once the vegetables are cooked, gently stir in the cornstarch and stir over heat until the sauce turns transparent and begins to simmer. Check for salt at this point. Gently stir in the tomatoes and let simmer about 5 minutes, until the tomatoes are heated all the way through. Serve over rice or a squash bowl.
NOTES: In the photos I’m using a beef cut called Beef Milanesa. It’s a round steak sliced very, very thin. Usually I use Beef Milanesa cut to make Rouladen. But this time I sliced it short-wise and threw it into the skillet. Under normal circumstances, I wouldn’t slice the meat this thin. This was my mother’s recipe and I grew up eating this dish. I wrote the recipe down when I was a teenager. Since then I’ve mostly done this from memory and I’ve made a couple little tweaks to the way I like it. For one thing, I like my vegetables soft so most people will think this is overcooked. Just do it the way you like it. I really dislike chewy meat, so I err on the side of really cooking it until falling apart. Again, you do you. This is a very saucy dish. Ha. If you would like more sauce, or less, keep in mind the ratio for a medium sauce is 1 Tbsp. cornstarch to 1 cup liquid. FYI, the cornstarch will only dissolve in cold liquid, so you must dissolve it before adding to your dish. Voila!
Can we talk about beef? Since Covid, the price of beef in Alaska, where I’m located, is too expensive. It’s been a very long time since I cooked with it. I found the “Beef Milanesa” cut on sale at a couple different grocery stores, so I bought it. My husband and I have been taking cruise vacations lately, and we seldom order any entree except beef or shellfish. The beef because we’re not eating it at home and the shellfish because we both dearly love it.
A story: I was on a cruise in the Mediterranean recently and sat next to a Swede at lunch. We had both ordered the Chicken Satay for an appetizer. When the meal was over and the waiter came to ask how everything was, the Swede commented that the Chicken Satay was overcooked. I thought it was perfect. My brother always says I am the SLOWEST eater. It’s because I can’t chew like other people, I guess. Anyway, overcooked (read TENDER) meat for me! Different strokes for different folks!

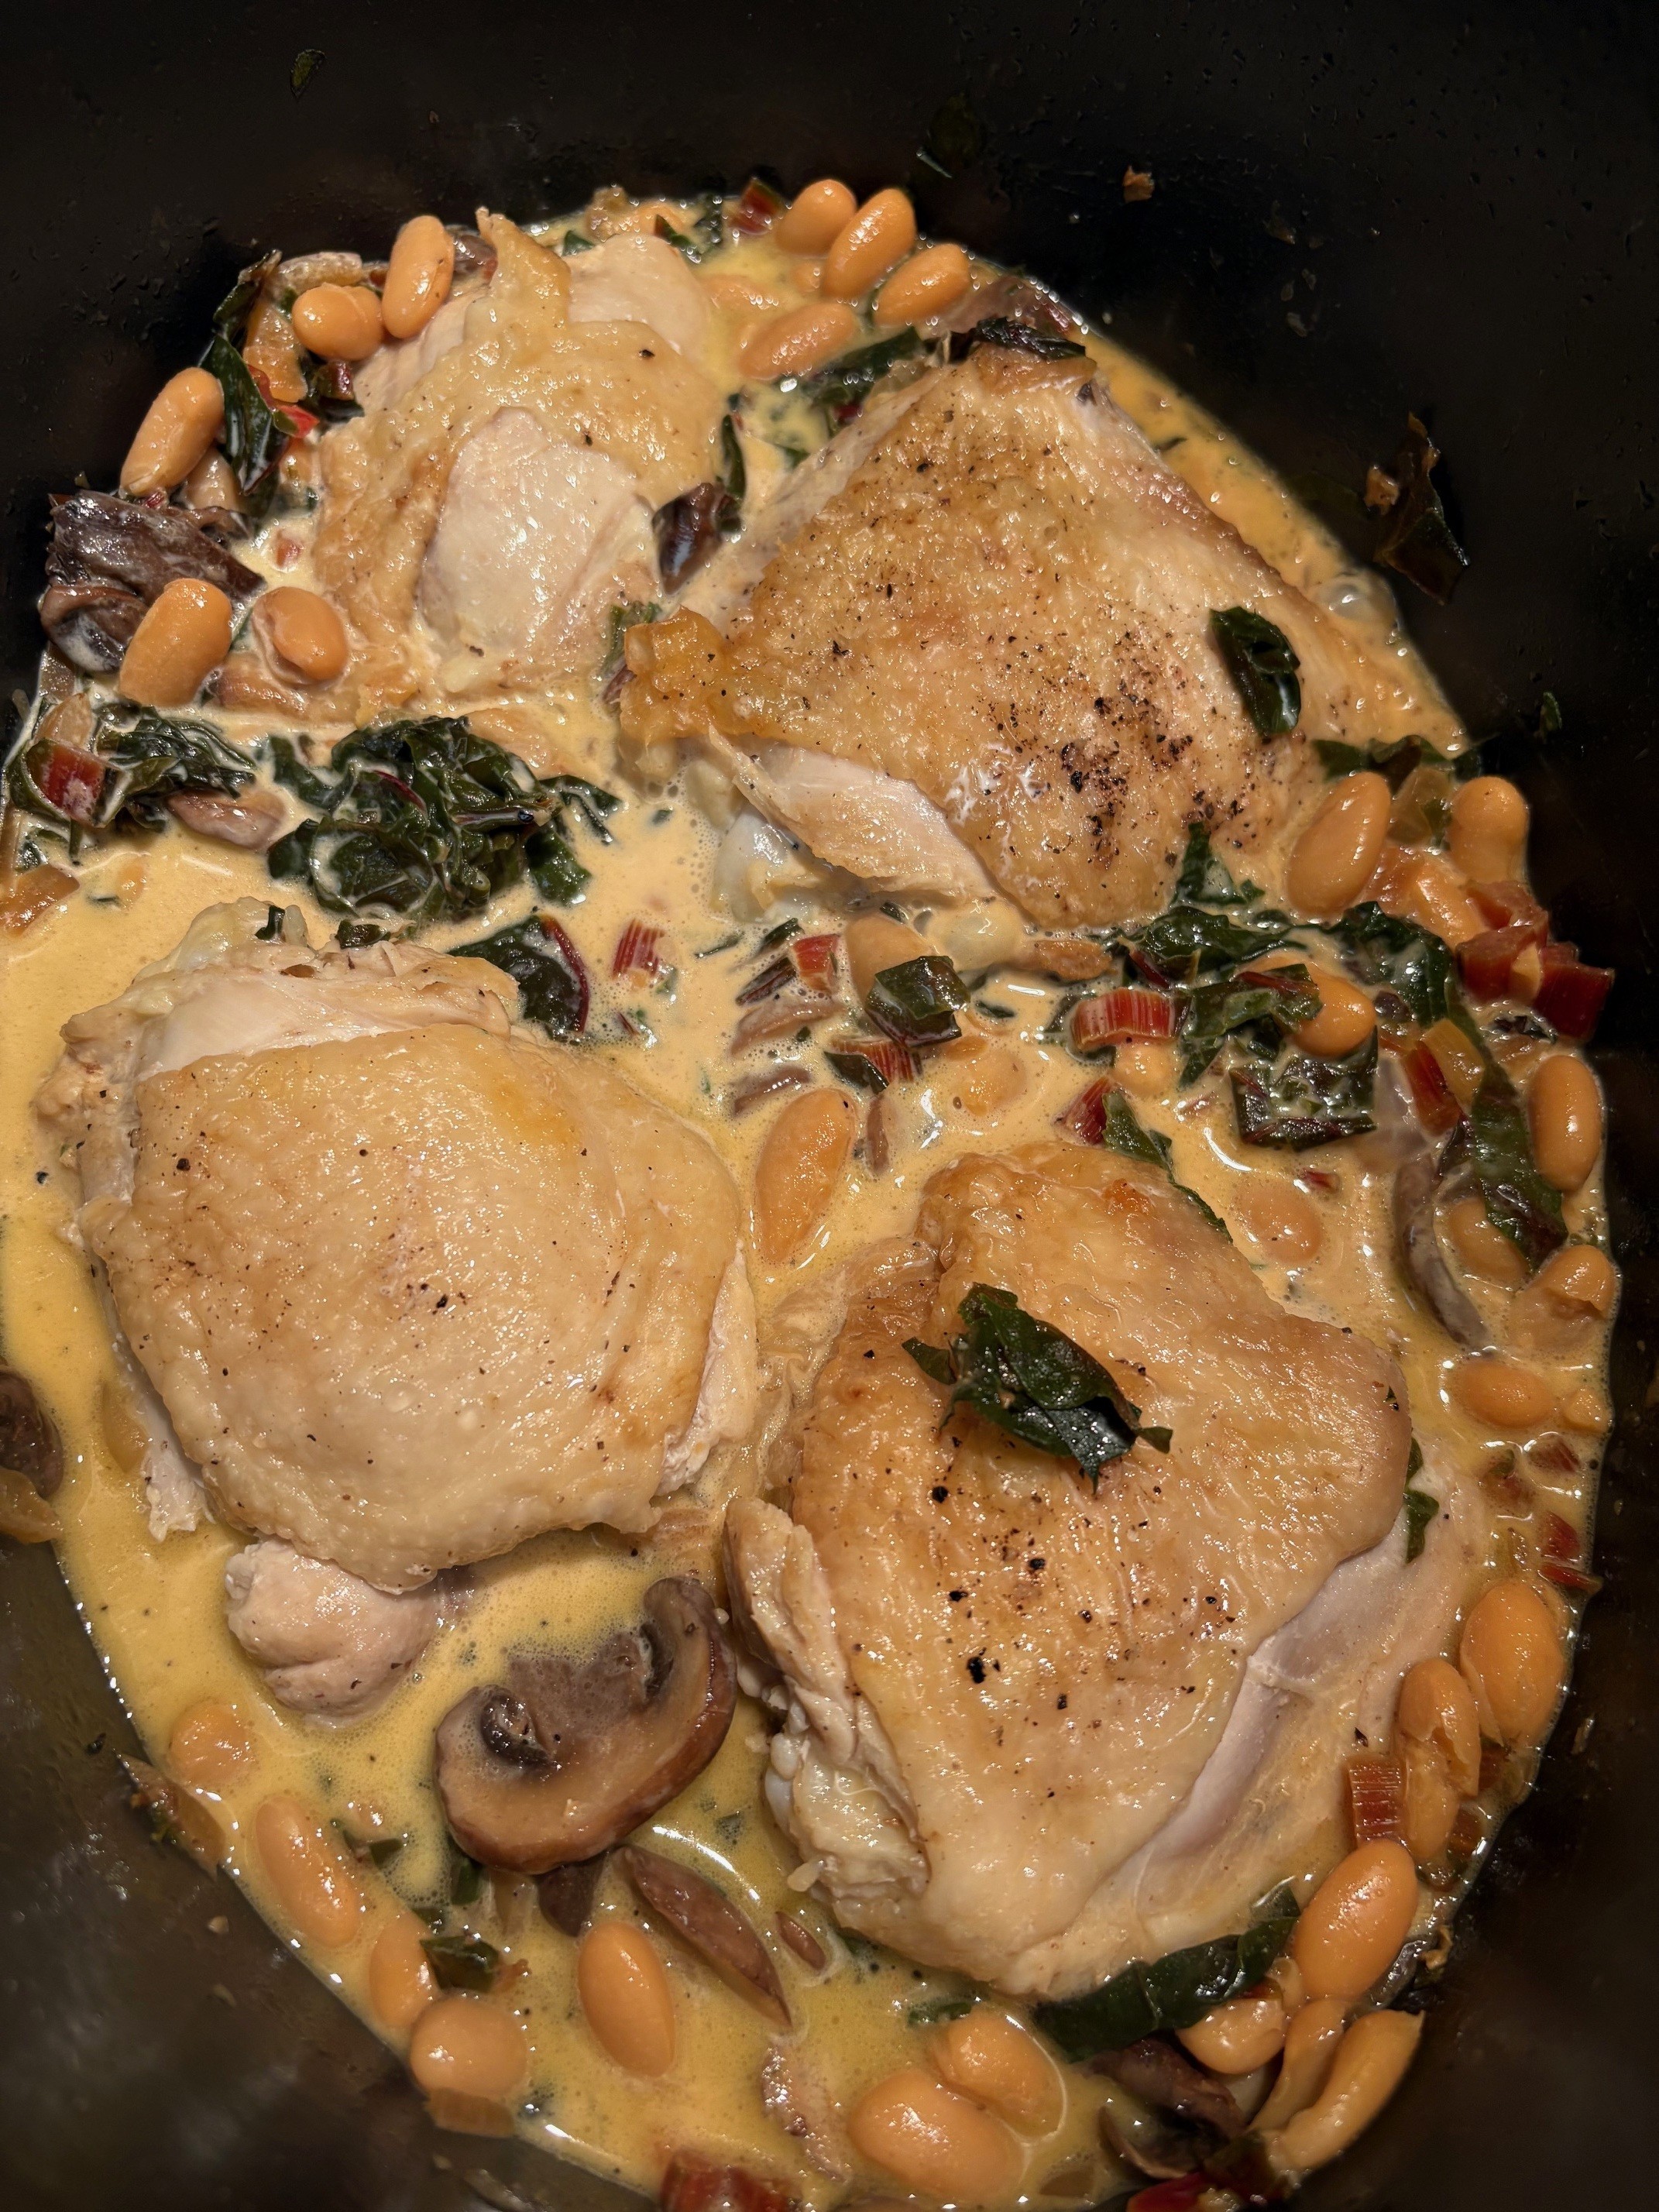
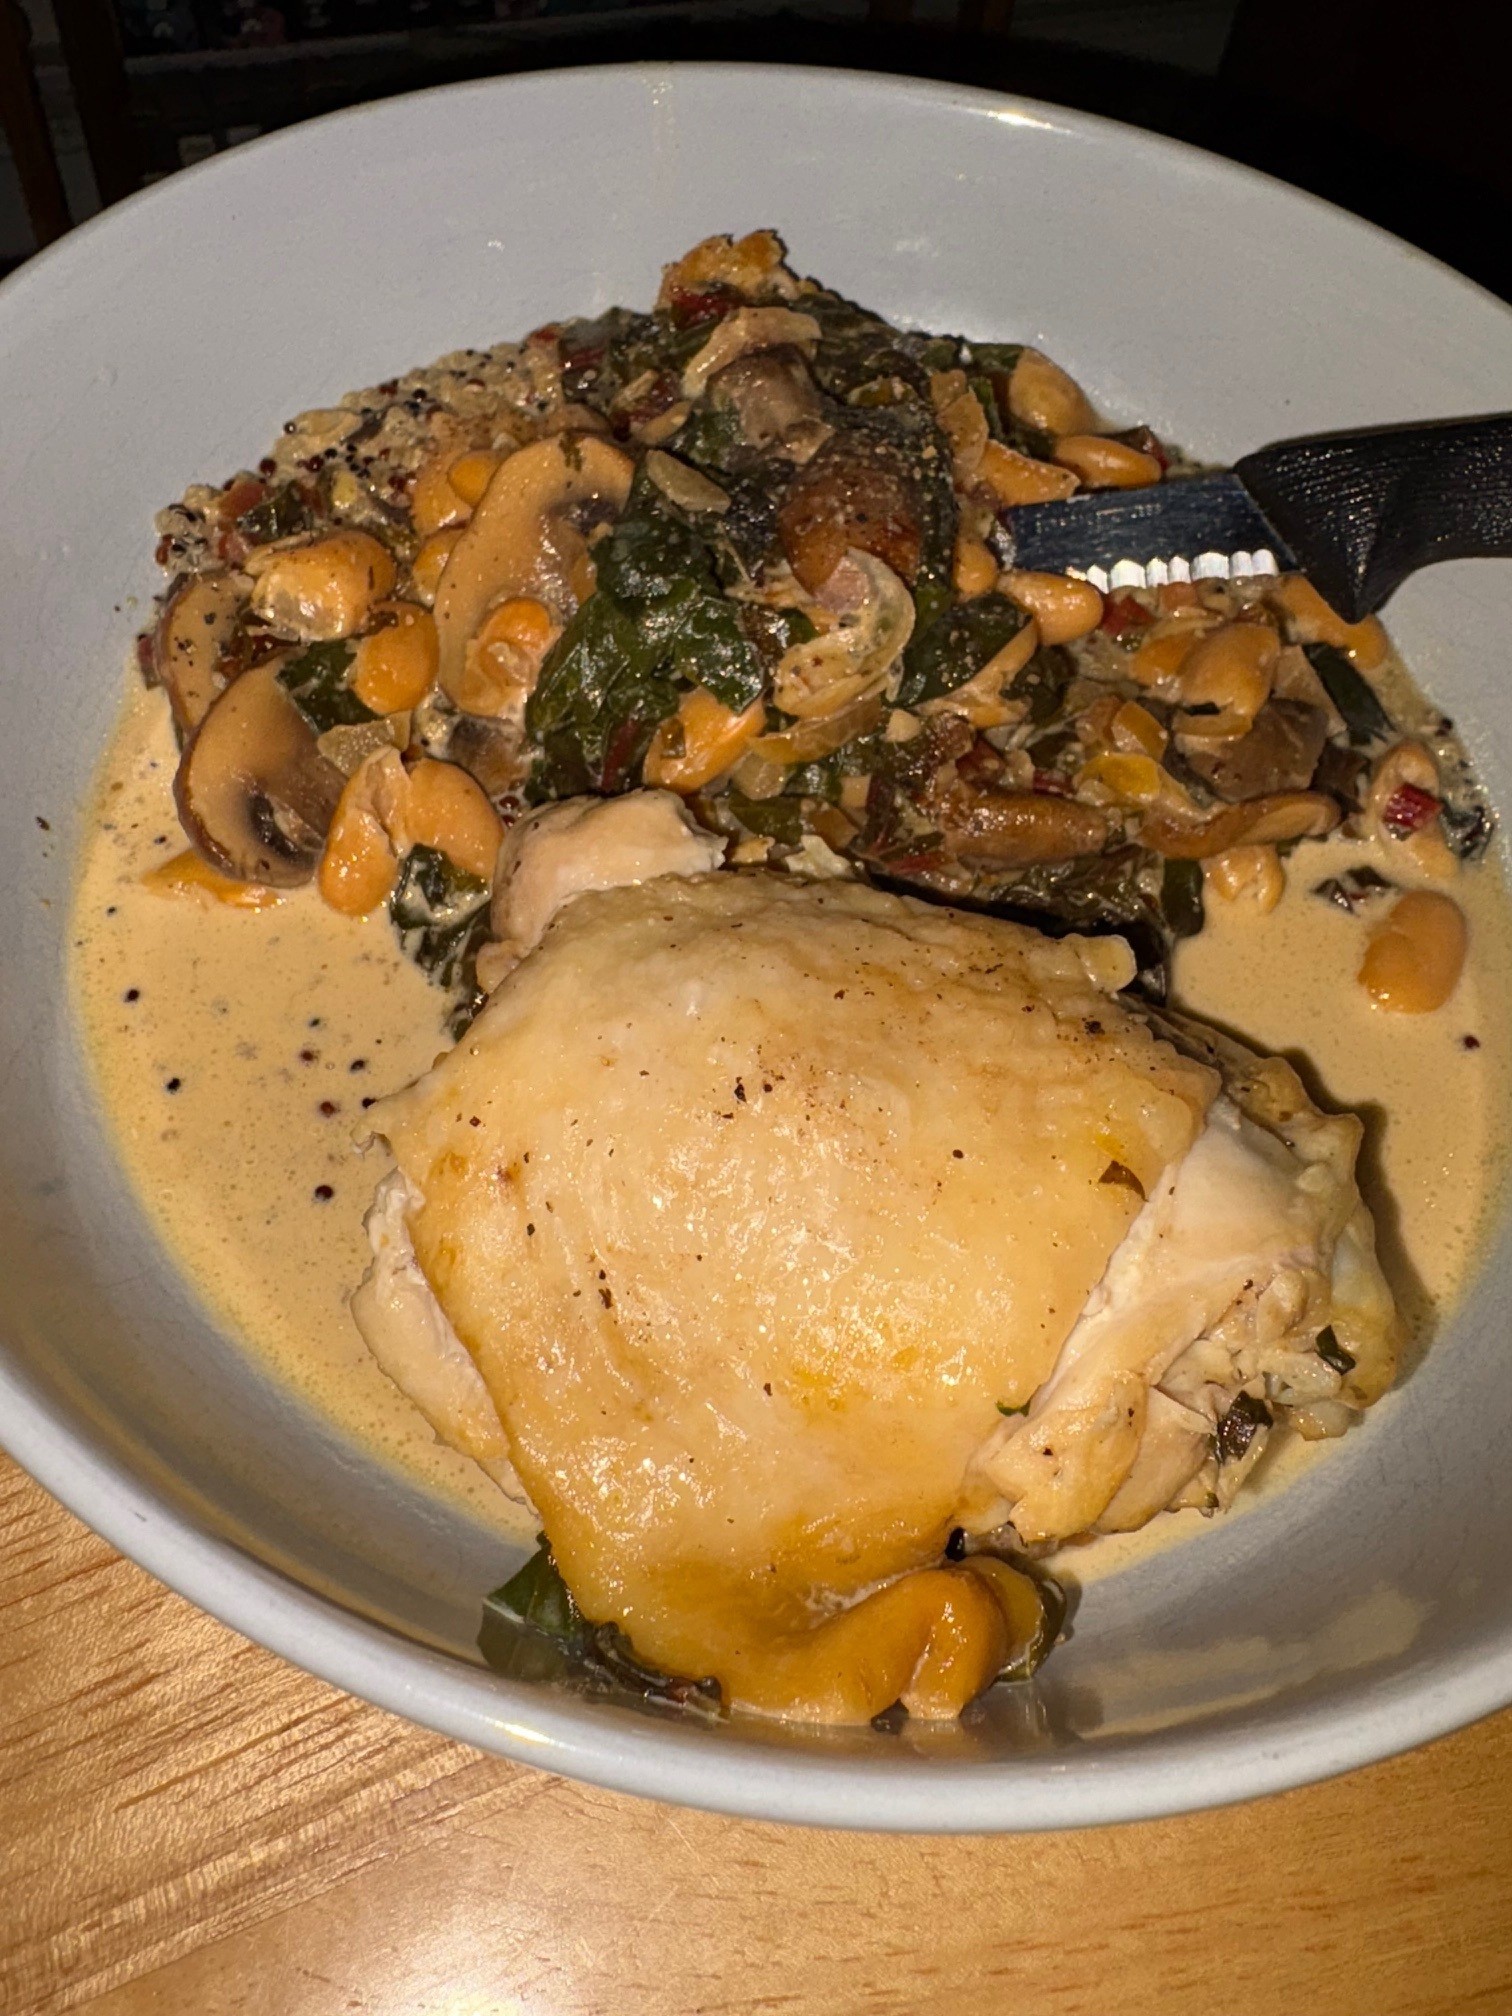
- Ingredients
- Olive oil
- 4-6 Chicken thighs, bone-in
- Salt and pepper (or optional seasoning salt & pepper)
- 1/2 onion (or 1 leek), chopped
- 1/2# mushrooms, sliced
- 1 bunch chard
- 1 clove garlic, minced
- 1/4 cup white wine, or broth
- 1 14 oz. can Cannellini beans
- 1/2 cup cream, optional
Heat olive oil in large skillet, or Dutch oven. Sprinkle chicken thighs with salt and pepper. Brown the chicken in the oil. Remove chicken from pan and set aside.
While that’s happening, strip the leaves from the main stem of the chard. Chop the stem.
Stir fry onion, mushrooms, and chard stems. When the onion is translucent and everything is a bit soft, stir in the garlic. Give it about a minute and then stir in the white wine. Let it cook another minute or two. Stir in the Cannellini beans. Let them heat through.
Chop the leafy parts of the chard. Stir them into the skilllet. Nestle chicken thighs on top. Cover and simmer for about half hour. If you decided to add cream, stir it in now and let it warm through. Add a bit more seasoned salt. Let it heat through, uncovered. When the chicken is cooked, serve. Yum.
NOTES: I made quinoa with chicken broth and served this dish over that. So, so good! I used Swiss chard for this, but regular chard would work fine.


- Ingredients
- 1 Tbsp. olive oil
- 1 lb. ground turkey
- Salt and pepper
- 1 bell pepper, diced
- 1 small onion, diced
- 2 cloves garlic, minced
- 1/2 Tbsp. grated fresh ginger
- 1/4 cup hoisin sauce
- 2 Tbsp. soy sauce
- 3 green onions, thinly sliced
- Lettuce leaves (or optionally use chips, winter squash, or sweet potato)
Heat olive oil in skillet and stir fry ground turkey, breaking it up as you go. Sprinkle with salt and pepper. Stir in bell pepper and onion, cook until soft. Stir in garlic and ginger, cook until soft. Stir in hoisin and soy sauce. Stir over heat until heated through. Sprinkle with green onions. Load into lettuce leaves (or chips or winter squash or sweet potato) or just eat it!


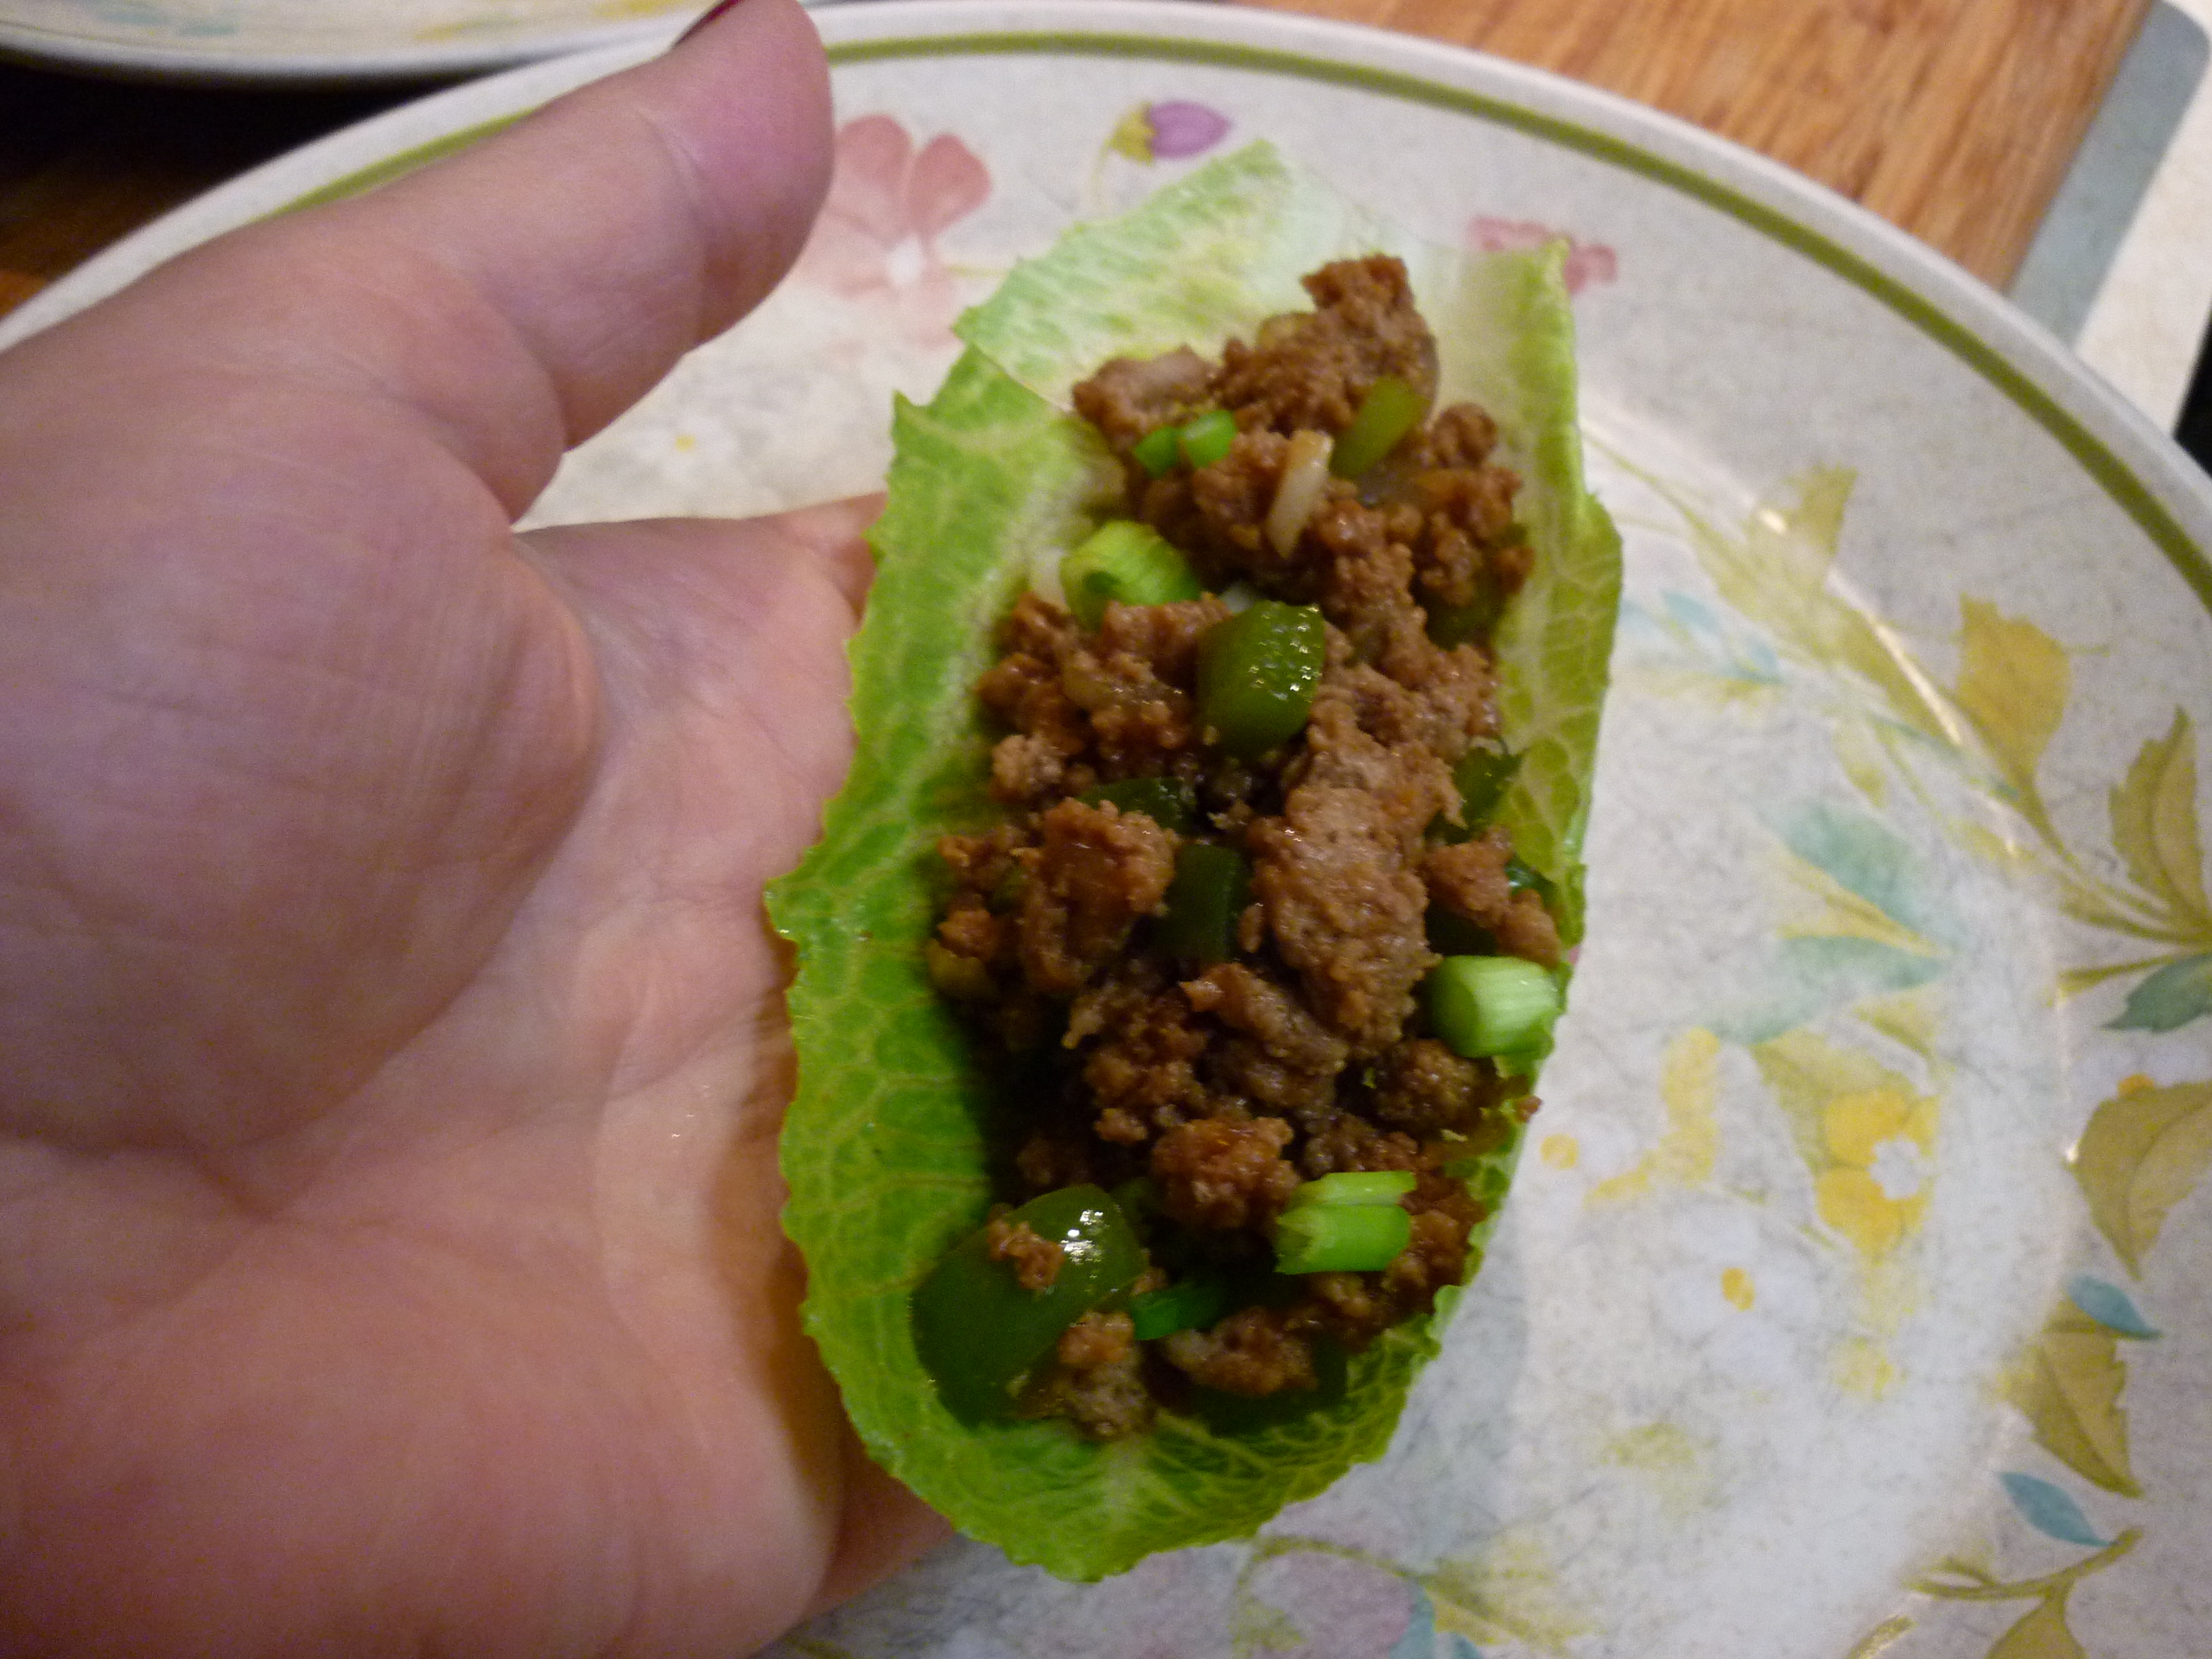


NOTES: I have tried loading this on any number of things. One of my favorites is using it as a dip for sweet potato chips. The recipe originated with Chungah Rhee over at Damn Delicious many years ago. And one more thing . . . I have used ground pork instead of ground turkey a few times. Still delicious!

- Ingredients
- 6 Tbsp. butter, divided
- 1 lb. mushrooms, quartered
- 4 garlic cloves, minced
- 2 green onions, sliced and divided
- 1/4 cup broth (or wine)
- 3/4 tsp. dried thyme (or fresh)
- Salt and pepper to taste
- 4 eggs
- 1 cup flour
- 1 cup milk
- 3/4 tsp. salt
- 3/4 cup parmesan, divided
Melt 2 Tbsp. butter in skillet and saute half the mushrooms until nicely browned. Remove from skillet and set aside. Melt another 2 Tbsp. butter in skillet and add the remaining mushrooms. Saute until nicely browned. Stir in garlic, one green onion, and the set-aside mushrooms. Continue stirring over heat until the garlic is fragrant and soft. Stir in broth, thyme, salt and pepper. Let broth reduce over heat, stirring occasionally. Keep warm over low heat.
In the meantime: Place a baking dish (about 9×13″) or other oven-proof dish into oven and preheat oven to 400 degrees F. In a food processor or blender, add eggs, flour, milk, and salt. Whir until it is thoroughly combined without any lumps. Remove heated dish from preheated oven and drop remaining 2 Tbsp. butter onto dish. Once it has melted, turn the dish so butter coats all sides. Pour batter from food processor into baking dish and sprinkle 1/2 cup shredded parmesan over top. Return dish to oven for 18-20 minutes. Do not open the oven to peek at this. Just wait 18 minutes before checking.
At 18 minutes, the Dutch baby should be puffed and golden brown with crispy looking edges. It may need another minute or two in the oven. Remove from oven and sprinkle the mushroom mixture over all. Sprinkle with remaining parmesan and remaining one green onion. Serve immediately.
Note: Timing is key, don’t start making this unless you can serve it immediately. It doesn’t take long, so that helps. I use the lid of my Dutch oven as a baking dish because it is cast iron and the perfect size. A Dutch Baby is a puffed pancake that falls very quickly, so once it’s removed from the oven it must be served immediately for best taste and effect. Opening the oven to peek, or taking it out of the oven prematurely, will start the falling process and I don’t think there’s any coming back from that. Just leave it alone in the oven and then look at it quickly after the 18-minute mark to see if it needs more time.

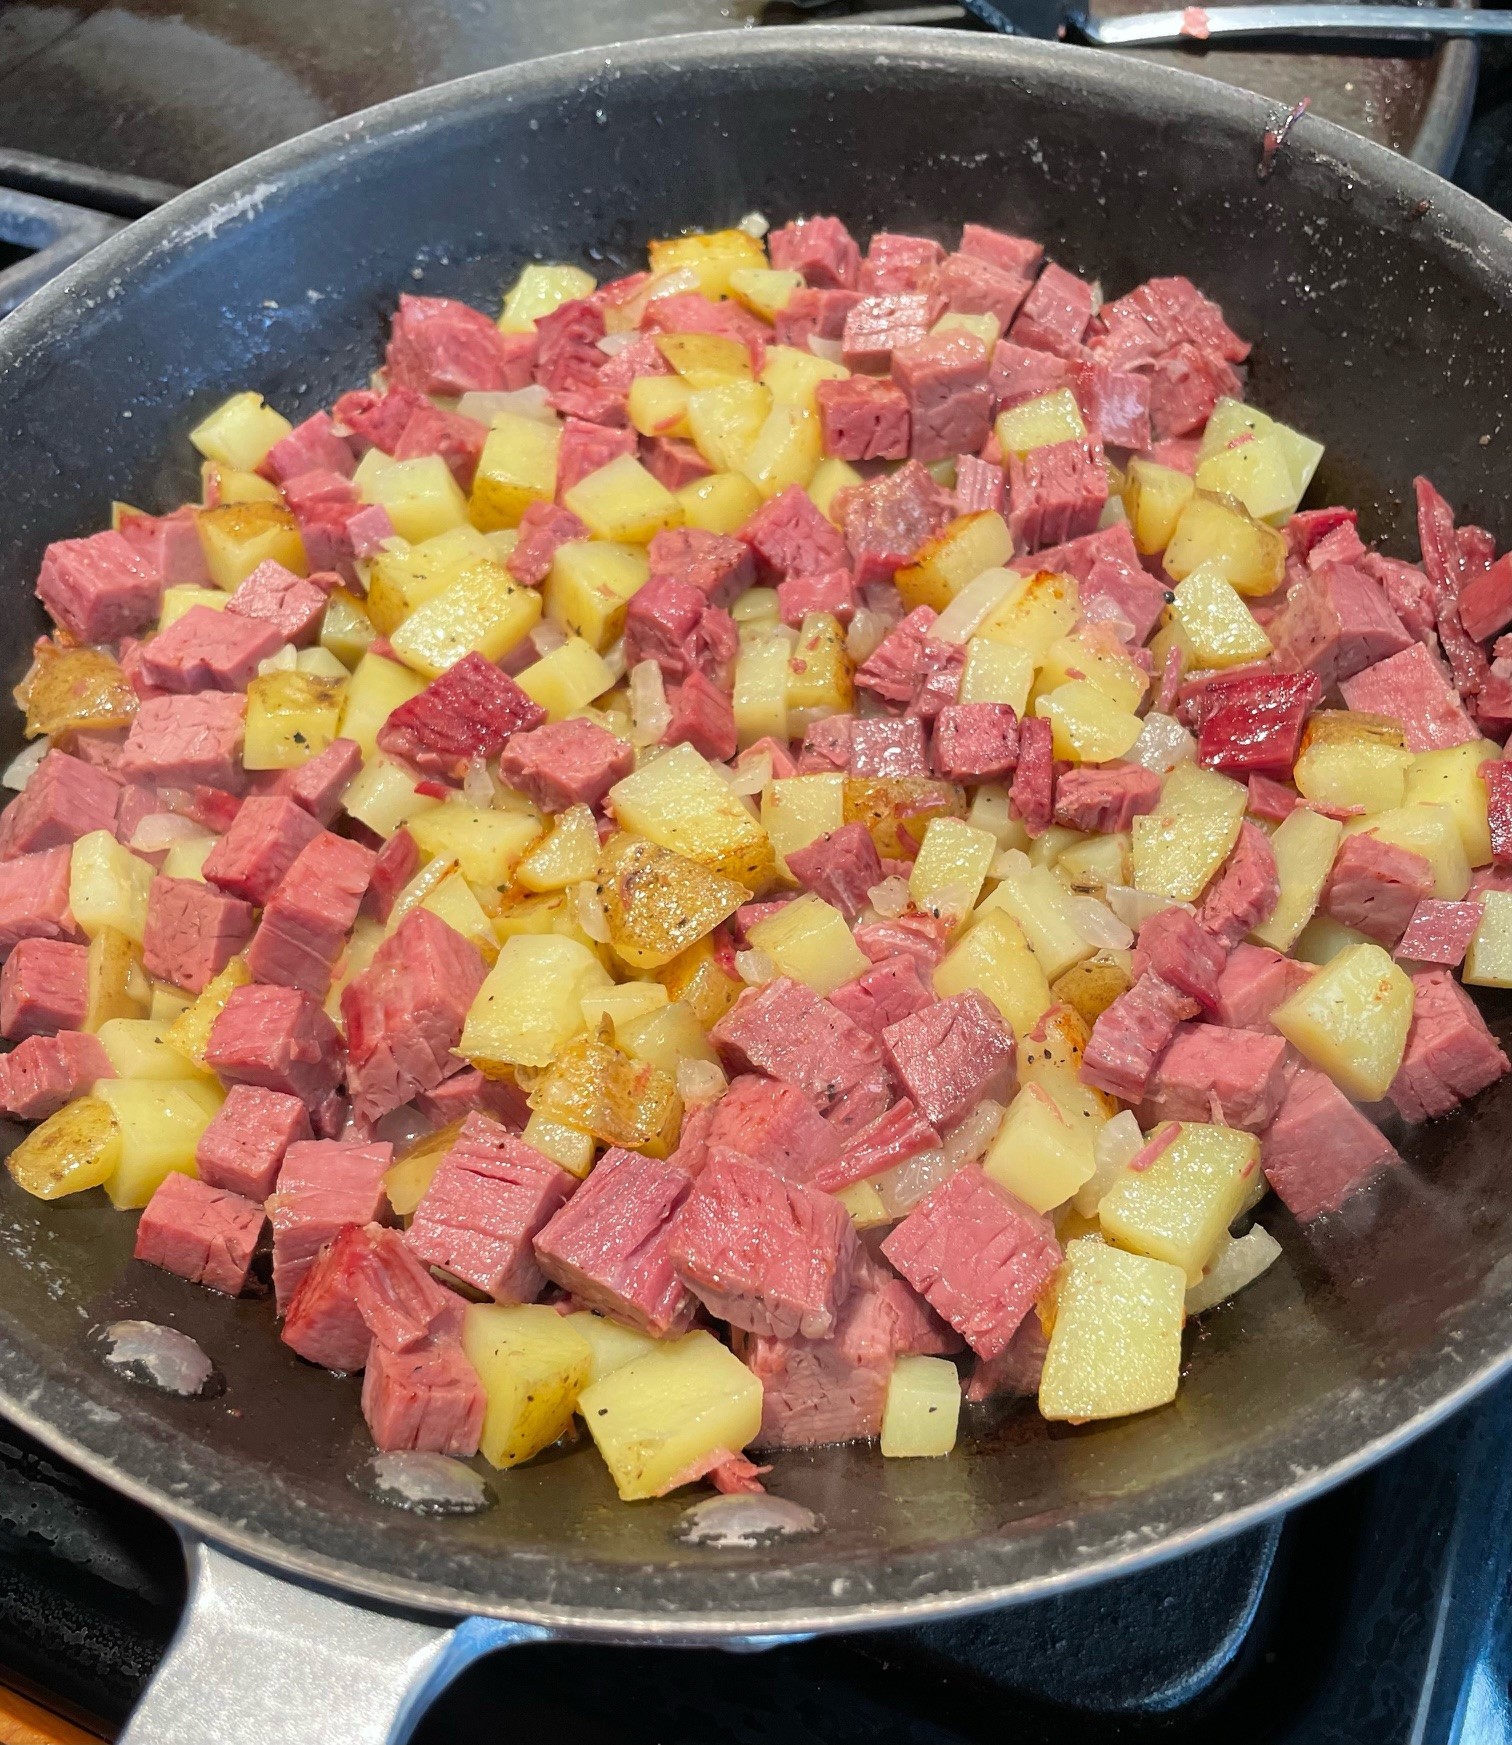
- Ingredients
- Butter and oil
- Onion, chopped
- Cooked corned beef, diced
- Cooked potatoes, diced
- Eggs
In a skillet, melt a pat of butter with a bit of oil and saute onion in it until transparent. Turn the heat up and stir in equal amounts of cooked and diced corned beef and potatoes. When it’s all well mixed, press down on it and leave it over the flame for a few minutes. Put your spatula beneath the mixture and turn sections of it over, so the browned parts are on top and the bottom gets browned again. Once your hash is a healthy brown color, create indentations in the hash with a spoon and crack eggs into the indents. Reduce heat and cover the skillet until the eggs are done to your liking. My liking is a very soft-cooked egg that forms a sauce in my bowl. Serve warm!
NOTES: Add as many eggs as you feel like eating. You can see in the photograph what I did. It always depends upon how much corned beef I have leftover from dinner (usually St. Patrick’s Day dinner). I do love this dish. I used to make it in the oven for dinner once in awhile. When we go on cruise vacations (frequently), I eat corned beef hash and poached eggs nearly every morning. It’s a bit of a trick up at the buffet deck, scooping up their runny corned beef hash onto a plate and then standing in line waiting for the egg poacher to notice me, hoping the whole mess is still reasonably warm when I find a place to sit down and devour it. First-world problems. I get it. The corned beef hash I make at home is SO MUCH better! And now you can make it, too!
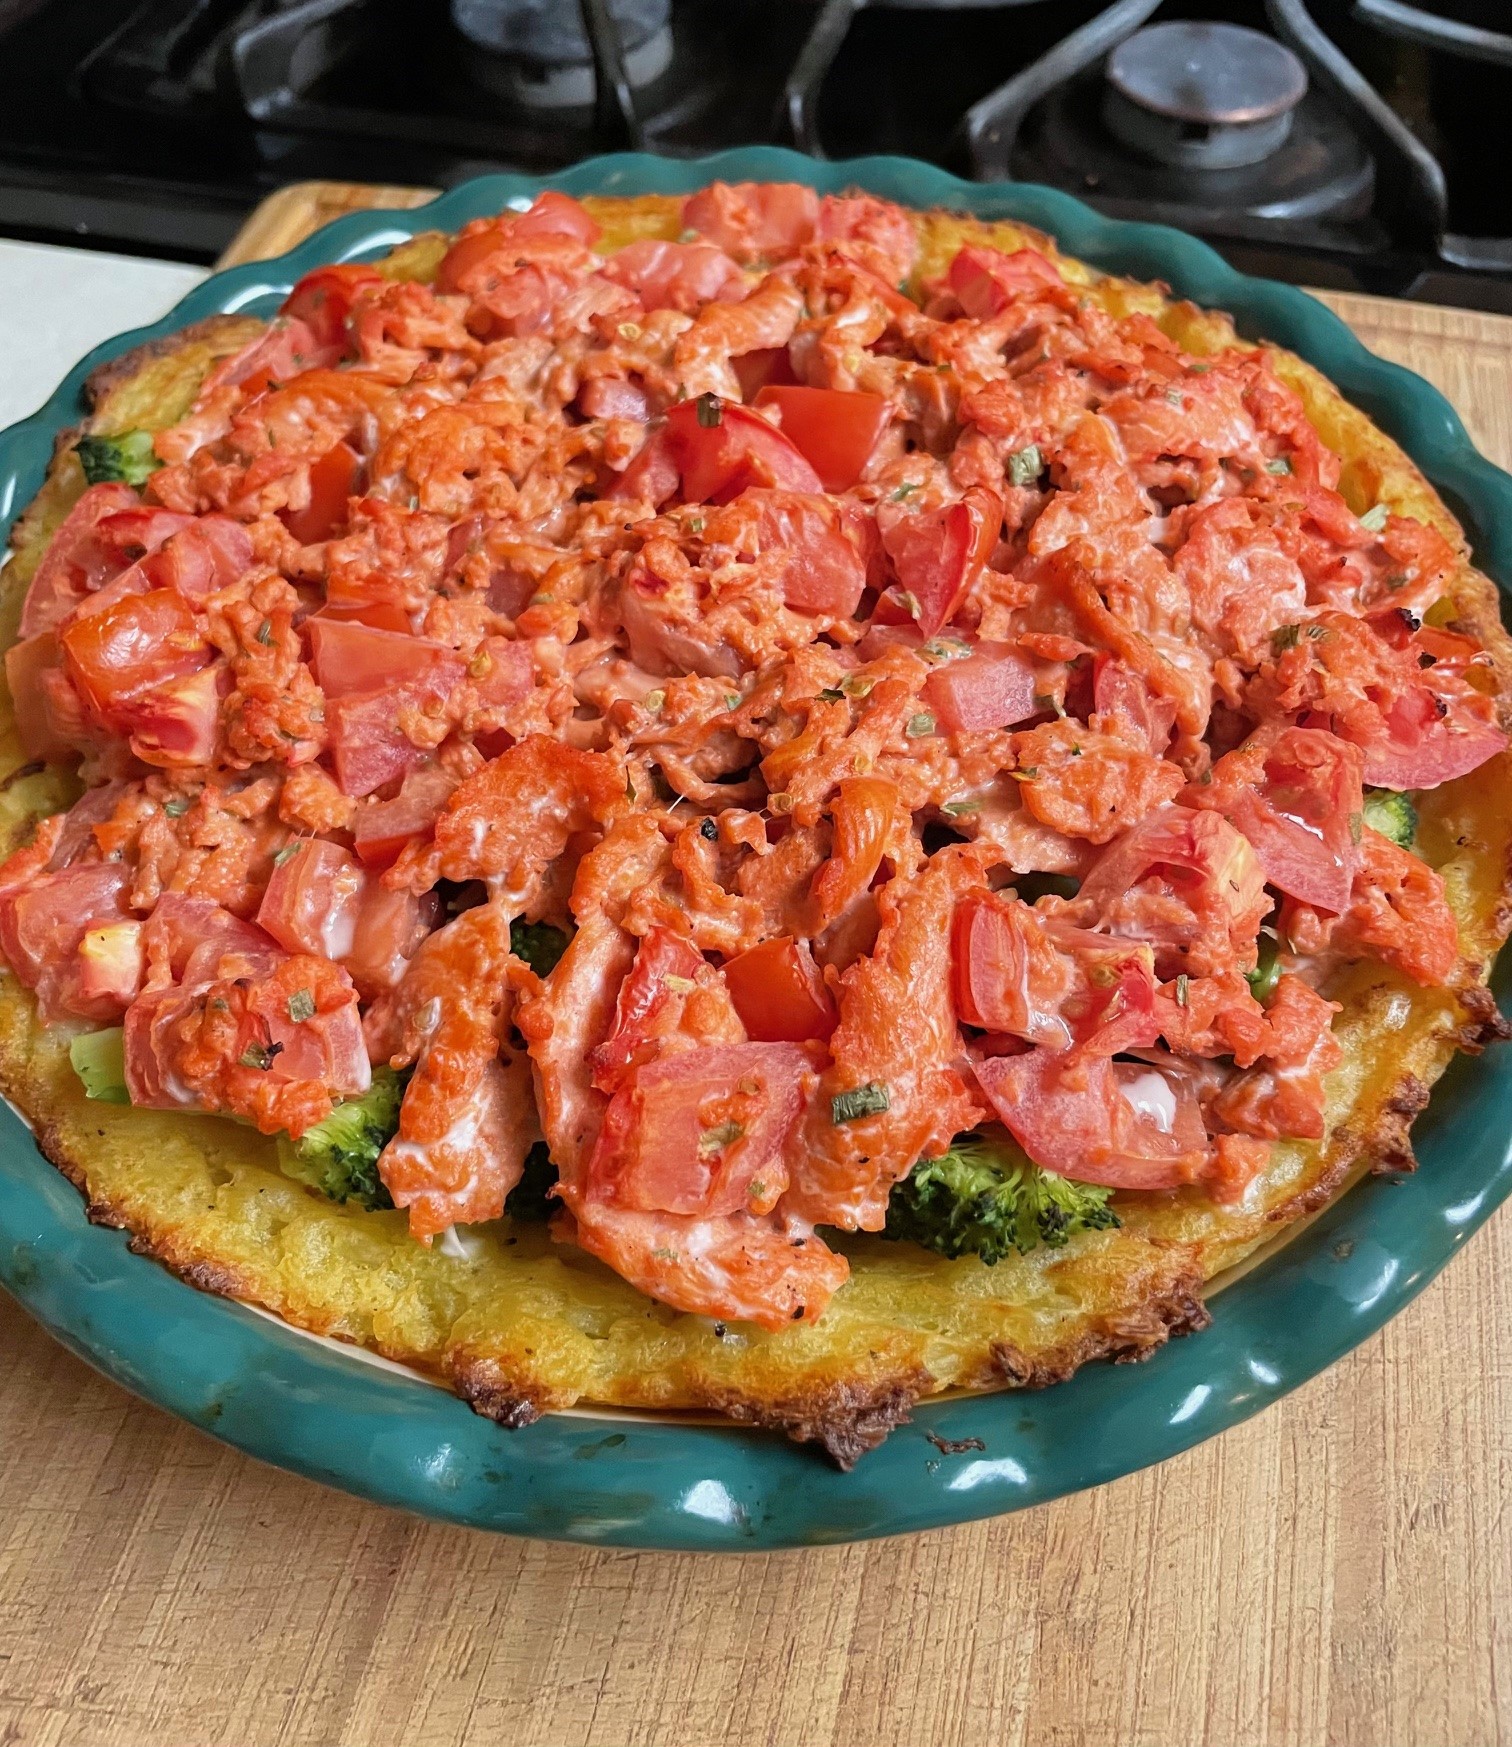

- Ingredients
- Potatoes, 4-5 large
- Salt and pepper, or just seasoning salt
- Tartar sauce, 3-4 Tbsp.
- Olive oil
- Broccoli, one small head, cut into florets
- Salmon pieces, about 2-1/2 cups (or lightly smoked salmon)
- Roma tomatoes, about 3 of them, chopped
- Chives, dried or fresh, about 1 tsp. dried
- Salt and pepper
- Juice of 1/2 lemon
Preheat oven to 400 degrees F. Prepare a shallow baking dish with non-stick spray. [I use a 9″ ceramic pie pan.]
Boil potatoes until soft. Strain potatoes and season with salt and pepper (or seasoning salt). Mash the potatoes. Stir tartar sauce into the mashed potatoes. Stir about 1/2 Tbsp. olive oil into mashed potatoes. Spoon the mashed potatoes into the prepared baking dish and tamp it into the bottom and sides with a spoon or rubber scraper. Drizzle with olive oil. Bake at 400 degrees F for 20-30 minutes, until golden.
Steam or broil or otherwise cook broccoli. Set aside.
Stir together salmon, tomatoes, chives, salt and pepper, and lemon juice. Set aside.
Remove potatoes from oven and arrange broccoli over the top. Scoop the salmon mixture over the top of the broccoli. Bake an additional 15-30 minutes at 400 degrees F, until fish is cooked.
*Lightly Smoked Salmon . . . Spread one salmon filet with Dijon mustard and then sprinkle with salt and pepper (heavy on the pepper). Smoke at 225 degrees F for 1-1/2 hours. Good to go.
NOTES: This recipe started from Jamie Oliver. I have SO MUCH salmon. I had lightly smoked a salmon filet, but then realized I wasn’t having a dinner party so what would I do with it all. Improvise! I couldn’t really figure out where Jamie Oliver was headed just by reading the recipe, but once I started making this, I was like, “Oh, I get it!” So, that time I used smoked salmon instead of regular. It was already “cooked” instead of raw. I didn’t use any prawns because, well, I have SO MUCH salmon. I get salmon from my friend Sandy, and she had sent me a couple frozen bricks of boneless salmon meat. Another time, I used nearly the whole brick making this. It’s perfect! I didn’t have cherry tomatoes, so I used Romas instead. And on and on it goes. Mixing tartar sauce with mashed potatoes was the real mind-blower, but it’s great! I cannot overstate how flavorful this dish is, a mix of earthy and tart. Try it!
