You are currently browsing the monthly archive for January 2019.

I’ve made this dish several times over the past couple years and it’s really, really delicious. My recipe is based upon one found at TamingTwins, but I’ve modified it quite a bit.
This dish is how I use my leftover salmon that’s already cooked. I haven’t tried it, but I believe canned salmon would work as well. We eat a lot of sweet potatoes because they purportedly are lower in carbs than regular potatoes, but that may just be an advertising ploy by sweet potato growers. Sweet potatoes are commonly called yams in the USA, but real yams are an entirely different vegetable originating in Africa or Asia and most of us have probably never eaten or seen one. That aside, if you’re at the grocery store shopping for yams, almost assuredly they are selling you sweet potatoes. Go ahead and get the yams.
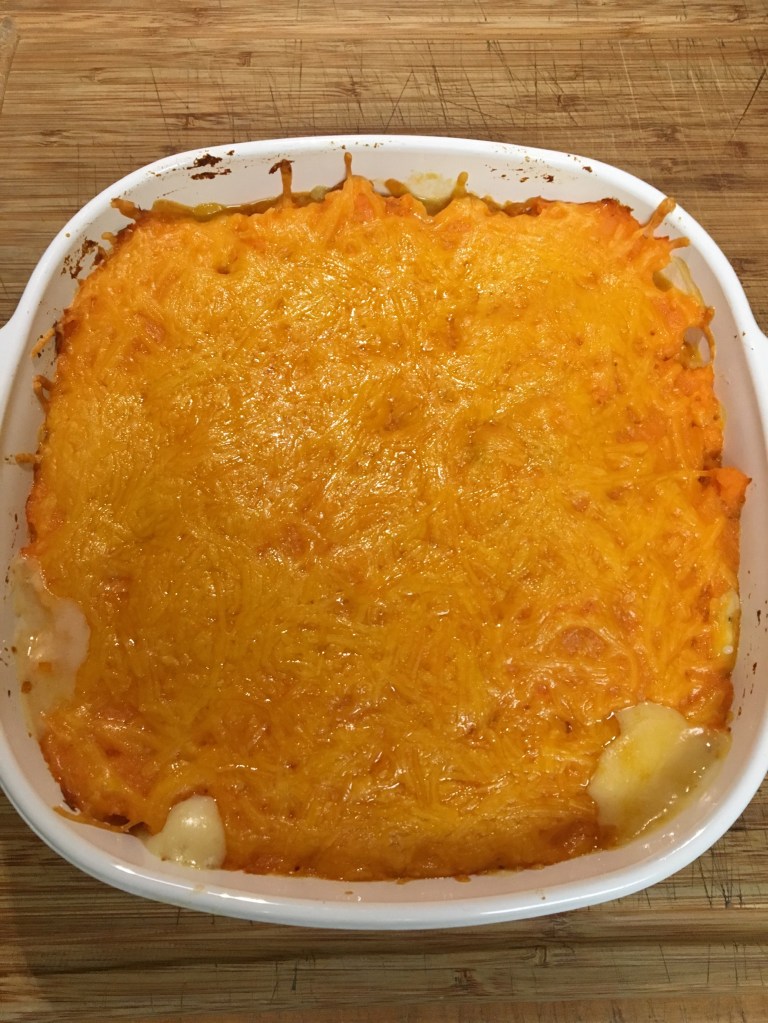
This recipe’s proportions are basically eyeballed. I’ll give you my ingredient proportions, but do feel free to wing it with a handful of this or that. You’ll see. I tend to start by choosing a baking dish that I can spread a layer of flaked salmon evenly across the bottom. The next layer is prawns and onion that has been cooked in milk. TamingTwins poached her salmon with onion in the milk, but I like to use my leftover salmon that’s already cooked. However you decide to do things, the purpose is to flavor the milk with seafood. The next layer is the shrimp and onion-flavored milk made into a white sauce. The next layer is the mashed sweet potatoes mixed with grated cheddar cheese. You can cook the sweet potatoes however you like, they just need to end up mashed. The last layer is grated cheese over the top. This dish is like a shepherd’s pie, but maybe we should call it a fisher’s pie. It may not look like much, but it’s super yummy.
- Ingredients
- 2-3 Sweet potatoes (yams)
- Salt and pepper
- 1 cup grated cheddar cheese, divided
- Cooked salmon, at least two serving pieces
- 1-1/2 cups milk
- 1/2 onion, chopped
- 5 Prawns (extra-large), peeled, deveined, and rough chopped
- 3 Tbsp. butter
- 3 Tbsp. flour
- 1 Tbsp. parsley flakes (optional)
Peel and cut the sweet potatoes into large pieces. Put them into a pot with an inch or so of water and boil/steam until the sweet potatoes are soft. Mash them and then stir in a dash of salt and pepper and 1/3 cup grated cheese. Set aside.
Debone and flake the salmon. Spread it evenly across the bottom of a baking dish. I used a 2-quart dish. Set aside.

Bring milk with onion to a boil in a saucepan and let simmer for a couple minutes until the onion is cooked. Stir in the prawns. Let simmer until they’re cooked. It won’t take long at all, a minute or two. Strain out the onion and prawns, making sure to save the milk. Spread the onions and prawns across the salmon in the baking dish. Set aside. Let the milk cool to room temperature or less. It was zero degrees here while I was last making this, so I just strained the milk into a measuring cup and set it outside to cool. Didn’t take long. Ha.

Preheat the oven to 350 degrees. Make a roux by melting butter in a small saucepan and stirring in the flour, salt, and pepper over medium heat. Stir in the cooled milk and continue stirring over medium heat until the sauce is thick and bubbly. Remove from heat and stir in the parsley flakes, if using (I didn’t have any). Pour the sauce over the seafood in the baking dish.

Dollop mashed sweet potatoes evenly over the filling in the baking dish. You can smooth it out or fluff it up, however you like. Sprinkle with remaining 2/3 cup grated cheese.


Bake at 350 degrees F for 30-40 minutes, until heated through. Heavenly!

I baked this one for thirty minutes, but it could have used another 5-10 in the oven. I was too hungry to wait!

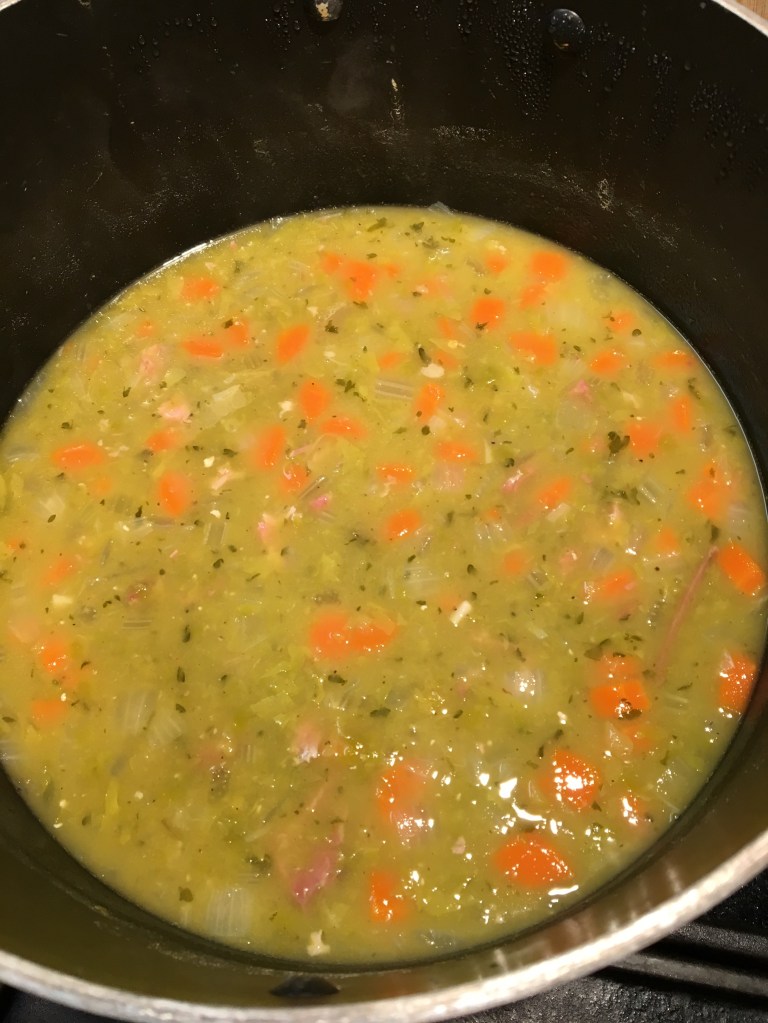
I am a fan of split pea soup. I buy the spiral-sliced fully-cooked hams at Costco and whenever we have ham for dinner, I save the bone to make split pea soup. If I need to cook chicken for a dish calling for shredded chicken meat, then I might cook the chicken in water and use the flavored water for this split pea soup.
My meals tend to be like guitar riffs where one thing builds on another. This morning I was trying to use up all the Cheesy Potatoes from last night’s Christmas dinner, so I diced some leftover ham and put it on the bottom of a skillet, then plopped the leftover Cheesy Potatoes on the ham. Once heated, I cracked four eggs over the top, covered the skillet until the eggs were cooked to my liking and had a delicious brunch. I digress.
- Ingredients:
- Ham bone (with a little meat left on) or bacon or breakfast sausage
- 4 cups water or chicken stock
- 1/2 # dried green split peas
- 1 cup onion, chopped
- 1 cup celery, chopped
- 2 carrots, chopped
- Salt and pepper
- 2 Tbsp. dried parsley (optional)
- Fresh or frozen peas (optional)
If you are using a ham bone, then just put it into a large stock pot. If you are using bacon or breakfast sausage, then fry it in your stock pot first. If there is a lot of fat, drain it off. Add the water, split peas, onion, celery, carrots, salt and pepper, optional parsley. Bring to a boil and then lower heat to simmer for 3-4 hours. Let it cool a little bit. Remove the ham bone and take the meat off the bone. Return the meat to the pot. Discard the bone. Bring the pot to a boil again. If you are adding fresh or frozen peas, do it now. Let them cook a minute or two. Remove pot from heat. Serve.
Almond-Coconut Tart Crust and Almond Tart Crust
You can find my first foray into tart crusts here with the Lingonberry Curd Tart, also a gluten-free crust. There are a lot of almond-flour crust recipes on the web and the two in this post I have recently tried. They are both configured as sweet crusts for sweet fillings.
Almond-Coconut Tart Crust

This one can be found at A Foodcentric Life. I liked the crispiness of the crust. I used it as a crust for a golden raspberry curd tart that turned out disastrously, but the disaster had nothing to do with the crust. The crust was great.
- Ingredients:
- 1-1/2 cups almond flour
- 1/2 cup coconut flour
- 2 Tbsp. brown sugar
- 6 Tbsp. melted butter
Add all ingredients to a food processor and process until it’s fully incorporated. I found that mine did not stick together yet. That’s okay, just make sure it’s evenly mixed. I had to scrape the bottom of my food processor and give it a few more whirls to make sure all the butter made it into the dough.
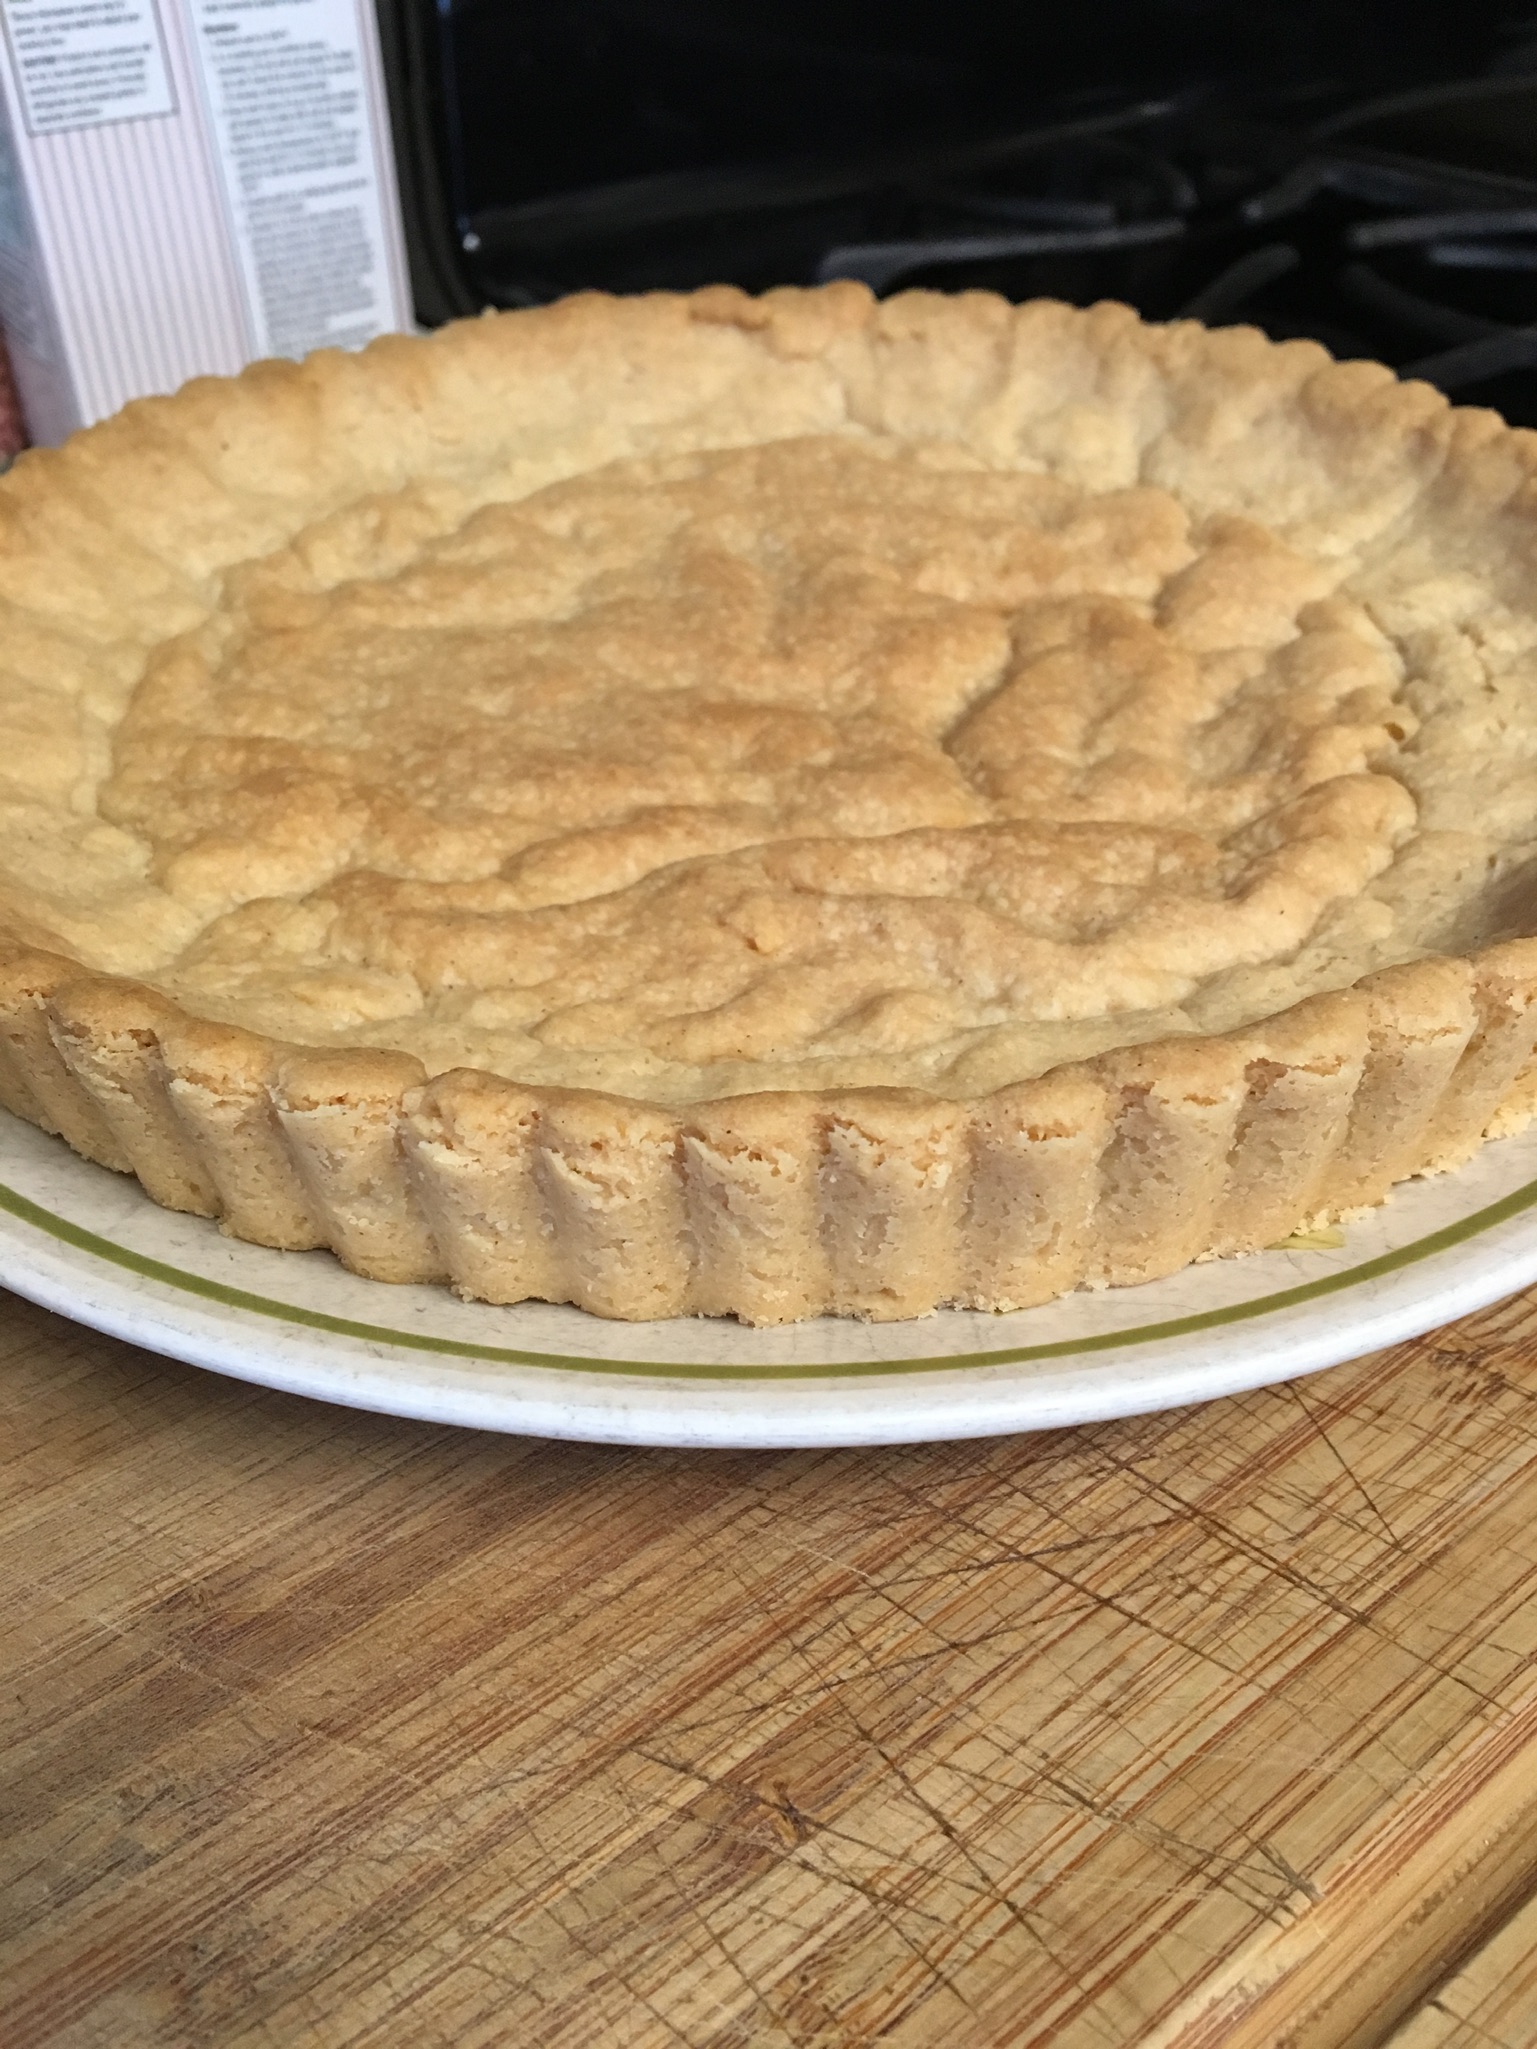
Spray a 9″ tart pan with a removable bottom and preheat the oven to 350 degrees.
The processed ingredients should stick together in your hands. If it does not stick together when you squeeze it, then you might try adding more butter. I thought mine was too dry, but I carried on without changing anything and it turned out great. Scoop out a pinch at a time and press onto the sides of the tart pan. Add dough a pinch at a time all the way around and then sprinkle the remaining dough into the bottom of the pan and press in evenly. As I said, it’s quite dry, but does stick together. Try to make the dough as even and smooth as possible.
I set mine on a baking sheet to bake, but next time I think I’ll just set the tart pan in the oven. Bake at 350 degrees for 13-16 minutes. It should be a golden brown color. Remove from oven. Let sit on a cooling rack until cool and then remove from tart pan. Fill with your favorite no-bake filling.
Almond Tart Crust
This one can be found at wholesomeyum.com. It held up well to the pumpkin cream filling that I used. The texture is a bit more cake-like than cookie-like. I think that’s because of the egg.
- Ingredients
- 2-1/2 cups almond flour
- 1/3 cup sugar
- Dash salt
- 1/4 cup melted butter
- 1 egg
- 1/2 tsp. vanilla extract
Preheat oven to 350 degrees. Spray a 9″ tart pan with removable bottom.
Add all ingredients into a food processor and process until it sticks together smoothly. Remove dough a pinch at a time and, starting along the edge of the tart pan, stick the dough to the pan. Once the edge is complete, use the rest of the dough to cover the bottom of the pan. Make sure you go all the way to the top of the pan.

Bake at 350 degrees for 10-12 minutes. Remove from oven and let cool. Remove from tart pan. Fill with pre-cooked filling, like cream, pudding, or curd.
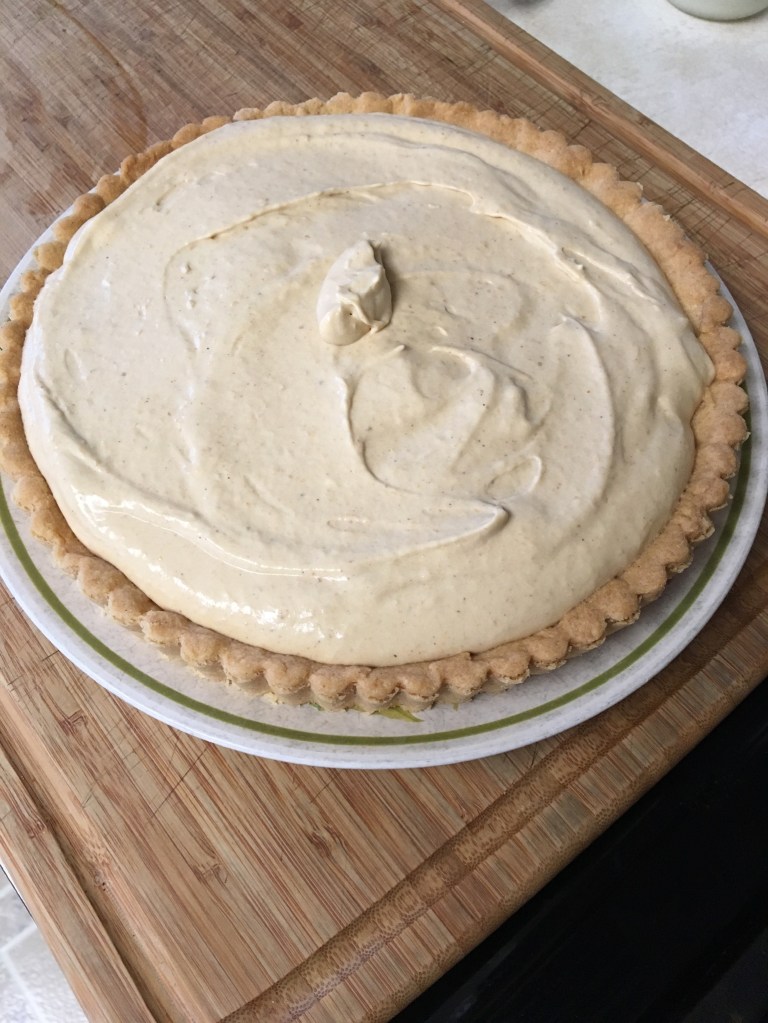
Here is a picture of my pumpkin cream tart. The pumpkin cream part was ho-hum, I’m not a big fan of pumpkin cream pie so I won’t bother posting the recipe here. The crust is good, though.
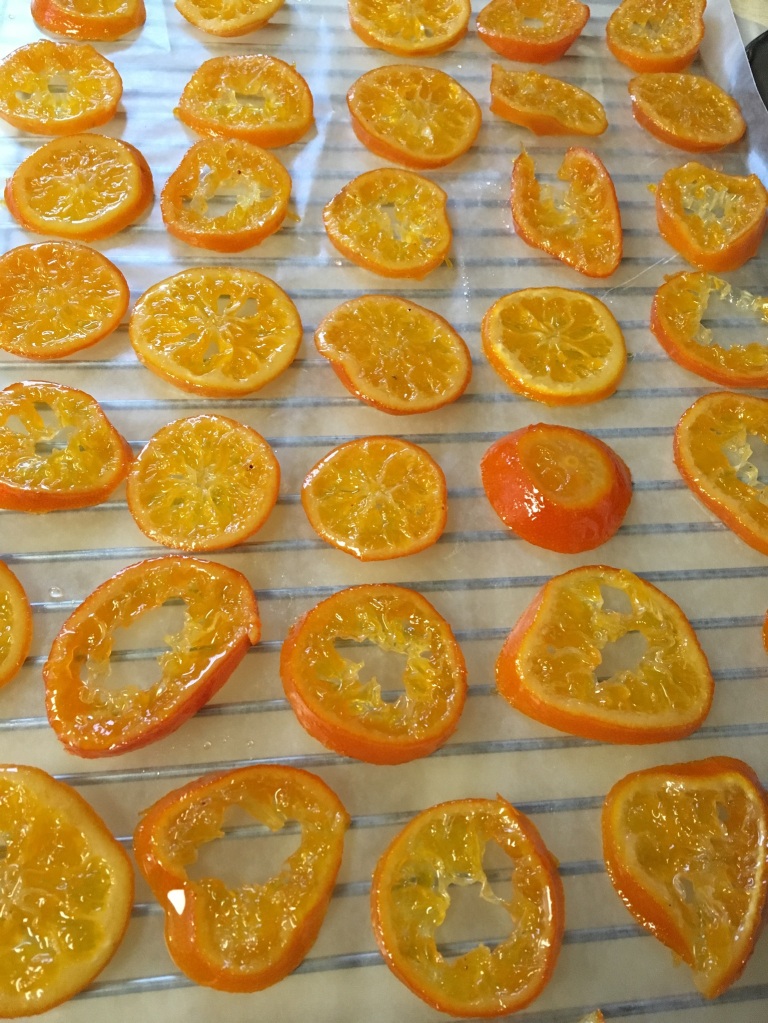
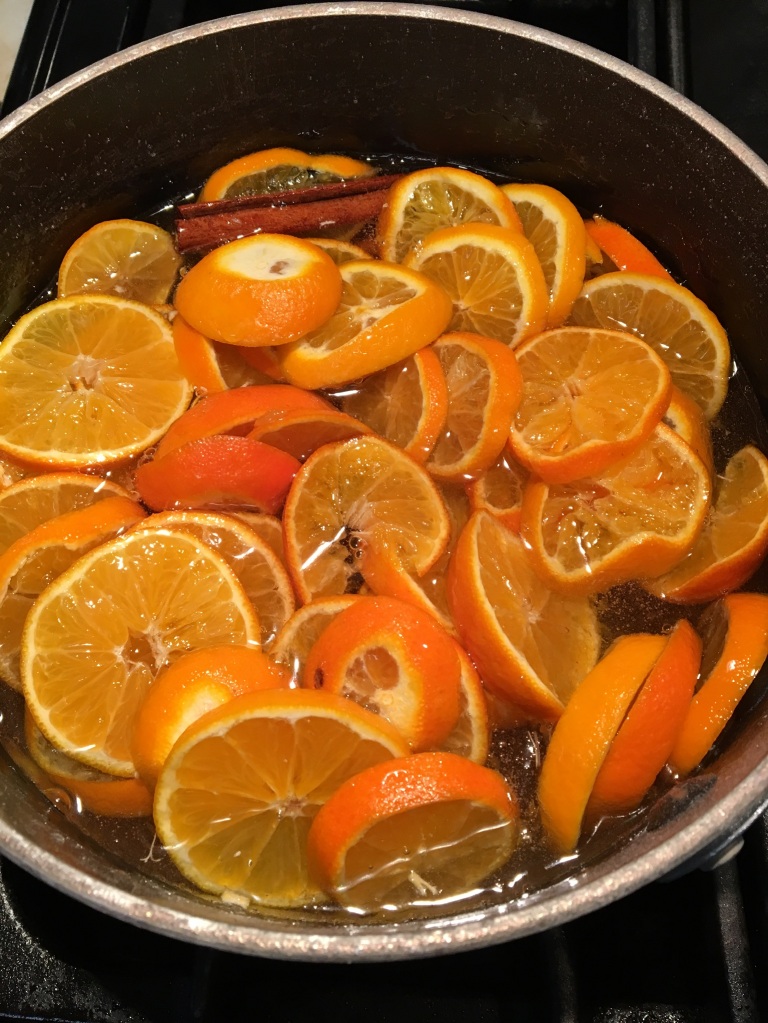
Fresh Mandarin oranges (also known as Clementines, Halos, Cuties, etc.) are very popular at Christmastime here. I had too many of them to eat out of hand, so I cast around the internet for a way to use some easily. This recipe fit the bill. I used the one found at Cupcake Project. I don’t have a dehydrator, and am not really interested in a crispy product. That being said, I can’t figure out how I’m going to store these as they are QUITE STICKY. Totally delicious, but QUITE STICKY. Now, I suppose if I were baking some kind of Grand Marnier or orange cake or dessert, I could place these candied Mandarins decoratively on top. But I’m trying to watch what I eat in this quasi-post-holiday season, so instead of using them as a garnish, I am eating these off the paper, several at a time. It’s defeating my purpose, I know. I should never have too much of anything because I feel like I must finish eating it. All of it. Sigh. These are so, so good.
A couple notes . . . the cinnamon flavor is a little bit strong, so next time I might use two cinnamon sticks instead of four. There is a huge amount of leftover syrup, about 3-1/2 cups, what am I going to do with it?
- Ingredients
- 8 Mandarin oranges
- 2 cups water
- 2 cups sugar
- 4 cinnamon sticks
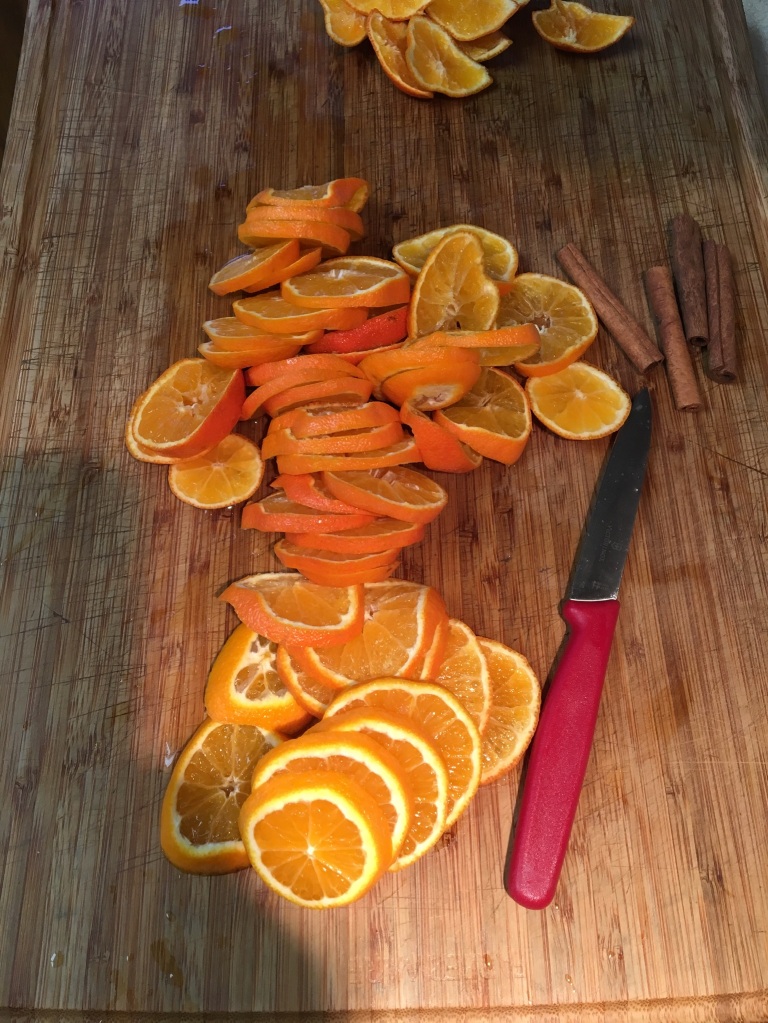
Slice the oranges into about 6 thin slices each one. In a large saucepan stir together water and sugar, bring to a boil. Add the mandarins and cinnamon. Bring to a boil again. Reduce heat. Stirring only occasionally, let it simmer 40 minutes. Using tongs, remove the slices.
Cupcake Project used a cooling rack set over paper to catch the drips. There is a caveat not to let them sit too long on the racks or the racks will get all sticky, hard to clean. I don’t want to deal with my racks like that, so instead I placed a sheet of wax paper over my racks. Later in the day I used the tongs to turn each slice over. The next day I moved the slices to a new sheet of wax paper. Later that day I turned them over. Note that I was taste-testing them frequently throughout. Ha. The next day I changed the wax paper again. An option for storage would be to dredge each slice through granulated or sanding sugar, but I think I’ll simply layer them between sheets of wax paper. That should work to keep them from sticking to each other.

As I said earlier there’s a lot of leftover syrup. You could make a second batch in the same syrup, that would be super good. I poured my leftover syrup in jars and plan to use as a sweetener for salad dressing or pancake syrup or cocktail syrup. It would taste pretty good to sweeten tea, too.
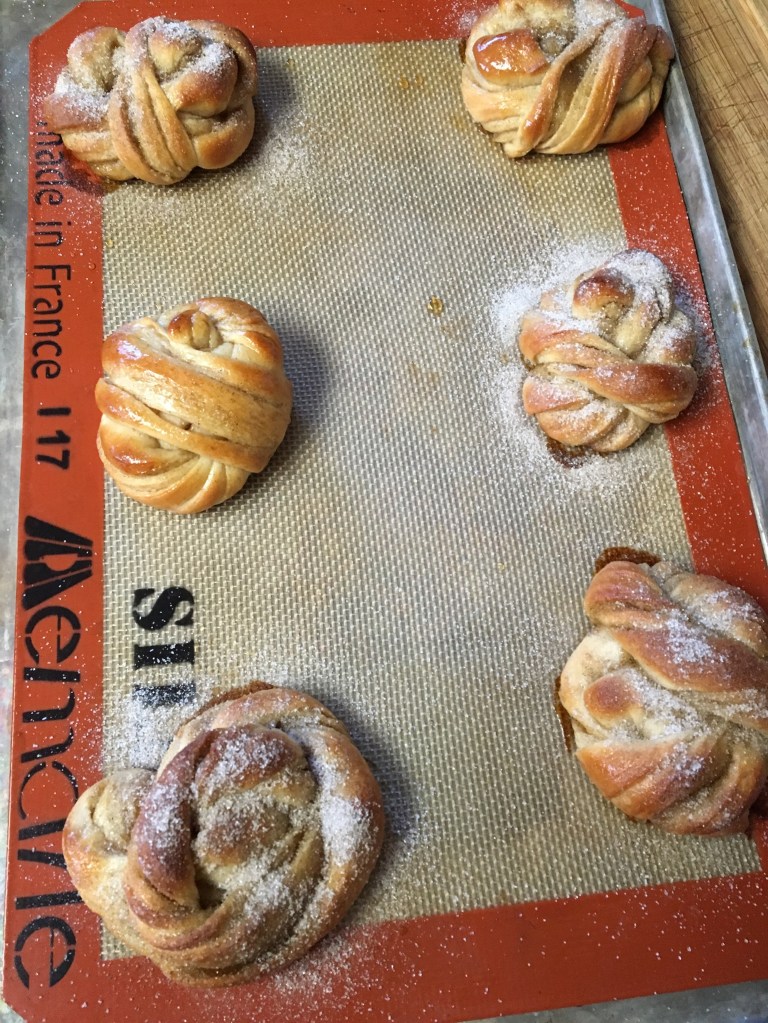
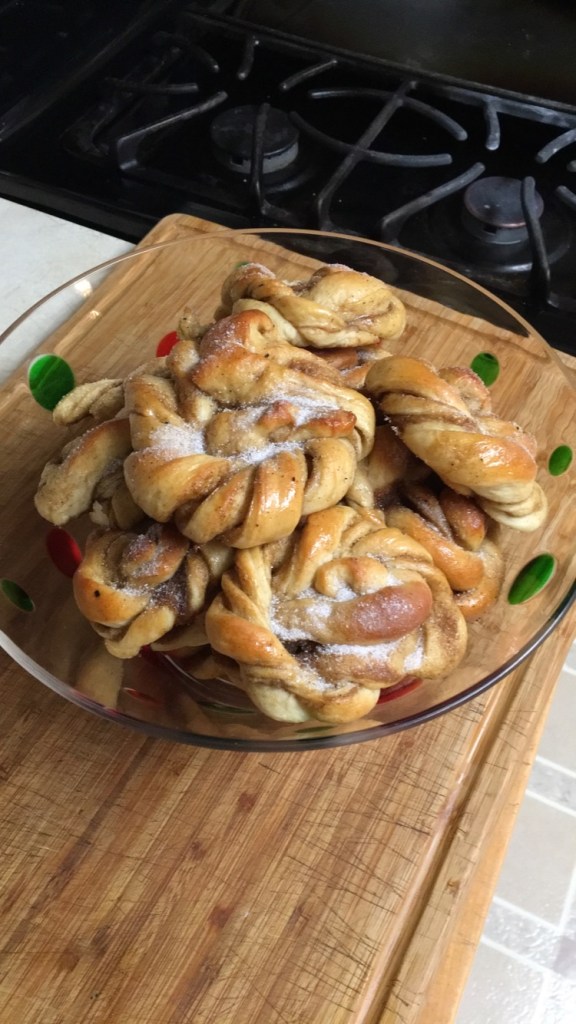
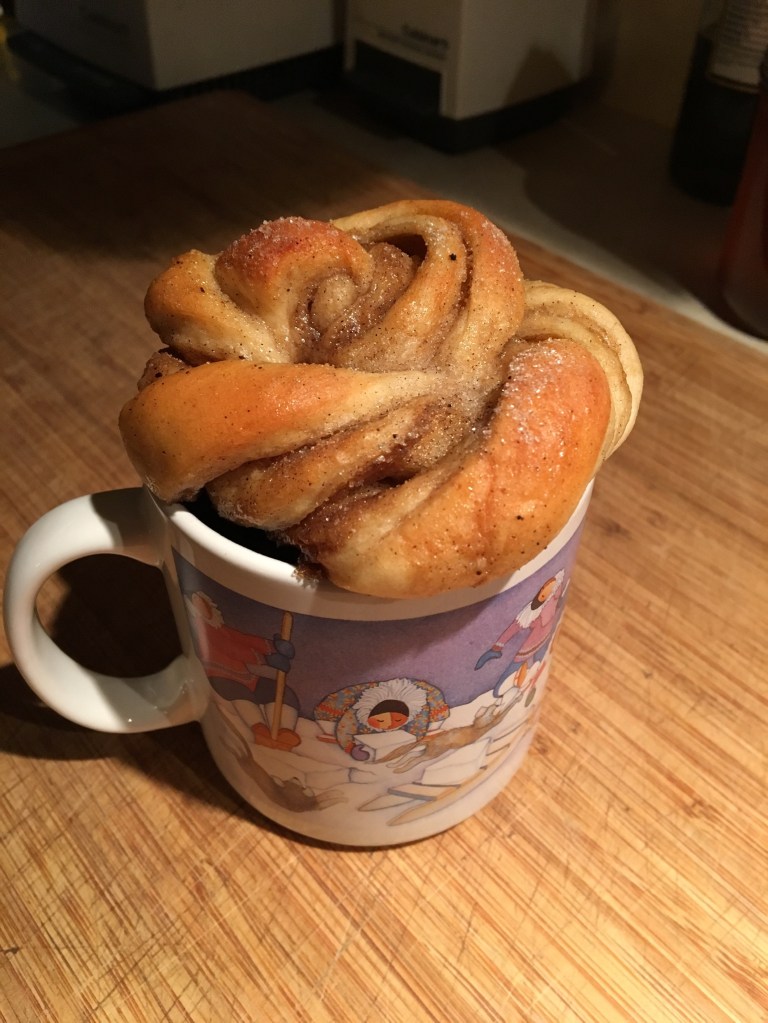
This recipe comes from fixfeastflair.com. I love the look of these and they taste amazing. That being said, I’d like to see a fluffier roll as these seem a bit dense to me. I’m probably doing something wrong. But it’s all good!
- Dough Ingredients
- 1 cup warm milk, heated to 110 degrees F
- 1 envelope (2-1/4 tsp.) active dry yeast
- 1/3 cup brown sugar
- 3-1/4 cups flour (I use bread flour)
- 1 tsp. ground cardamom
- 1/4 tsp. salt
- 5 Tbsp. butter, softened
In the bowl of a stand mixer, pour milk and sprinkle yeast over the top of the milk. Stir in a teaspoon of brown sugar. Let activate for about 10 minutes. Stir in the remaining brown sugar, about 2 cups flour, ground cardamom, salt, and butter. Using the dough-hook attachment, mix for several minutes to build up the gluten, scraping the bowl down every so often. Add flour a half-cup at a time until the dough comes away from the side of the bowl and is smooth to the touch. Let rise in a warm place until the dough is doubled, at least an hour.
- Filling ingredients
- 4 Tbsp. butter, softened
- 1/3 cup brown sugar
- 1-1/2 tsp. ground cardamom
While the dough is rising mix together the filling ingredients into a spreadable paste. Also prepare two or three baking sheets with parchment paper or Silpats.
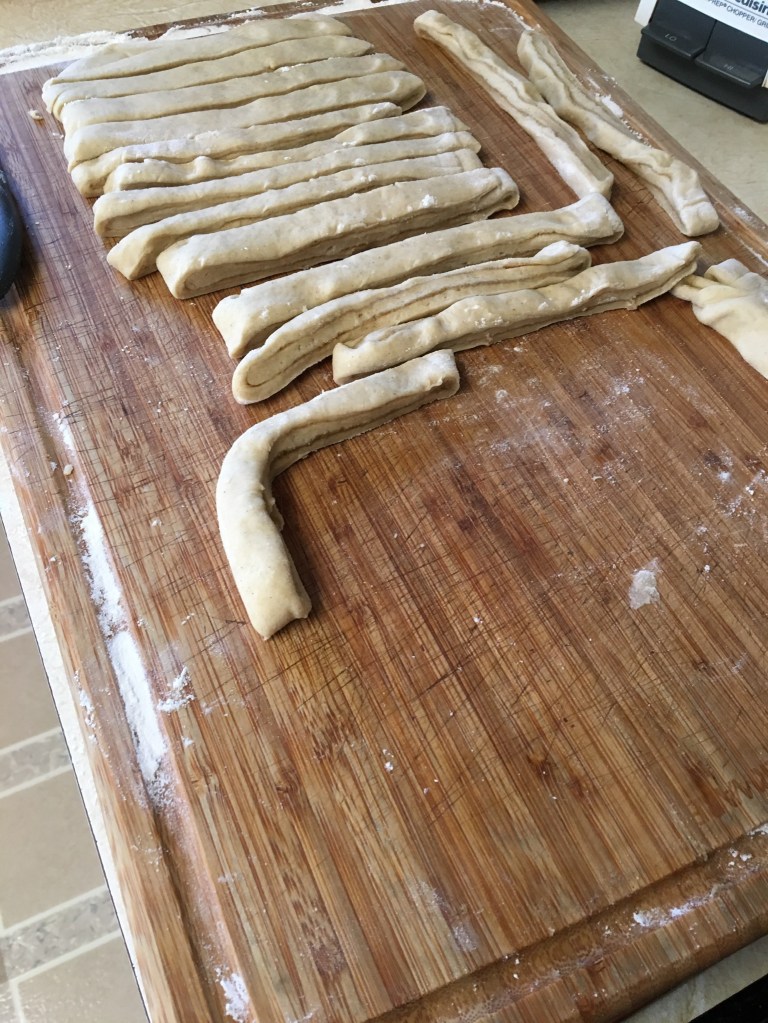
Once it’s risen acceptably, punch the dough down and roll out on a floured surface into a rectangle 21″ by 13″. Spread the filling over all the dough, all the way to the edges.
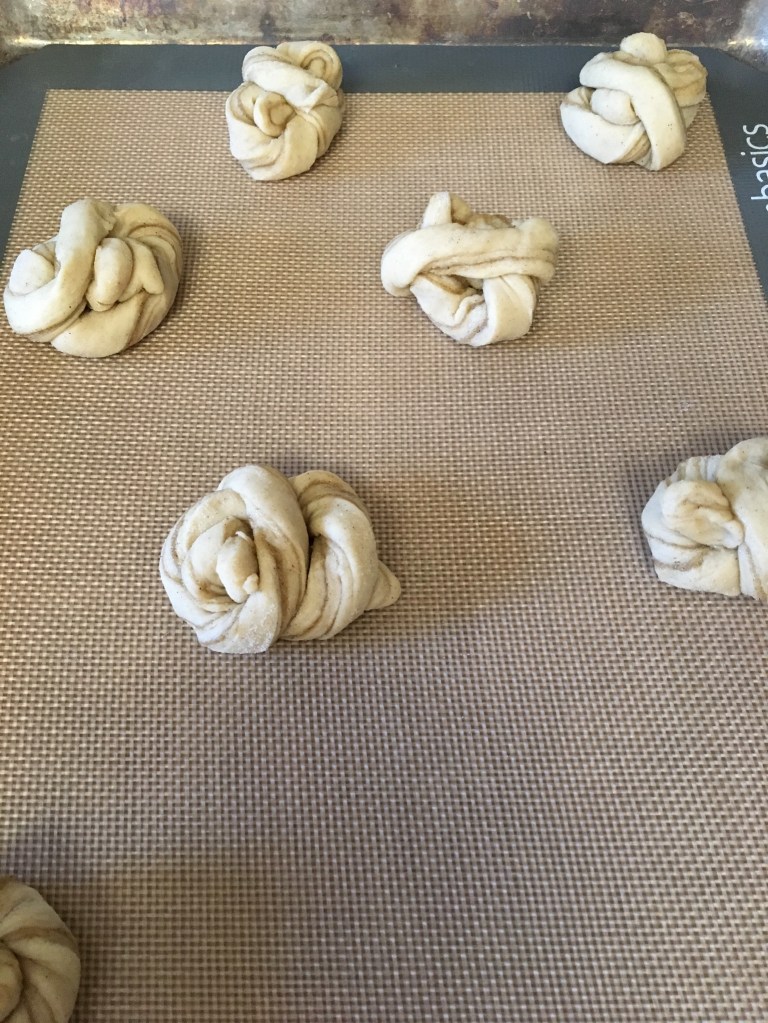
Fold the long side of the dough evenly into thirds toward the center (each third is 7″). Run the rolling pin over to compress slightly. Turn the dough so that the open ends are on the right and left sides. Starting at either left or right, cut the dough into thin strips. When finished, you should have 15 to 20 strips. Please go look at fixfeastflair.com to see how to do this next part. She’s got a gif that shows how to make the rolls. You take each strip and roll it around your hand, making sure the ends are firmly tucked underneath.
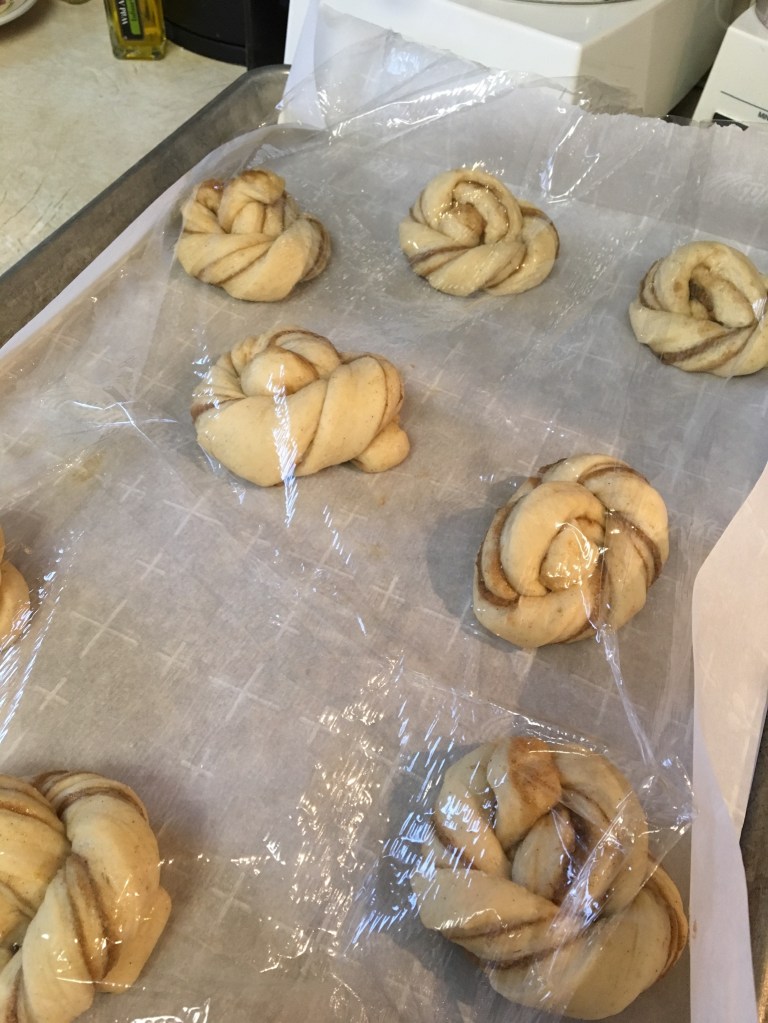
Set the rolls on the prepared baking pans and cover with plastic or a kitchen cloth. Let rise for about 30 minutes. The pictures are showing two different times I baked these, so don’t let that throw you off. I did it the same both times.
- Topping Ingredients
- 1/4 cup water
- 1/4 cup brown sugar
- 1/2 tsp. vanilla extract
- 1 Tbsp. sugar
- 1/2 Tbsp. ground cardamom
While the rolls are rising on the pans, in a small saucepan mix together water and brown sugar. Bring to a boil and remove from heat. Stir in vanilla extract. Set aside. In a small dish, stir together 1 Tbsp. sugar and 1/2 Tbsp. ground cardamom. Set aside.
Preheat oven to 425 degrees. Bake rolls for 8 to 10 minutes or until quite brown and baked through completely (don’t burn them, however).
While they’re still hot, brush with topping syrup and then sprinkle with sugar mixture. Remove to rack to cool. Serve while warm. Or not. These are so, so yummy!