You are currently browsing the category archive for the ‘Miscellaneous’ category.
I usually, not always, use Certo Liquid Fruit Pectin for my jam. The recipe booklet that I use is from 1975 when the liquid pectin came in bottles. Now the pectin comes in sealed envelopes and each envelope is equivalent to one half-bottle. As you can see, my recipe booklet is falling apart. The new recipe sheet that comes inside the packages now isn’t as comprehensive as the old one. I do not water-bath can my jam. There is enough sugar in it to act as a preservative. Using canning lids keeps air from getting in. When I was a child, my mother only used paraffin to cover the jam and many people still do it that way.
- This is how I prep for a jam-making session
- Set out enough sanitized jars and rings to match the yield of the recipe, either pints, cups, or half-cups.
- Put the appropriate number of lids into a small saucepan of water over low heat.
- Set out my canning funnel, a ladle, metal serving spoon, and small dish.
- Cut open the envelope of Certo and set it in the small dish.
- [The small dish is for the foam (which is just as delicious as the jam, only foamy)]
- Blueberry Jam
- Yield 9-1/2 cups (6 lb.)
- 4-1/2 cups prepared fruit (about 1-1/2 quarts fully ripe blueberries)
- 2 Tbsp. lemon juice
- 7 cups (3 lb.) sugar
- 2 envelopes Certo Liquid Fruit Pectin
Thoroughly crush, one layer at a time, about 1-1/2 quarts blueberries. Measure 4-1/2 cups into a very LARGE saucepan. Stir in lemon juice. Stir in sugar and mix well.
Over high heat, bring to a full rolling boil and boil hard 1 minute, stirring constantly. Remove from heat; at once stir in Certo. Skim the foam off with a metal spoon. Continue to stir and skim. Ladle into jars, leaving 1/2″ room at the top.
Wipe the rims of the jars and screw on the lids. Turn the jars upside down for at least thirty minutes (or as long as hours and hours–doesn’t matter). If the fruit is floating, give the jars a shake every once in awhile. Turn the jars right side up and let cool completely before marking and storing.
Many times it can take more than a day for the jam to set. Try not to worry. If it really does not set, then you have a nice batch of syrup or you can try to process it again. I have never done that, I just go the syrup route. C’est la vie.
I usually, not always, use Certo Liquid Fruit Pectin for my jam. The recipe booklet that I use is from 1975 when the liquid pectin came in bottles. Now the pectin comes in sealed envelopes and each envelope is equivalent to one half-bottle. As you can see, my recipe booklet is falling apart. The new recipe sheet that comes inside the packages now isn’t as comprehensive as the old one. I do not water-bath can my jam. There is enough sugar in it to act as a preservative. Using canning lids keeps air from getting in. When I was a child, my mother only used paraffin to cover the jam and many people still do it that way.
- This is how I prep for a jam-making session
- Set out enough sanitized jars and rings to match the yield of the recipe, either pints, cups, or half-cups.
- Put the appropriate number of lids into a small saucepan of water over low heat.
- Set out my canning funnel, a ladle, metal serving spoon, and small dish.
- Cut open the envelope of Certo and set it in the small dish.
- [The small dish is for the foam (which is just as delicious as the jam, only foamy)]
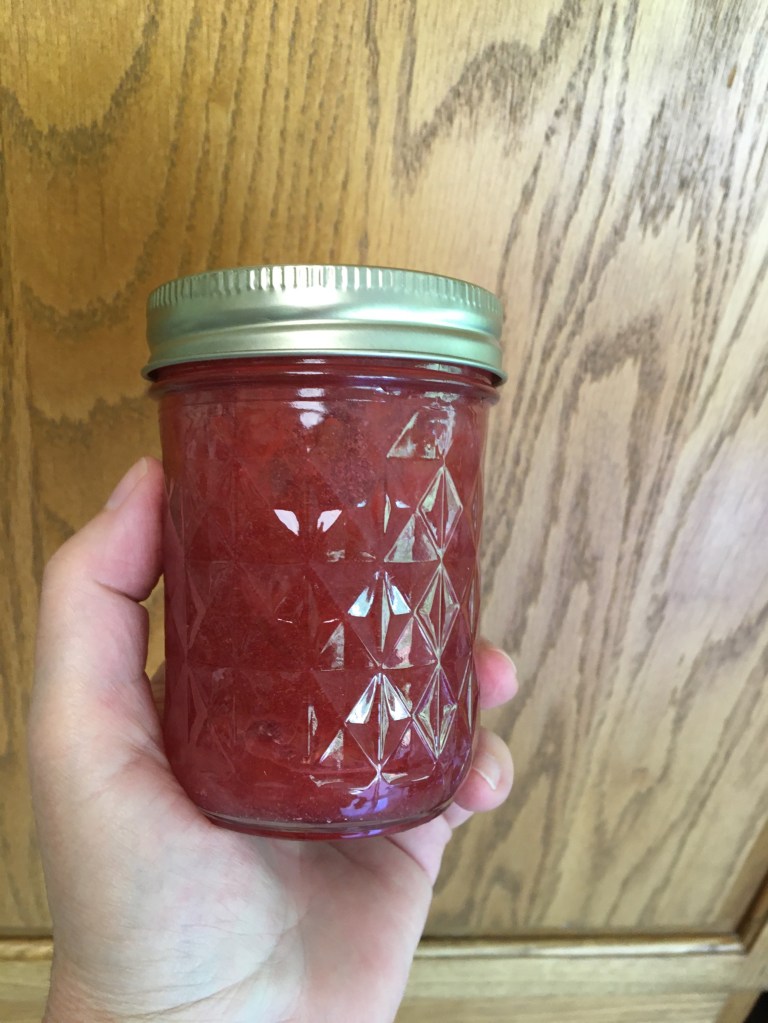
- Strawberry or Blackberry or Dewberry or Boysenberry or Youngberry Jam
- Yield 8 cups (5 lb.)
- 4 cups prepared fruit (about 2 qt. fully ripe berries)*
- 7 cups (3 lb.) sugar
- 1 envelope Certo Liquid Fruit Pectin
First, prepare fruit. Crush completely, one layer at a time, about 2 quarts fully ripe berries. (If desired, sieve half of pulp to remove some of the seeds.) Measure 4 cups into a very LARGE saucepan. *(With strawberries, or other berries lacking tartness, use 3-3/4 cups fruit and add 1/4 cup lemon juice.) Stir in sugar and mix well.
Over high heat, bring to a full rolling boil and boil hard 1 minute, stirring constantly. Remove from heat; at once stir in Certo. Skim the foam off with a metal spoon. Continue to stir and skim. Ladle into jars, leaving 1/2″ room at the top.
Wipe the rims of the jars and screw on the lids. Turn the jars upside down for at least thirty minutes (or as long as hours and hours–doesn’t matter). If the fruit is floating, give the jars a shake every once in awhile. Turn the jars right side up and let cool completely before marking and storing.
Many times it can take more than a day for the jam to set. Try not to worry. If it really does not set, then you have a nice batch of syrup or you can try to process it again. I have never done that, I just go the syrup route. C’est la vie.
Please check the updates below for making currant jelly without added pectin.
I usually, not always, use Certo Liquid Fruit Pectin for my jelly. The recipe booklet that I use is from 1975 when the liquid pectin came in bottles. Now the pectin comes in sealed envelopes and each envelope is equivalent to one half-bottle. As you can see, my recipe booklet is falling apart. The new recipe sheet that comes inside the packages now isn’t as comprehensive as the old one. I do not water-bath can my jelly. There is enough sugar in it to act as a preservative. Using canning lids keeps air from getting in. When I was a child, my mother only used paraffin to cover the jelly and many people still do it that way.
- This is how I prep for a jelly-making session
- Set out enough sanitized jars and rings to match the yield of the recipe, either pints, cups, or half-cups.
- Put the appropriate number of lids into a small saucepan of water over low heat.
- Set out canning funnel, ladle, metal serving spoon, and small dish.
- Cut open the envelope of Certo and set it in the small dish.
- [The small dish is for the foam (which is just as delicious as the jam, only foamy)]
- Currant Jelly: Yield 7-1/4 cups (5-1/2 lb.)
- 5 cups prepared juice (about 4 lb. fully ripe red currants)
- 7 cups (3 lb.) sugar
- 1 envelope Certo Liquid Fruit Pectin
First, prepare juice. Crush about 4 lb. (3 quarts) fully ripe red currants. Add 1 cup water; bring to a boil and simmer, covered, 10 minutes. Place in jelly bag; squeeze out juice. Measure 5 cups into a very LARGE saucepan. Add sugar and mix well.
Place over high heat and bring to a boil, stirring constantly. At once stir in Certo. Then bring to a full rolling boil and boil hard 1 minute, stirring constantly. Remove from heat, skim off foam with a metal spoon, and pour quickly into jars.
Wipe the rims of the jars and screw on the lids. Turn the jars upside down for at least thirty minutes (or as long as hours and hours–doesn’t matter). Turn the jars right side up and let cool completely before marking and storing.
Many times it can take more than a day for jelly to set. Try not to worry. If it really does not set, then you have a nice batch of syrup or you can try to process it again. I have never done that, I just go the syrup route. C’est la vie.
Update 8/21/2021 . . . I picked 3 cups currants and smashed them with a potato smasher. Put them over heat with a splash of water and brought to a boil. Let them boil for a couple minutes. Smashed the remaining whole berries with a wooden spoon. Turned off the heat and poured into a sieve over a smallish bowl. Stirred and scraped, trying to get as much juice as possible out of the berries without the seeds. The final yield was 1-1/3 cups currant juice. Juice poured back into the pan. Stirred in 2 cups sugar. Boiled until it reached the gel stage. I eyeballed this, the gel stage. Yield 1/2 pint and 2 1/4 pint jars. It’s gelled so, no problem. Did not use pectin additive. Delicious!
Another update 8/13/2025 . . . I picked 7.4 ounces of currants. Yes, less and less every year. Sigh. Anyway, I added 1/8 cup water and boiled and smashed the berries. Used my smallest jelly bag and let it strain for many hours. I ended up with 1/2 cup juice. In my very smallest sauce pan I placed the juice and 1/2 cup sugar. Boiled and simmered for not long, maybe fifteen minutes? Ran a gel test by putting a teaspoon of jelly on a cold saucer and ran my finger through it. It stayed put. Gelled! Yield was about 2/3 cup jelly. Not much, but I do love currant jelly on toast.
I could eat this peach jam out of the jar with a spoon, and have done so! I haven’t tried the pear jam, but it’s the same recipe so I included it in case you want to try it. One time the local grocery store was selling cases of bruised cooking peaches for a very low price. I thought I had died and gone to heaven. We had peachy desserts for quite a few days, along with this delicious peach jam.
- Peach or Pear Jam
- Yield: 9 cups (5-1/2 lb.)
- 4 cups prepared fruit (about 3 lb. fully ripe peaches or pears)
- 1/4 cup lemon juice
- 7-1/2 cups (3-1/4 lb.) sugar
- 1 envelope Certo Liquid Fruit Pectin
First, prepare fruit. Peel and pit fully ripe peaches; core fully ripe pears. Grind or chop very fine. Measure 4 cups into a very LARGE saucepan. Add lemon juice. Stir in sugar and mix well.
Place over high heat, bring to a full rolling boil and boil hard 1 minute, stirring constantly. Remove from heat; at once stir in Certo. Skim off foam with a metal spoon. Ladle into jars, leaving 1/2″ headspace.
Wipe the rims of the jars and screw on the lids. Turn the jars upside down for at least thirty minutes (or as long as hours and hours–doesn’t matter). If the fruit is floating, give the jars a shake every once in awhile. Turn the jars right side up and let cool completely before marking and storing.
Notes: I usually, not always, use Certo Liquid Fruit Pectin for my jam. The recipe booklet that I use is from 1975 when the liquid pectin came in bottles. Now the pectin comes in sealed envelopes and each envelope is equivalent to one half-bottle. As you can see, my recipe booklet is falling apart. The new recipe sheet that comes inside the packages now isn’t as comprehensive as the old one. I do not water-bath can my jam. There is enough sugar in it to act as a preservative. Using canning lids keeps air from getting in. When I was a child, my mother only used paraffin to cover the jam and many people still do it that way.
- This is how I prep for a jam-making session
- Set out enough sanitized jars and rings to match the yield of the recipe, either pints, cups, or half-cups.
- Put the appropriate number of lids into a small saucepan of water over low heat.
- Set out my canning funnel, a ladle, metal serving spoon, and small dish.
- Cut open the envelope of Certo and set it in the small dish.
- [The small dish is for the foam (which is just as delicious as the jam, only foamy)]
What do you do with this? Well, it goes good with lamb and also makes a beautiful presentation in Thumbprint Cookies at Christmastime, along with Raspberry Jam or Currant Jelly.
- Fresh Mint Jelly
- Yield: 3-1/4 cups (2-1/2 lb.)
- 1-3/4 cups mint infusion (1-1/2 cups fresh mint)
- 2 Tbsp. lemon juice
- Green food coloring (optional)
- 3-1/2 cups (1-1/2 lb.) sugar
- 1 envelope Certo Liquid Fruit Pectin
First, prepare mint infusion. Wash 1-1/2 cups firmly packed mint leaves and stems. Place in a large saucepan and crush with a masher or glass. Add 2-1/4 cups water and bring to a boil. Remove from heat, cover, and let stand 10 minutes. Strain. Measure 1-3/4 cups into saucepan. Add lemon juice and a few drops of green food coloring if you decided to use it. Stir in sugar and mix well.
Place over high heat and bring to a boil, stirring constantly. At once stir in Certo. Then bring to a full rolling boil and boil hard 1 minute, stirring constantly. Remove from heat, skim off foam with a metal spoon, and pour quickly into jars.
Wipe the rims of the jars and screw on the lids. Turn the jars upside down for at least thirty minutes (or as long as hours and hours–doesn’t matter). Turn the jars right side up and let cool completely before marking and storing.
Many times it can take more than a day for the jelly to set. Try not to worry. If it really does not set, then you have a nice batch of syrup or you can try to process it again. I have never done that, I just go the syrup route. C’est la vie.
I usually, not always, use Certo Liquid Fruit Pectin for my jelly. The recipe booklet that I use is from 1975 when the liquid pectin came in bottles. Now the pectin comes in sealed envelopes and each envelope is equivalent to one half-bottle. My recipe booklet is falling apart. The new recipe sheet that comes inside the packages now isn’t as comprehensive as the old one. I do not water-bath can my jelly. There is enough sugar in it to act as a preservative. Using canning lids keeps air from getting in. When I was a child, my mother only used paraffin to cover the jelly and many people still do it that way.
- This is how I prep for a jelly-making session
- Set out enough sanitized jars and rings to match the yield of the recipe, either pints, cups, or half-cups.
- Put the appropriate number of lids into a small saucepan of water over low heat.
- Set out my canning funnel, a ladle, metal serving spoon, and small dish.
- Cut open the envelope of Certo and set it in the small dish.
- [The small dish is for the foam (which is just as delicious as the jelly, only foamy)]
I usually, not always, use Certo Liquid Fruit Pectin for my jam. The recipe booklet that I use is from 1975 when the liquid pectin came in bottles. Now the pectin comes in sealed envelopes and each envelope is equivalent to one half-bottle. As you can see, my recipe booklet is falling apart. The new recipe sheet that comes inside the packages now isn’t as comprehensive as the old one. I do not water-bath can my jam. There is enough sugar in it to act as a preservative. Using canning lids keeps air from getting in. When I was a child, my mother only used paraffin to cover the jam and many people still do it that way.
- This is how I prep for a jam-making session
- Set out enough sanitized jars and rings to match the yield of the recipe, either pints, cups, or half-cups.
- Put the appropriate number of lids into a small saucepan of water over low heat.
- Set out my canning funnel, a ladle, metal serving spoon, and small dish.
- Cut open the envelope of Certo and set it in the small dish.
- [The small dish is for the foam (which is just as delicious as the jam, only foamy)]

- Rhubarb Jam
- Yield: 6-1/4 cups (4 lb.) jam
- 3 cups prepared fruit (about 2 lb. rhubarb)
- 5-1/2 cups (2 lb. 6 oz.) sugar
- 1 envelope Certo Liquid Fruit Pectin
First, prepare fruit. Slice thin or chop about 2 pounds rhubarb. Put the rhubarb into a medium saucepan, add 3/4 cup water, and bring to a boil over medium heat. Reduce heat to simmer, covered, until the rhubarb is soft — about 1 minute. Measure 3 cups into a LARGE pan. Add sugar to pan and mix well.
Over high heat, bring to a full rolling boil and boil hard 1 minute, stirring constantly. Remove from heat; at once stir in Certo. Skim the foam off with a metal spoon. Continue to stir and skim. Ladle into jars, leaving 1/2″ room at the top.

Wipe the rims of the jars and screw on the lids. Turn the jars upside down for at least thirty minutes (or as long as hours and hours–doesn’t matter). If the fruit is floating, give the jars a shake every once in awhile. Turn the jars right side up and let cool completely before marking and storing.

Many times it can take more than a day for the jam to set. Try not to worry. If it really does not set, then you have a nice batch of syrup or you can try to process it again. I have never done that, I just go the syrup route. C’est la vie.

I usually, not always, use Certo Liquid Fruit Pectin for my jam. The recipe booklet that I use is from 1975 when the liquid pectin came in bottles. Now the pectin comes in sealed envelopes and each envelope is equivalent to one half-bottle. My recipe booklet is falling apart. The new recipe sheet that comes inside the packages now isn’t as comprehensive as the old one. I do not water-bath can my jam. There is enough sugar in it to act as a preservative. Using canning lids keeps air from getting in. When I was a child, my mother only used paraffin to cover the jam and many people still do it that way. I have heard that you should not increase the recipe and/or cut the amount of sugar, something about cooking time and setting and preserving. So, stick to the recipe.
- This is how I prep for a jam-making session
- Set out enough sanitized jars and rings to match the yield of the recipe, either pints, cups, or half-cups.
- Put the appropriate number of lids into a small saucepan of water over low heat.
- Set out my canning funnel, a ladle, metal serving spoon, and small dish.
- Cut open the envelope of Certo and set it in the small dish.
- [The small dish is for the foam (which is just as delicious as the jam, only foamy)]
- Rhubarb-Strawberry Jam
- Yield: 6-1/4 cups (4 lb.) jam
- 3-1/2 cups prepared fruit (about 1 lb. rhubarb and 1 quart strawberries)
- 6-1/2 cups (2 lb. 6 oz.) sugar
- 1 envelope Certo Liquid Fruit Pectin
Slice one pound rhubarb and put into saucepan. Add 1/4 cup water and bring to a boil. Reduce heat and let simmer until rhubarb is soft, about 1 minute. Thoroughly crush about 1 quart fully ripe strawberries. Mix the fruits together and measure out 3-1/2 cups. Place the fruit in a LARGE pan. Add sugar to pan and mix well.
Over high heat, bring to a full rolling boil and boil hard 1 minute, stirring constantly. Remove from heat; at once stir in Certo. Skim the foam off with a metal spoon. Continue to stir and skim. Ladle into jars, leaving 1/2″ room at the top.
Wipe the rims of the jars and screw on the lids. Turn the jars upside down for at least thirty minutes (or as long as hours and hours–doesn’t matter). If the fruit is floating, give the jars a shake every once in awhile. Turn the jars right side up and let cool completely before marking and storing.
Many times it can take more than a day for the jam to set. Try not to worry. If it really does not set, then you have a nice batch of syrup or you can try to process it again. I have never done that, I just go the syrup route. C’est la vie.

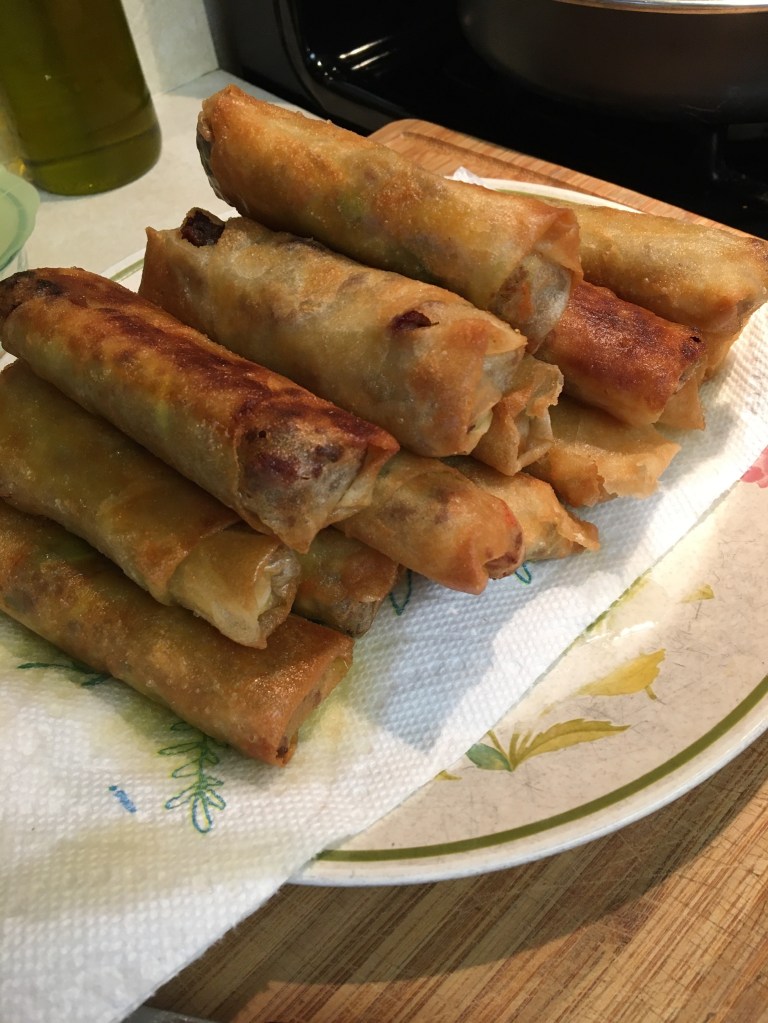
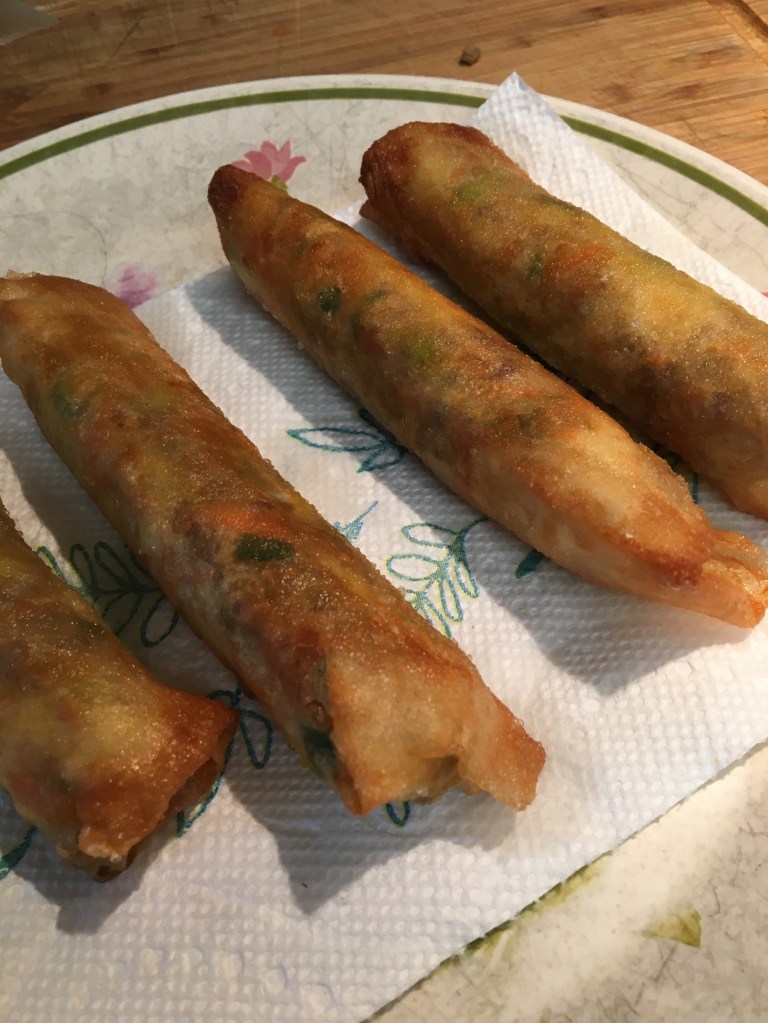
I want to put this on the blog so I can remember what I did because these turned out awesome and are easy to make. It was my first time making them myself. I’ve eaten them many times. All in all, I approached this with a great deal of trepidation, but it turned out to be a lot easier than I thought and I’m well-pleased with the results. It’s something I should make again. I put a lot of notes at the end.
- Ingredient List
- 1-2 Tbsp. cooking oil
- 1 lb. ground pork
- 1/2 cup minced onion
- 3 minced garlic cloves
- 1/2 cup shredded carrot
- 1/2 cup thinly sliced cabbage
- 1/2 cup chopped green onion
- Salt and pepper
- 1 Tbsp. soy sauce
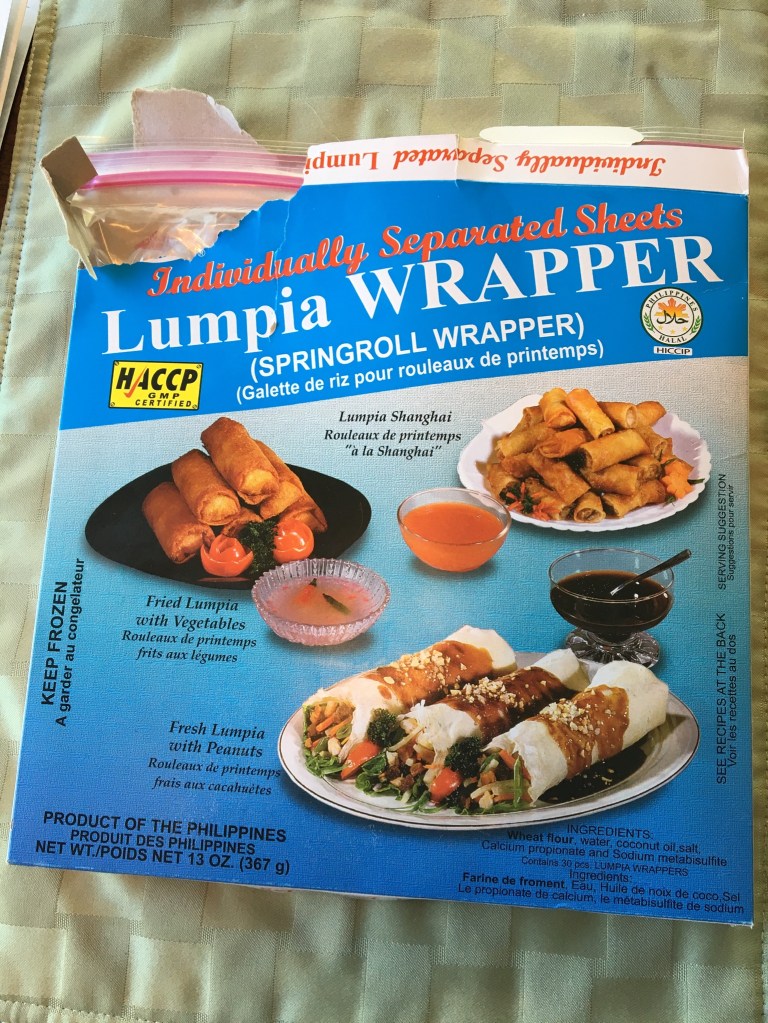
- Lumpia wrappers (14-15 should do it), thawed
- Cooking oil for frying
- Sweet Chili Sauce
Coat the bottom of a skillet with cooking oil and fry the ground pork until no longer pink. Remove from skillet to bowl. Strain off, and discard, all but a couple tablespoons of fat. In the skillet, stir fry onion and garlic until onion is translucent. Stir in vegetables, cooked pork, salt and pepper, and soy sauce. Keep the skillet over heat just a little while to soften the vegetables slightly. They will continue cooking off the heat. Remove from heat and let cool to room temperature.
Set a lumpia wrapper in front of you and place about 3 Tbsp. of filling near the bottom of the wrapper sheet. Roll up a little way, then fold in the sides to make an envelope. Dap the remaining wrapper edge with water and continue rolling. Check to make sure the seam is sealed.
Set the roll onto a plate and go onto the next one. Once you’re finished with the rolls, heat about 1/2-1″ oil in a skillet medium-hot. Using tongs set lumpia into oil. Turn to another side once the first side is brown and continue this way until the roll is brown all over. Remove from skillet and set on paper towels to soak extra oil. Wait till they cool off a little before dipping in Sweet Chili Sauce and wolfing down.
- NOTES
- I use real lumpia wrappers. They are round, about 8″ diameter. They came in a box that was supposed to be frozen, but was thawed by the time it got into my house. I kept the box in the refrigerator for a couple days and they worked just fine. There was no indication of how many were in the box, but my estimate is more than 30. This recipe made 14 lumpia. Lumpia wrappers are incredibly thin. I watched a video of how they’re made and basically the dough is just smeared across the frying pan and then peeled off. Thank goodness the box of wrappers has plastic between each wrapper. The plastic sheet may be thicker than the lumpia wrapper itself.
- Online I’ve seen that many people use egg-roll wrappers instead of lumpia wrappers. I cannot speak to that as I’ve never tried it.
- The good reason for using cooked filling ingredients, rather than raw, is that you can fry the lumpia quickly and get that nice crispy outside texture without worry that the meat is cooked through on the inside. The frying part of this went very, very quickly on a fairly high oil temperature.
- Once you dab water on the lumpia wrapper you need to finish rolling it immediately or the wrapper disintegrates. Just sayin’.
- My friend who makes these a lot uses pork, carrots, cabbage, and french-cut green beans. The filling recipe is flexible and I think every family has their own way of doing it.
- I read online someone said the filling is easier to work with if it’s been refrigerated. That sounds right. I think you’d end up with more uniform rolls and could make them larger.
- Also, I read that you can very easily freeze the lumpia rolls before you fry them, just make sure to separate with wax paper or something like that so they won’t stick to each other. Don’t thaw first, but be careful of spatter while you’re frying frozen food. You might have to fry at a lower temperature, too, but I’m not sure as I have not tried this.
- Lumpia was our dinner and two of us ate a dozen of them.


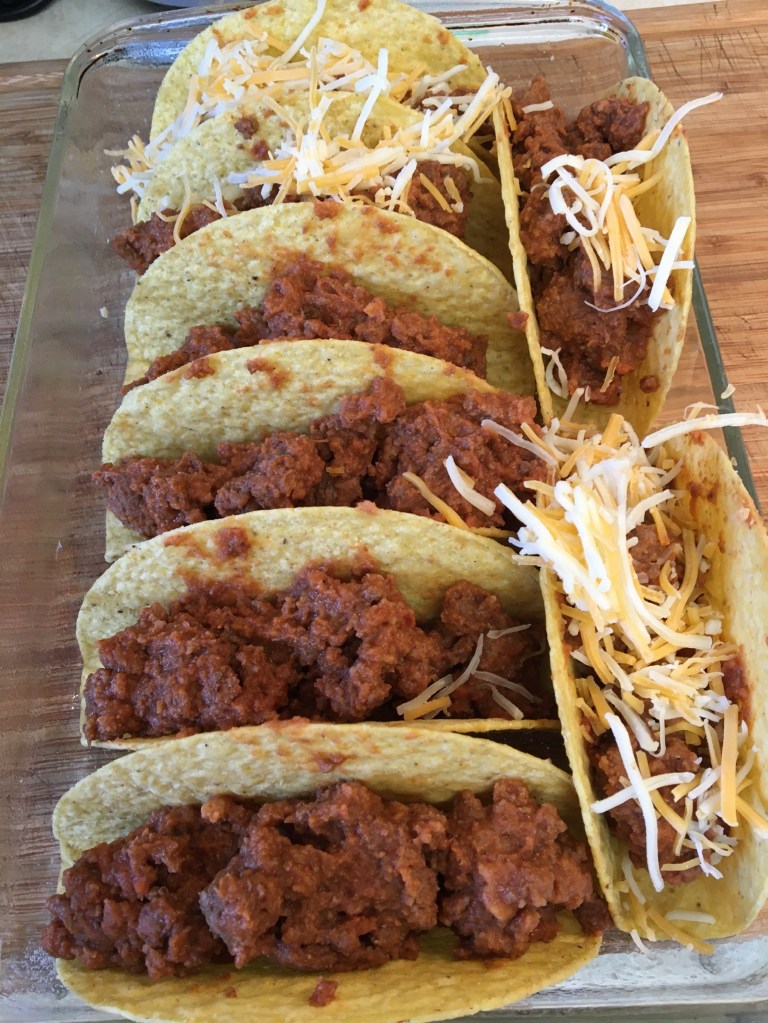
This is a super fast and delicious dish. The recipe started at OneGoodThingByJillee. Hers makes a ton, so I’ve cut it down and changed it slightly. I use Old El Paso brand Stand ‘n Stuff taco shells. There are ten shells in each box. In an 11×7″ baking dish you can fit 8 shells and that makes plenty for three people. They stand up beautifully, so there’s very little finagling. They are gluten-free. If you do not have access to these beauties, you’ll have to eyeball things to make it work. Jill has instructions on her site on how to make hard-shells from soft corn tortillas. I did try that one time, but I found it to be too tricky. The very best thing on Jill’s site is her recipe for taco seasoning and I make that ALL the time. I added a triple-recipe below.

- Baked Taco Ingredients
- 1 lb. ground beef
- 3 Tbsp. taco seasoning (or one store-bought envelope)
- 8 oz. can tomato sauce
- 1 cup (1/2 of a 15oz. can) refried beans
- 8 Stand ‘n Stuff taco shells
- 1 cup shredded cheddar or Mexican mix cheese
- Toppings of your choice (sour cream, salsa, jalapenos, etc.)
Prepare an 11×7″ baking dish by spraying with non-stick spray. Preheat oven to 400 degrees F.
In a frying pan, brown ground beef. Sprinkle with taco seasoning and then stir in tomato sauce and refried beans. Set the taco shells into the dish as pictured. Distribute the ground beef mixture evenly into all the taco shells. Sprinkle shredded cheese over all the shells. Bake at 400 degrees for ten minutes or until the cheese is melted. Top with your favorite toppings. Voila! Done! Inhale!

- Triple-Batch Taco Seasoning Ingredients
- 6 Tbsp. chili powder (I use ancho chili powder)
- 1-1/2 tsp. garlic powder
- 1-1/2 tsp. onion powder
- 1-1/2 tsp. red pepper flakes
- 1-1/2 tsp. dried oregano
- 1 Tbsp. paprika
- 3 Tbsp. ground cumin
- 3 Tbsp. kosher salt
- 2 Tbsp. pepper
Mix all together and use 2-3 Tbsp. for each pound of meat. For tacos, I sprinkle it over cooked ground beef, then stir in a little water and cook until the water evaporates. I also use this mix on beef or chicken fajita-makings and other types of meat. I sprinkle it on before or after cooking, it just depends. No rules! This batch should last you a good long while.

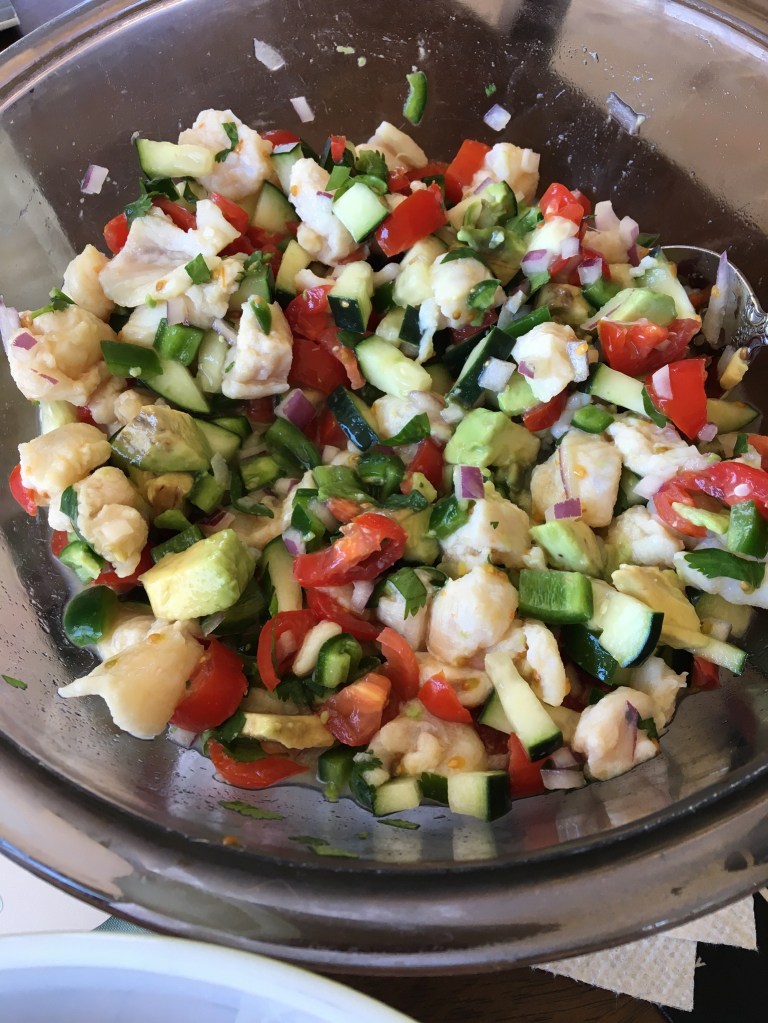
I ate half of this all by myself. Burp. The recipe from my cousin Pam calls for 6 Swai fillets and yields about 10-12 servings as a snack. I cut the recipe and used two fillets. It still makes enough to feed four, or three if one of them eats half of it. Just sayin’. I’m going to list the ingredients, but the amounts are really up to you.
- Ingredients
- Swai fillets (I have used other whitefish at different times, still quite tasty)
- Lime juice
- Salt
- Tomatoes, diced
- Cucumbers, diced
- Jalapenos or serranos (pictured here are jalapenos), diced
- Red onion, diced
- Cilantro, chopped
- Avocado, diced
- Tortilla chips
Slice the fish into tidbits, about 1/2″ pieces. Place into a large bowl and cover with lime juice. This time I used bottled lime juice, but I’ve also squeezed fresh — takes a lot of limes! Make sure there is enough lime juice to cover the fish. Sprinkle generously with salt (for 2 Swai fillets I used about 1/2 Tbsp. salt). Cover the bowl and let stand refrigerated for an hour (longer is fine).
Chop remaining ingredients, except avocado and chips, and stir into the fish mix. Taste for salt and add more if needed. Cover and let stand refrigerated for an hour (longer is fine).
Just before serving, stir in the avocado. Serve with tortilla chips.