
Anchorage True Value Hardware had their annual “Ladies Night” last week. What a great marketing ploy! No parking spaces remained. My husband drove my daughter and I in the car, and then picked us up when it was over two hours later. There were hundreds of women lining the aisles of paint supplies, power tools, housewares, and Christmas decorations, all waiting to get their card stamped at each guest-table for an entry into the grand prize drawing of a barbecue grill worth hundreds of dollars. The store also drew tickets for gift baskets valued at $200 to $400 every fifteen minutes, like clockwork. Since we arrived wearing the requisite ugly sweater and/or Aloha shirt, we were each issued an additional door prize ticket. The guest tables sprinkled throughout the store were mostly food-related, ranging from Shagi’s Sauces to Great Alaska Pizza Company. They gave us each a sample and then stamped our card. Bummer, but we didn’t win anything.
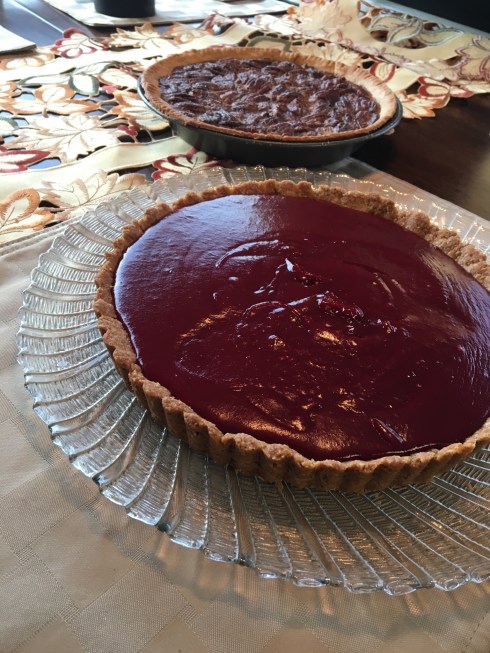
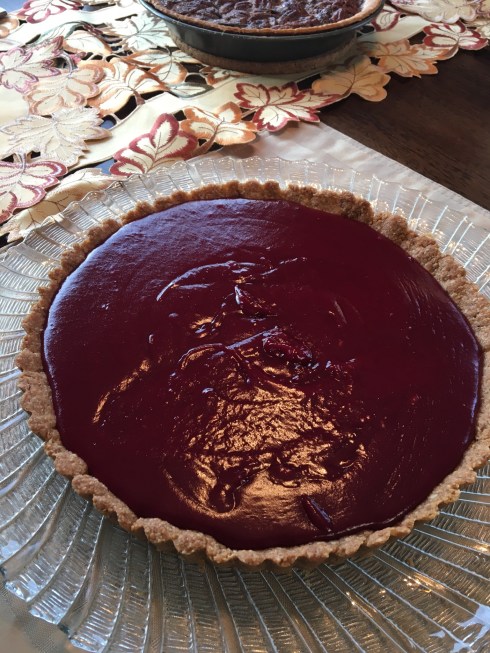
Of course, browsing led to buying and I purchased a set of tart pans. I’ve been wanting some since the whole gluten-free issue entered my life, because there are so many tart recipes that use almond flour and don’t require a rolling pin. I do own a rolling pin and I do use it to roll out bread dough and crush graham crackers, but that’s the extent of it. I still can’t make a pie crust. Anyway, the whole tart thing became something I was wanting to try. The pictures won’t be great, but I need to get this down so I can remember what and how I did this. It turned out so much better than I expected!
HOW TO DO IT
You will need a 9″ tart pan with a removable bottom. My tart pans are not coated with a non-stick finish and since this was my first foray into tart-making, I was a little freaked out about having a mess all stuck to the pan. I sprayed the pan. In retrospect I may not have had to do that, but it didn’t hurt anything.
For the crust recipe I used Shiny Cooking’s walnut-oat pie crust. I followed her instructions precisely and it could not have turned out any better.
- Crust Ingredients
- 1-1/3 cups gluten-free rolled oats (not quick oats)
- 1 cup walnuts (do not chop them yet)
- 1/3 cup brown sugar, firmly packed
- 1/4 tsp. salt
- 6 Tbsp. melted butter
Preheat the oven to 350 degrees F. Sprinkle the oats in a round cake pan and place in the preheated oven. Sprinkle the walnuts in another round cake pan and also place in the preheated oven. Shake the pans around every once in awhile until the walnuts release their fragrance and start turning brown. Watch carefully as you do not want them too brown or scorched. The walnuts will be done soonest, about 8 minutes. Remove walnuts from the oven. Let them cool a couple minutes and then rough chop with a knife. The oats take longer to toast, about 15 minutes. Remove from oven just as they start turning golden.
Place the rough-chopped walnuts and the oats into a food processor with the brown sugar and salt. Whir (is that even a word?) until it’s all very fine. Slowly pour the melted butter in through the top of the food processor while the mixture is whirring. When the mixture is mostly sticking together remove from food processor.
I took a pinch at a time of the dough and, starting on the sides, pressed the dough into the tart pan. I tried to fill every crevice all the way to the top of the sides. Try to be careful when pressing dough into that space where the removable bottom meets the side-ring. Removing the bottom may be a bit tricky if you get dough beneath it.
Bake at 350 degrees for about 14 minutes. The crust should be just turning brown. Mine took about 17 minutes. Set on a rack to cool. Let it cool completely before messing with it any more.

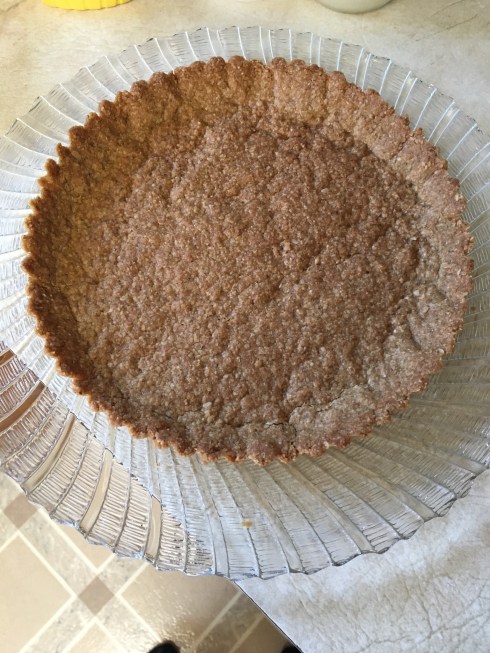
Have a plate ready to put the tart crust on. There’s science involved in the pan removal. As it cools, the crust contracts or the metal expands . . . one of those things happen, so you should be able to see that the crust is no longer tight up against the pan. Gingerly push up beneath the center bottom so that the sides fall downward. Now very, very carefully remove the bottom. I found I had to run my thumbnail along the edge in order to loosen it, I had a tiny amount of dough between the bottom and the sides. It wasn’t a big deal. Again carefully, set the crust on the prepared plate. Whew! You did it!
Now, onto the filling. This is the easy part. I used this super simple recipe from Dinner with Julie.
- Lingonberry curd filling ingredients
- 3 cups fresh or frozen lingonberries (may substitute cranberries)
- 1 cup sugar
- 1 lemon, zest and juice
- 1/2 cup butter cut into small pieces
- 2 eggs AND 2 egg yolks
In a saucepan, mix together lingons, sugar, lemon zest, and lemon juice. Stir over medium heat until the lingons are soft and the skins start to pop. Remove from heat and pour through a sieve (scrape down the saucepan and set it aside, you’ll need it again in a few minutes). Press the mixture through the sieve so that you get as much pulp as possible. Discard the solids, or use for a different purpose. Immediately stir the butter into the strained juice. Stir occasionally until all the butter is melted. Pour the mixture back into the saucepan. Whisk in the eggs and egg yolks. Whisk constantly over medium heat until the curd becomes bubbly and thick.
Remove from heat. You can strain the curd if you don’t want any little bits of lemon zest or egg in it, but that’s one step too far for me. I stirred the curd off the heat for a few minutes so that it wouldn’t be too hot when I poured it into my crust which I was still freaking out about, sure that some horrible thing would happen to crack my crust or cause it to get soggy. None of that happened. It was simply perfect. But this is what I did and how I did it. Let the tart cool at room temperature. It is ready to serve once cooled. I made mine one day ahead and then stowed it in the refrigerator over night. Still perfect.

1 comment
Comments feed for this article
January 8, 2019 at 9:08 am
Gluten-Free Tart Crusts | Foods Passion
[…] can find my first foray into tart crusts here with the Lingonberry Curd Tart, also a gluten-free crust. There are a lot of almond-flour crust recipes on the web and the two in this post I have recently […]