
You are currently browsing the category archive for the ‘Breakfast’ category.

- Ingredients
- 3 mashed bananas
- 1 egg
- 1/4 cup brown sugar
- 2 cups rolled oats
- 1/4 cup gluten-free flour (or other)
- 1/2 tsp. cinnamon
- 1/2 tsp. baking soda
- 1/4 tsp. salt
- 1 cup berries
Prepare an 8″ or 9″ square baking dish with parchment paper or non-stick spray. Preheat oven to 350 degrees F.
In a mixing bowl stir together banana, egg, and brown sugar until well mixed. Stir in oats, flour, cinnamon, baking soda, and salt until well mixed.
Pour half the batter into the prepared baking dish and smooth the top. Sprinkle berries over the batter. Dollop the remaining batter to cover the berries.
Bake at 350 degrees for 30-35 minutes until bars are set.
NOTES: I’ve made this many, many times now. It’s super simple. I’ve been short a banana and even that worked. There isn’t much flour in these, so the type of flour is not important for the recipe. I use gluten-free so that I can share them with a family member, but all-purpose or whole wheat flour works for the recipe, too. I’ve tried fresh blueberries and both fresh and frozen (and then thawed) raspberries (red and gold). I feel confident that you could use frozen berries as well. I pick loads of raspberries every summer and freeze and vacuum seal them. Once thawed, they are a bit of a mess, so I drain out the juice without squeezing and then sprinkle the remaining pulp over the batter as per the recipe. One pound of frozen raspberries yields me about one cup juice and one cup berry pulp. The pulp works just right for this recipe. I’m going to use the juice for a different purpose. The original recipe is found at thisdelicioushouse. I really like these bars because they don’t use much sugar or flour. The stars of the recipe are the bananas, the oats, and the fruit.

- Batter Ingredients
- 1/2 cup milk
- 1 Tbsp. sour cream
- 2 Tbsp. melted butter
- 1/2 tsp. vanilla extract
- 2 eggs
- 2/3 cup flour
- 1 Tbsp. sugar
- 1/2 Tbsp. baking powder
- Filling Ingredients
- 1-1/2 cups ricotta
- 4 oz. cream cheese
- 1 egg
- 3 Tbsp. sugar
- 1/2 Tbsp. lemon zest
- 1 Tbsp. lemon juice
- 1/4 tsp. vanilla extract
- 1/2 tsp. salt
- Sauce Ingredients
- This is up to you. If you want to make your own, then try 2/3 cup fresh fruit mixed in a saucepan with 2/3 cup sugar. Bring to a boil and let simmer 5-10 minutes. Or use syrup. Or use something you’ve picked up from the store, or from a friend. It’s all good!
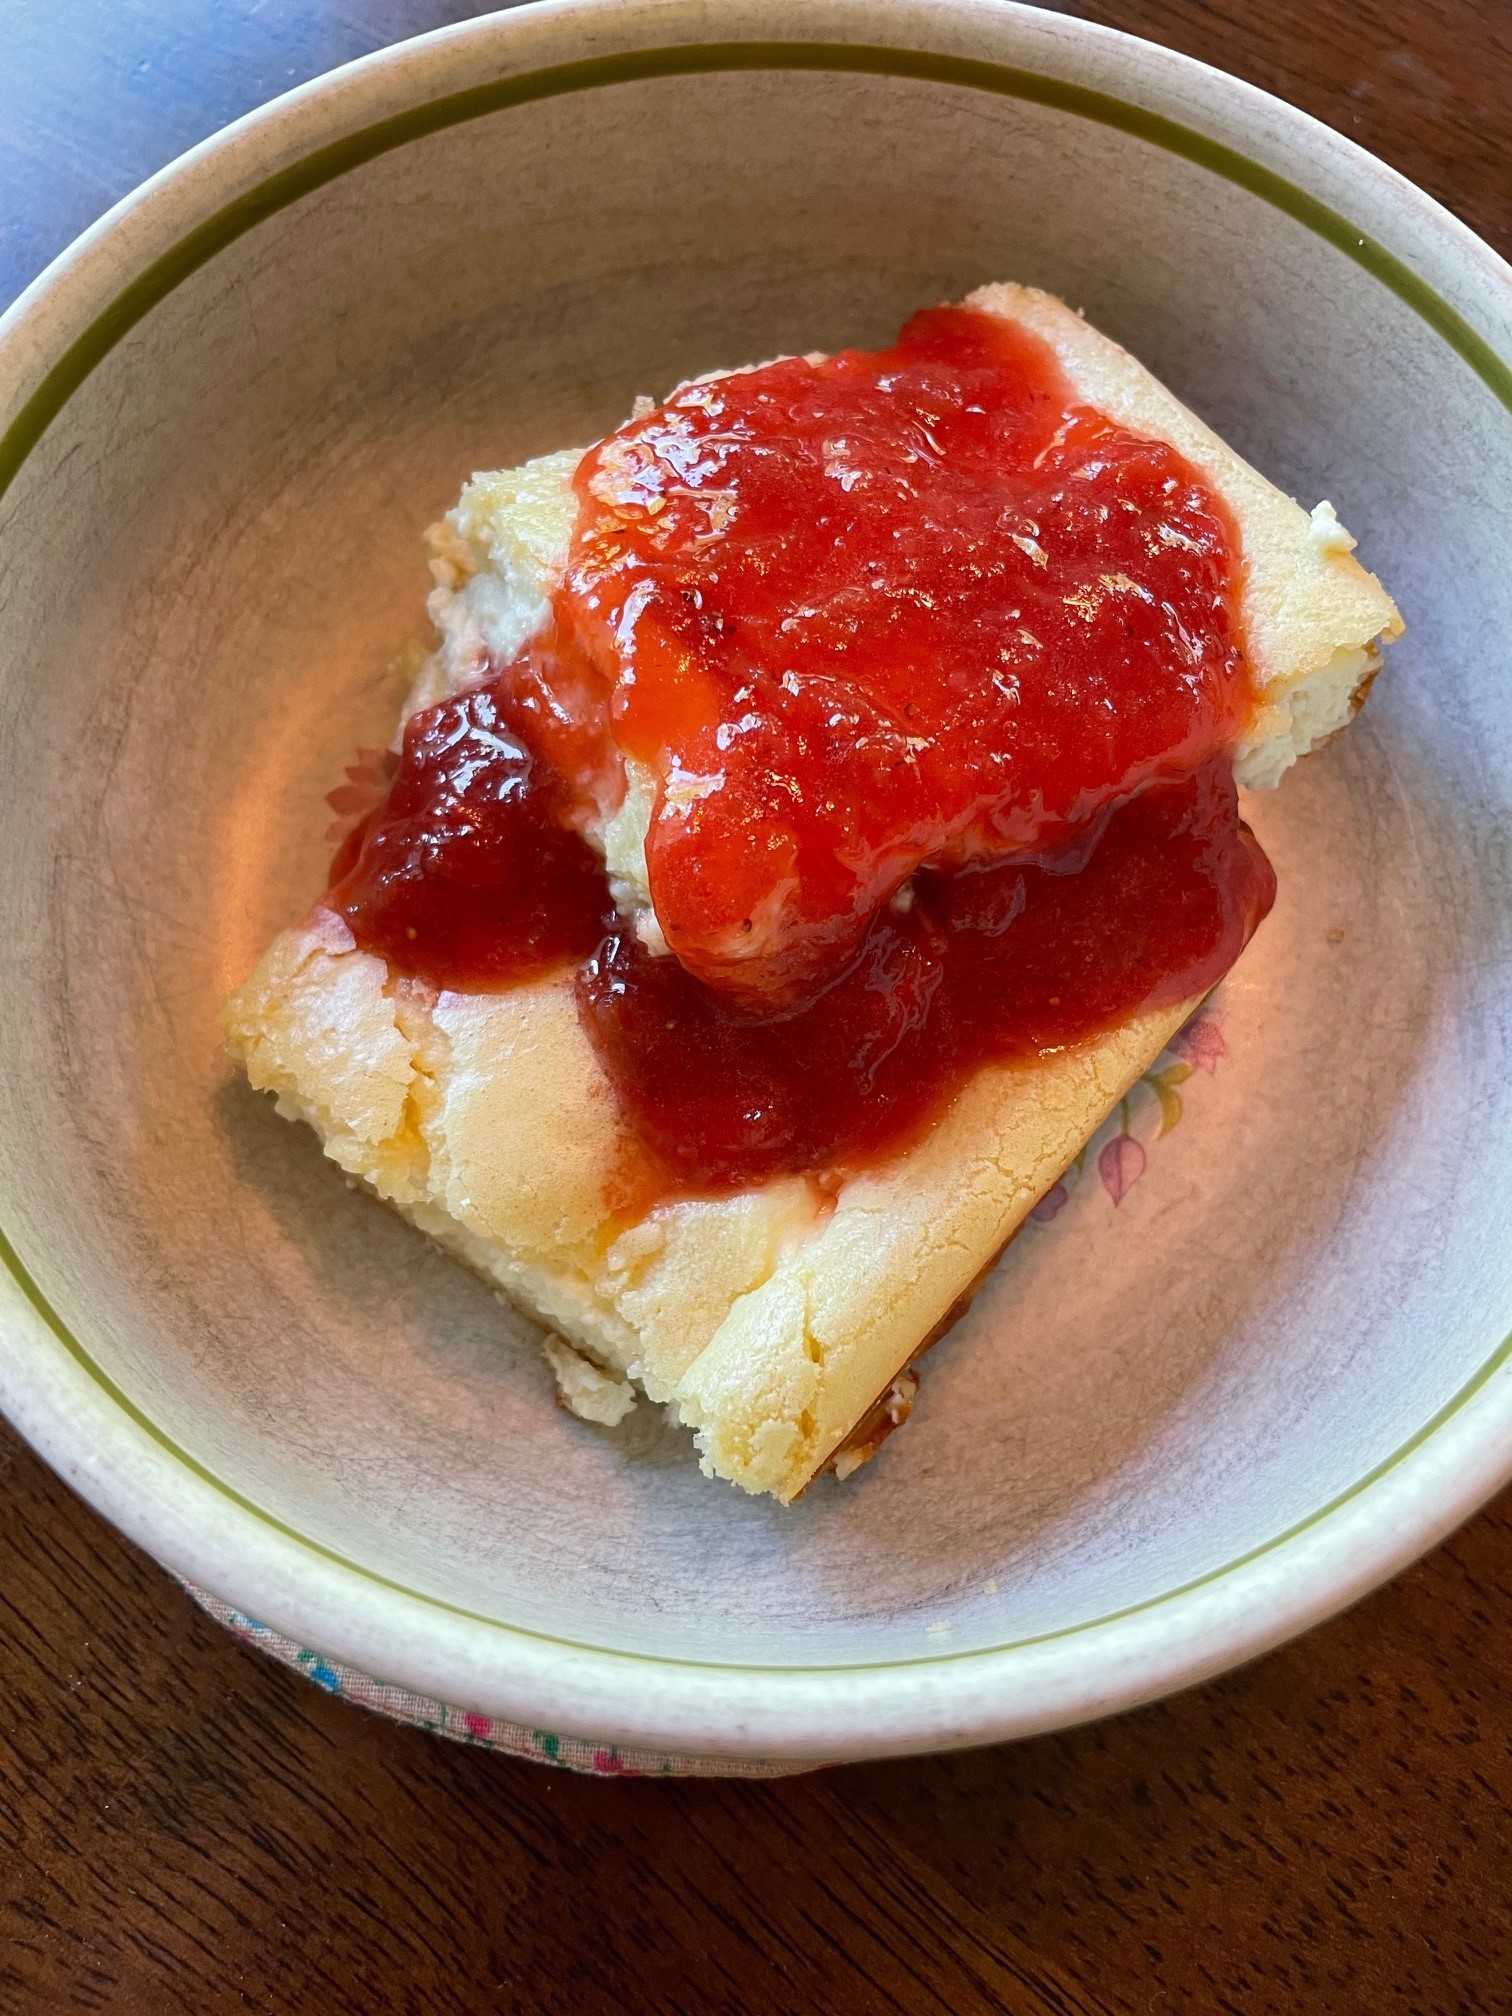
Preheat oven to 350 degrees F. Prepare a 9×9″ baking dish with non-stick spray or by greasing.
Place the batter ingredients into a blender or food processor and blend until smooth. Pour half the batter into the prepared baking dish and bake at 350 degrees for about 10 minutes, until set.
Meanwhile, in a large bowl, whisk together ricotta, cream cheese, egg, and sugar. Add lemon zest, lemon juice, vanilla, and salt. Mix until thoroughly combined. Spread the cheese filling over the baked batter in the dish. Very carefully spread the remaining batter evenly over the cheese filling to cover.
Bake at 350 degrees for 35 to 40 minutes, until the top is golden and the filling nearly set. Remove from oven and let stand 10-15 minutes. Cut the blintz into squares and serve warm with your favorite sauce over the top. The sauce I used for the top photograph is rhubarb. Yummy! Serves 6-9.
NOTES: This recipe is based upon one by Ina Garten. I halved it because there are only two of us. I’ve made it with many different kinds of fruit sauce. Baking is so much easier (for me) than making crepes and filling and sauce.

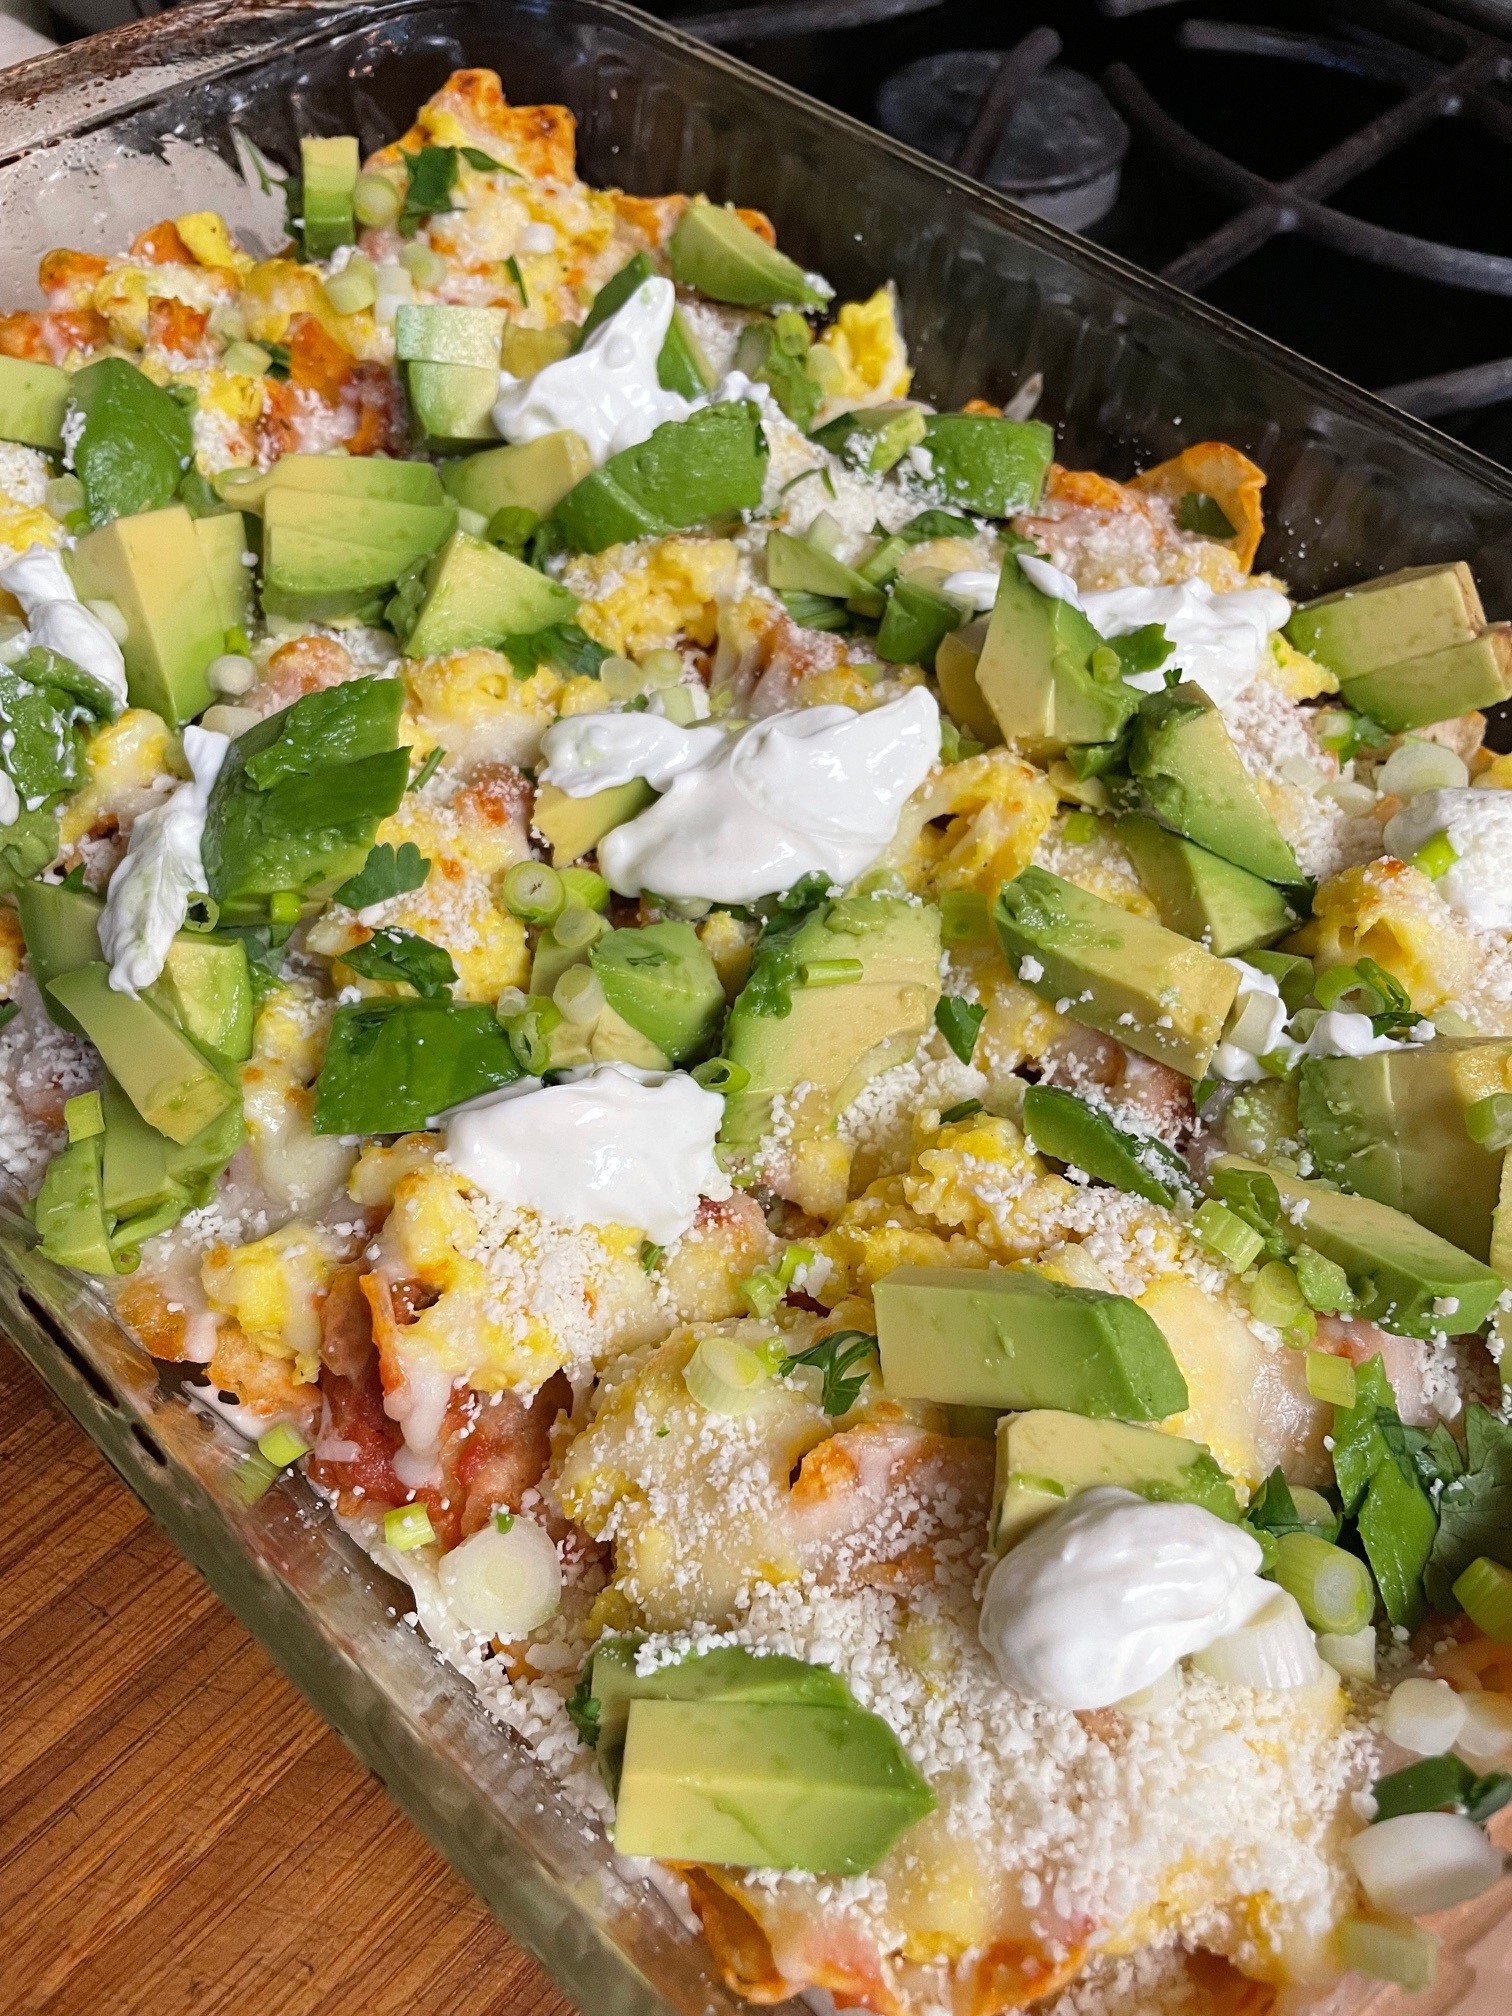
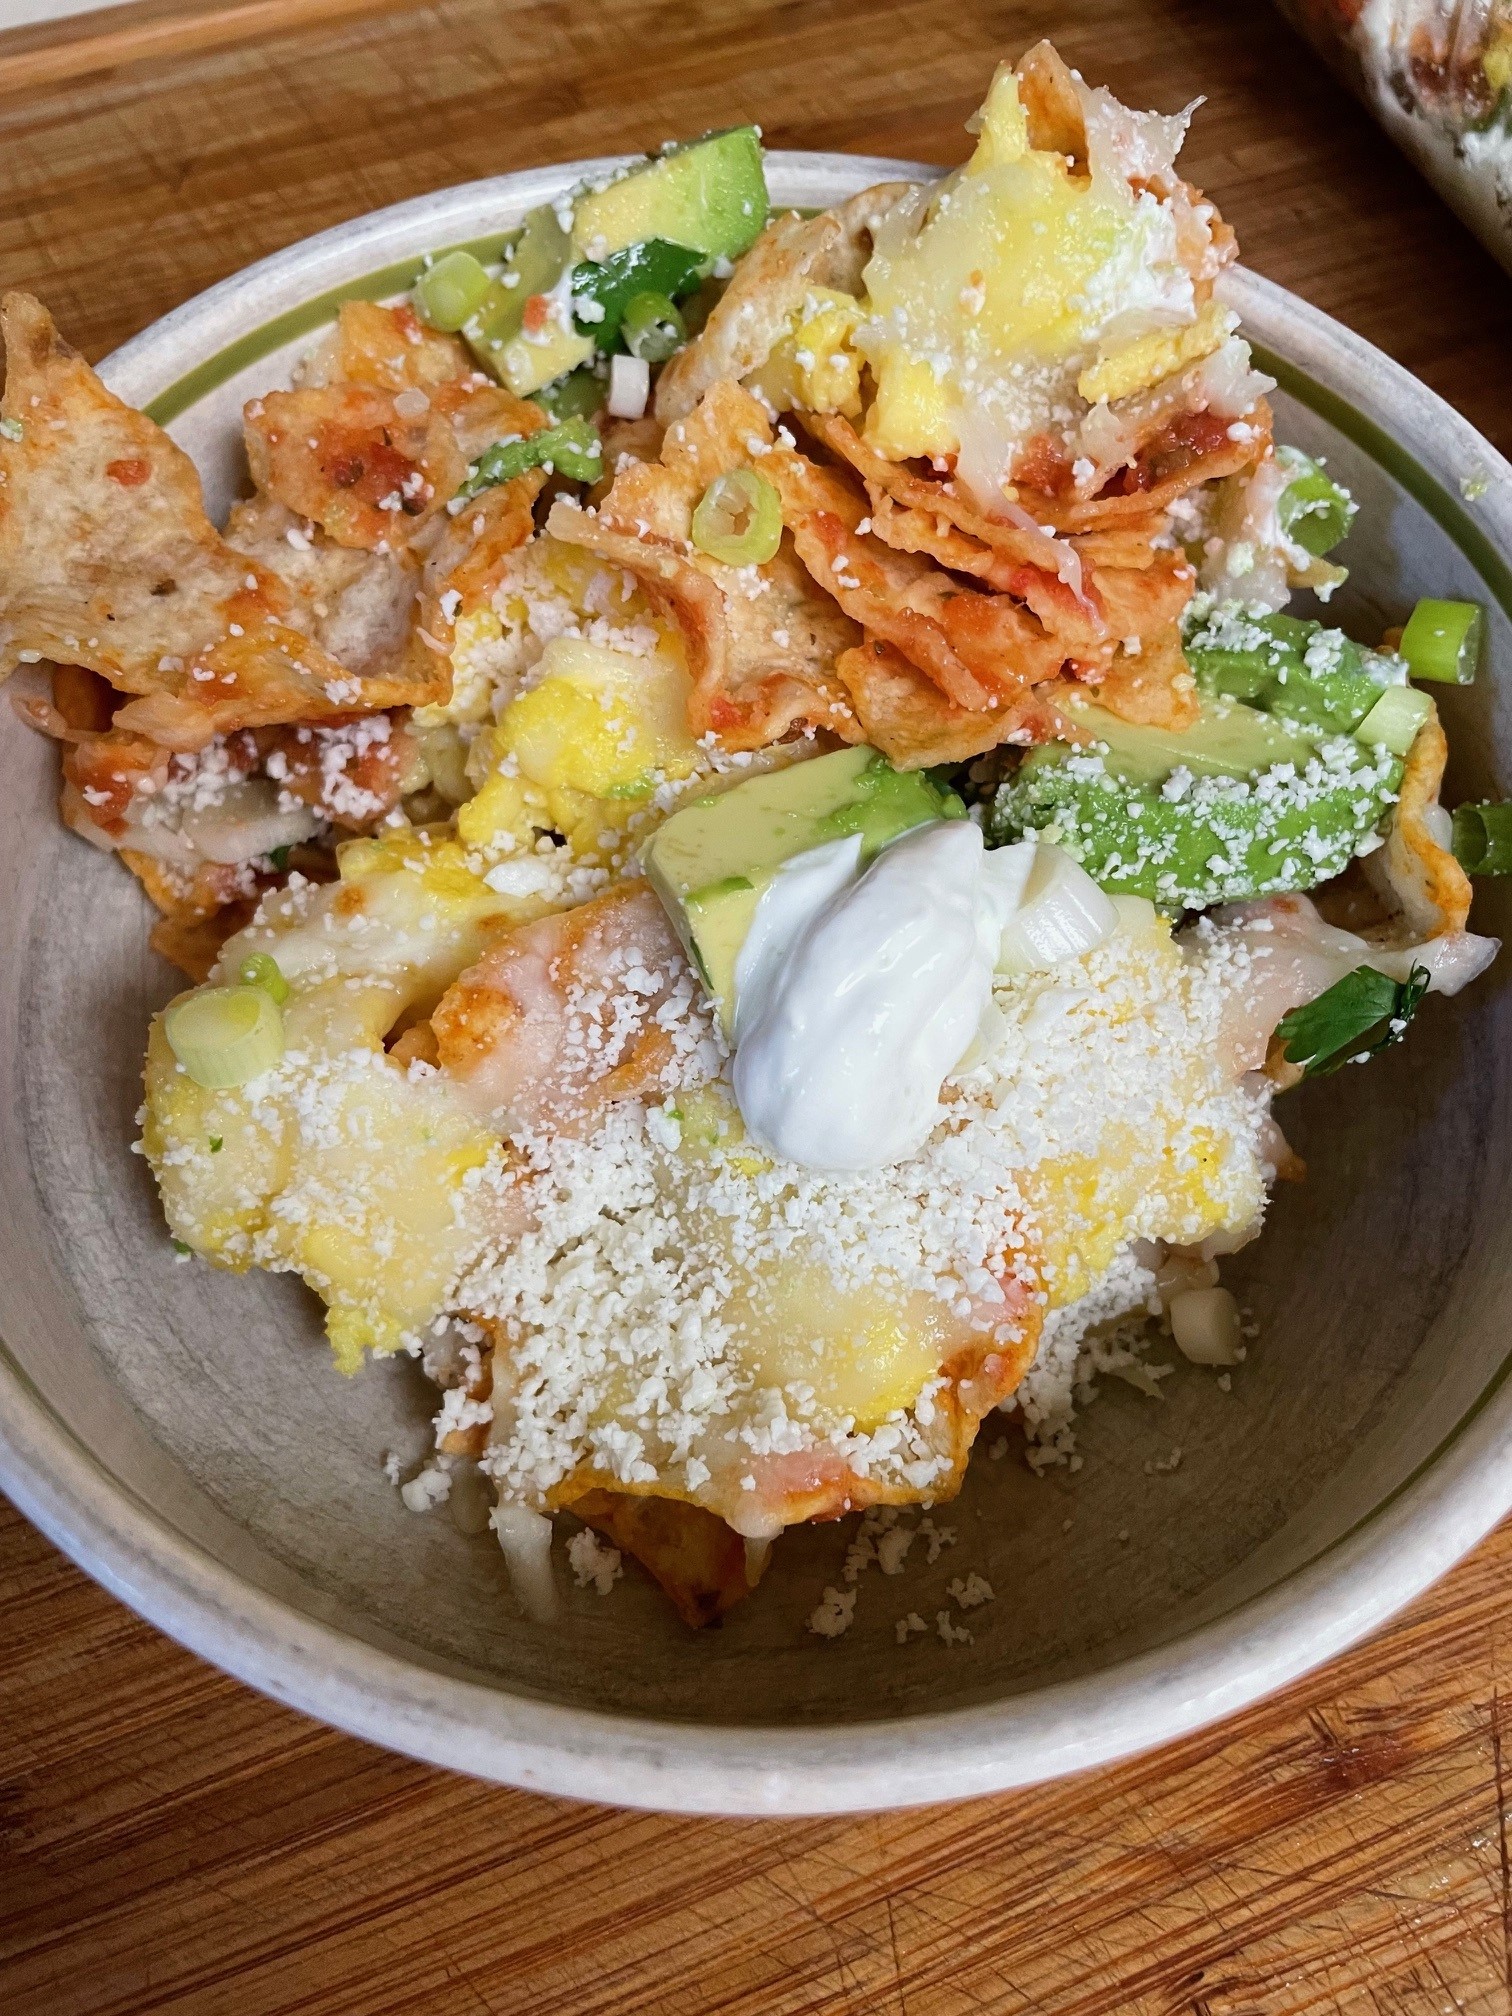
- Ingredients
- 4 cups tortilla chips (gluten-free if desired)
- 1 cup smooth red salsa
- 6 eggs, scrambled and cooked
- 1/2 cup shredded Queso Quesadilla cheese
- 1/4 cup cilantro, chopped
- 1/4 cup Cotija cheese
- 1 avocado, diced
- 2 green onions, sliced
- Sour cream
Preheat oven to 350 degrees F.
Place tortilla chips into 9×13″ baking dish. Heat in 350 degree oven for 5 minutes.
While that is happening, heat salsa in very large bowl in microwave oven (or on stovetop).
Pour warm tortilla chips into warm salsa and stir until well coated. Spray the 9×13″ baking dish with non-stick spray. Pour the tortilla-salsa mix into prepared baking dish. Distribute the scrambled eggs across the top of the tortilla mix. Sprinkle with Queso Quesadilla cheese. Place under broiler flame until cheese melts. Remove from heat. Sprinkle with cilantro, Cotija, avocado, and green onions. Dollop sour cream across top, as desired. Serve warm. Serves 4.
NOTES: I had never eaten this before, but it is delicious! The chips soften to a good consistency and the flavors are great. Super simple to make, although it created a lot of dirty dishes. Yum!

- Ingredients
- 6 Tbsp. butter, divided
- 1 lb. mushrooms, quartered
- 4 garlic cloves, minced
- 2 green onions, sliced and divided
- 1/4 cup broth (or wine)
- 3/4 tsp. dried thyme (or fresh)
- Salt and pepper to taste
- 4 eggs
- 1 cup flour
- 1 cup milk
- 3/4 tsp. salt
- 3/4 cup parmesan, divided
Melt 2 Tbsp. butter in skillet and saute half the mushrooms until nicely browned. Remove from skillet and set aside. Melt another 2 Tbsp. butter in skillet and add the remaining mushrooms. Saute until nicely browned. Stir in garlic, one green onion, and the set-aside mushrooms. Continue stirring over heat until the garlic is fragrant and soft. Stir in broth, thyme, salt and pepper. Let broth reduce over heat, stirring occasionally. Keep warm over low heat.
In the meantime: Place a baking dish (about 9×13″) or other oven-proof dish into oven and preheat oven to 400 degrees F. In a food processor or blender, add eggs, flour, milk, and salt. Whir until it is thoroughly combined without any lumps. Remove heated dish from preheated oven and drop remaining 2 Tbsp. butter onto dish. Once it has melted, turn the dish so butter coats all sides. Pour batter from food processor into baking dish and sprinkle 1/2 cup shredded parmesan over top. Return dish to oven for 18-20 minutes. Do not open the oven to peek at this. Just wait 18 minutes before checking.
At 18 minutes, the Dutch baby should be puffed and golden brown with crispy looking edges. It may need another minute or two in the oven. Remove from oven and sprinkle the mushroom mixture over all. Sprinkle with remaining parmesan and remaining one green onion. Serve immediately.
Note: Timing is key, don’t start making this unless you can serve it immediately. It doesn’t take long, so that helps. I use the lid of my Dutch oven as a baking dish because it is cast iron and the perfect size. A Dutch Baby is a puffed pancake that falls very quickly, so once it’s removed from the oven it must be served immediately for best taste and effect. Opening the oven to peek, or taking it out of the oven prematurely, will start the falling process and I don’t think there’s any coming back from that. Just leave it alone in the oven and then look at it quickly after the 18-minute mark to see if it needs more time.

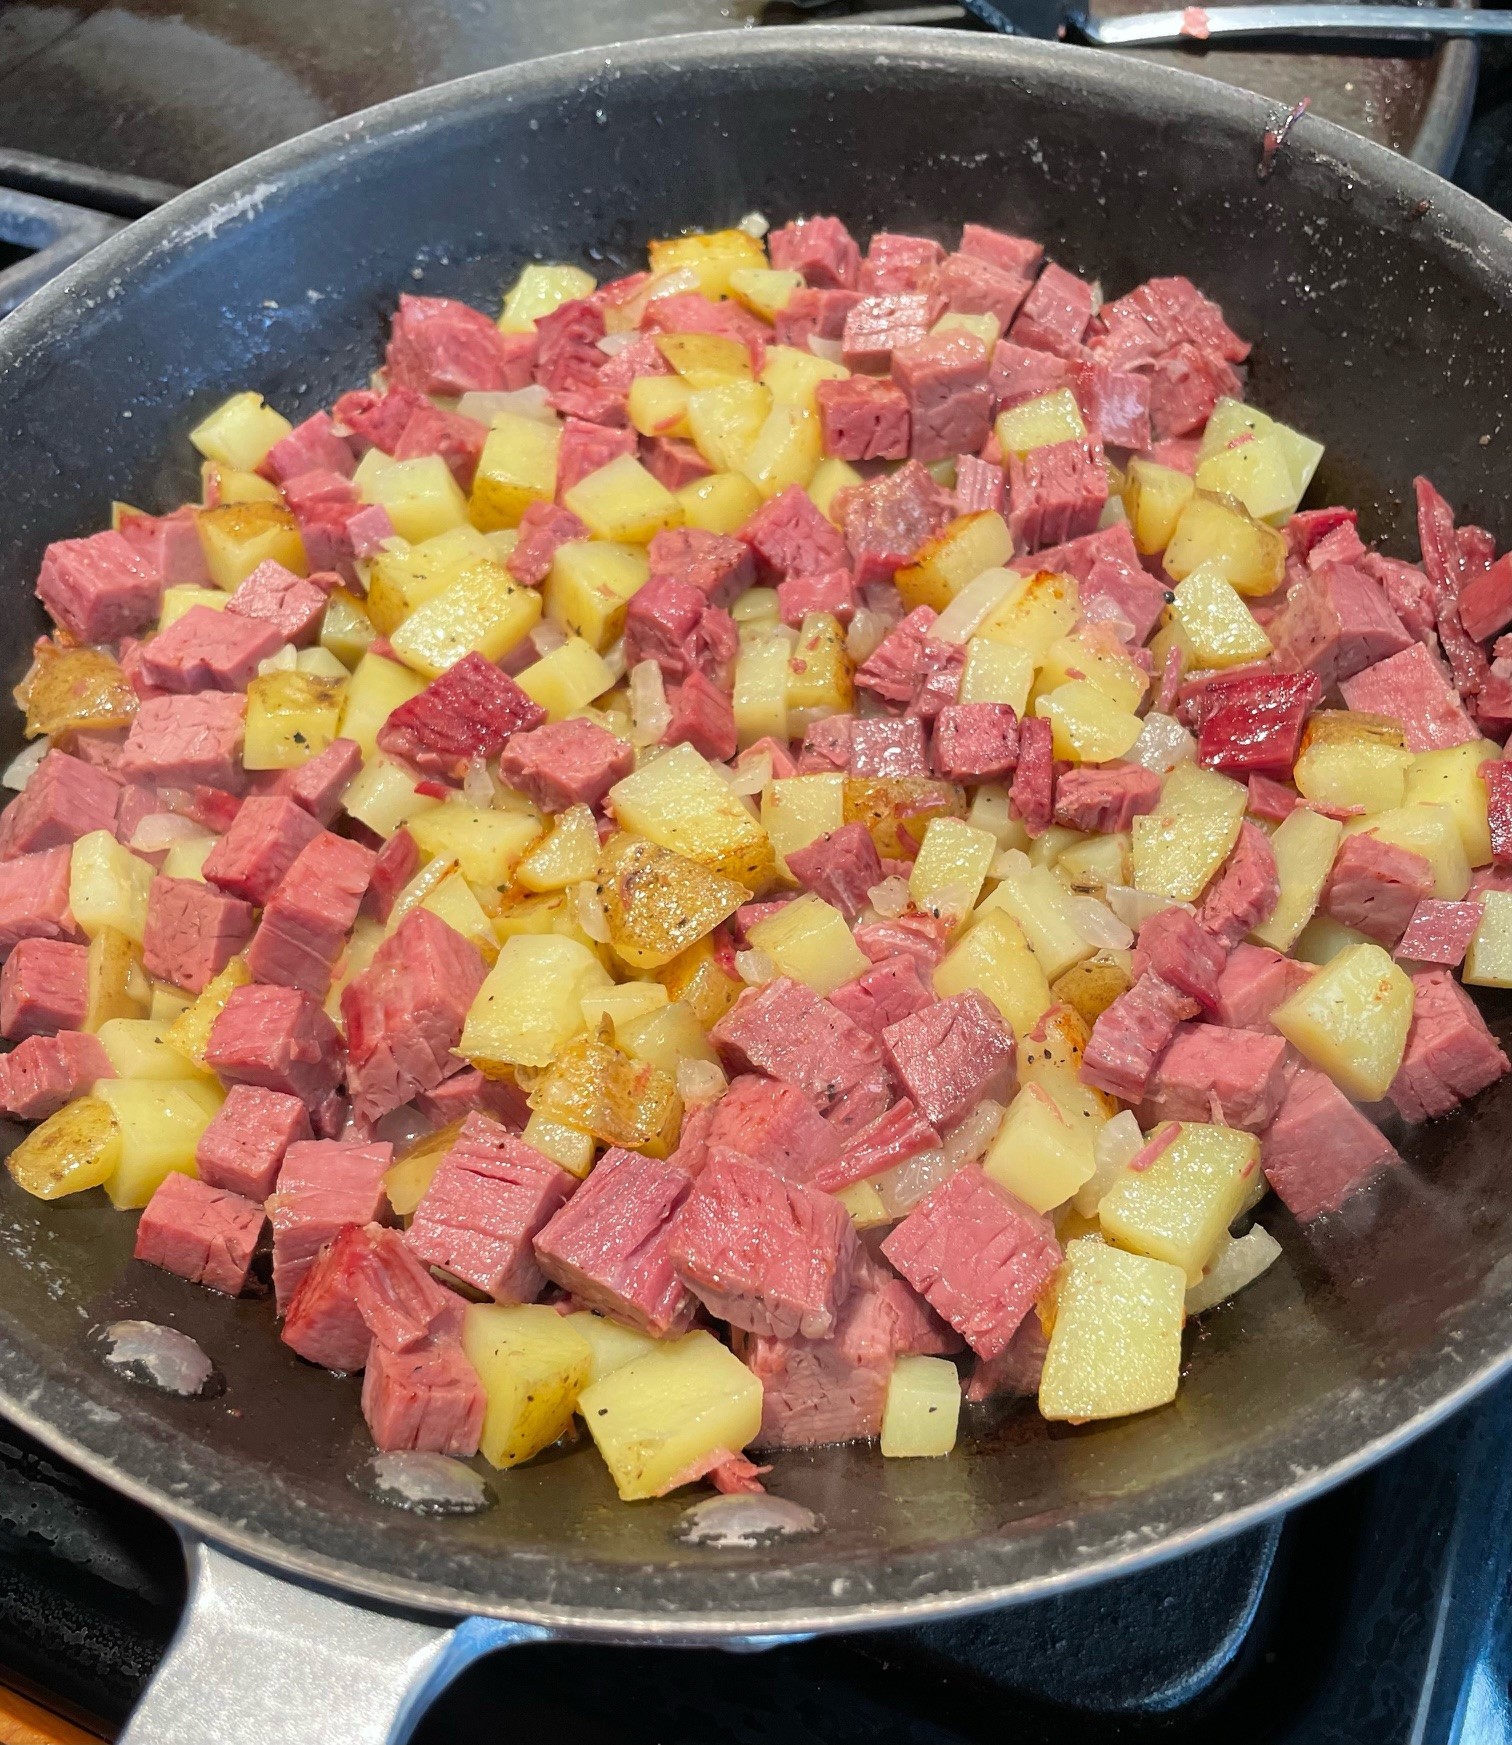
- Ingredients
- Butter and oil
- Onion, chopped
- Cooked corned beef, diced
- Cooked potatoes, diced
- Eggs
In a skillet, melt a pat of butter with a bit of oil and saute onion in it until transparent. Turn the heat up and stir in equal amounts of cooked and diced corned beef and potatoes. When it’s all well mixed, press down on it and leave it over the flame for a few minutes. Put your spatula beneath the mixture and turn sections of it over, so the browned parts are on top and the bottom gets browned again. Once your hash is a healthy brown color, create indentations in the hash with a spoon and crack eggs into the indents. Reduce heat and cover the skillet until the eggs are done to your liking. My liking is a very soft-cooked egg that forms a sauce in my bowl. Serve warm!
NOTES: Add as many eggs as you feel like eating. You can see in the photograph what I did. It always depends upon how much corned beef I have leftover from dinner (usually St. Patrick’s Day dinner). I do love this dish. I used to make it in the oven for dinner once in awhile. When we go on cruise vacations (frequently), I eat corned beef hash and poached eggs nearly every morning. It’s a bit of a trick up at the buffet deck, scooping up their runny corned beef hash onto a plate and then standing in line waiting for the egg poacher to notice me, hoping the whole mess is still reasonably warm when I find a place to sit down and devour it. First-world problems. I get it. The corned beef hash I make at home is SO MUCH better! And now you can make it, too!
- Ingredients
- 1 cup + 2 Tbsp. flour
- 3/4 cup sugar
- 1 tsp. cinnamon
- 1/2 tsp. baking soda
- 1/2 tsp. baking powder
- 1/4 tsp. salt
- 1/3 cup cooking oil
- 2 eggs
- 1/2 tsp. vanilla extract or paste
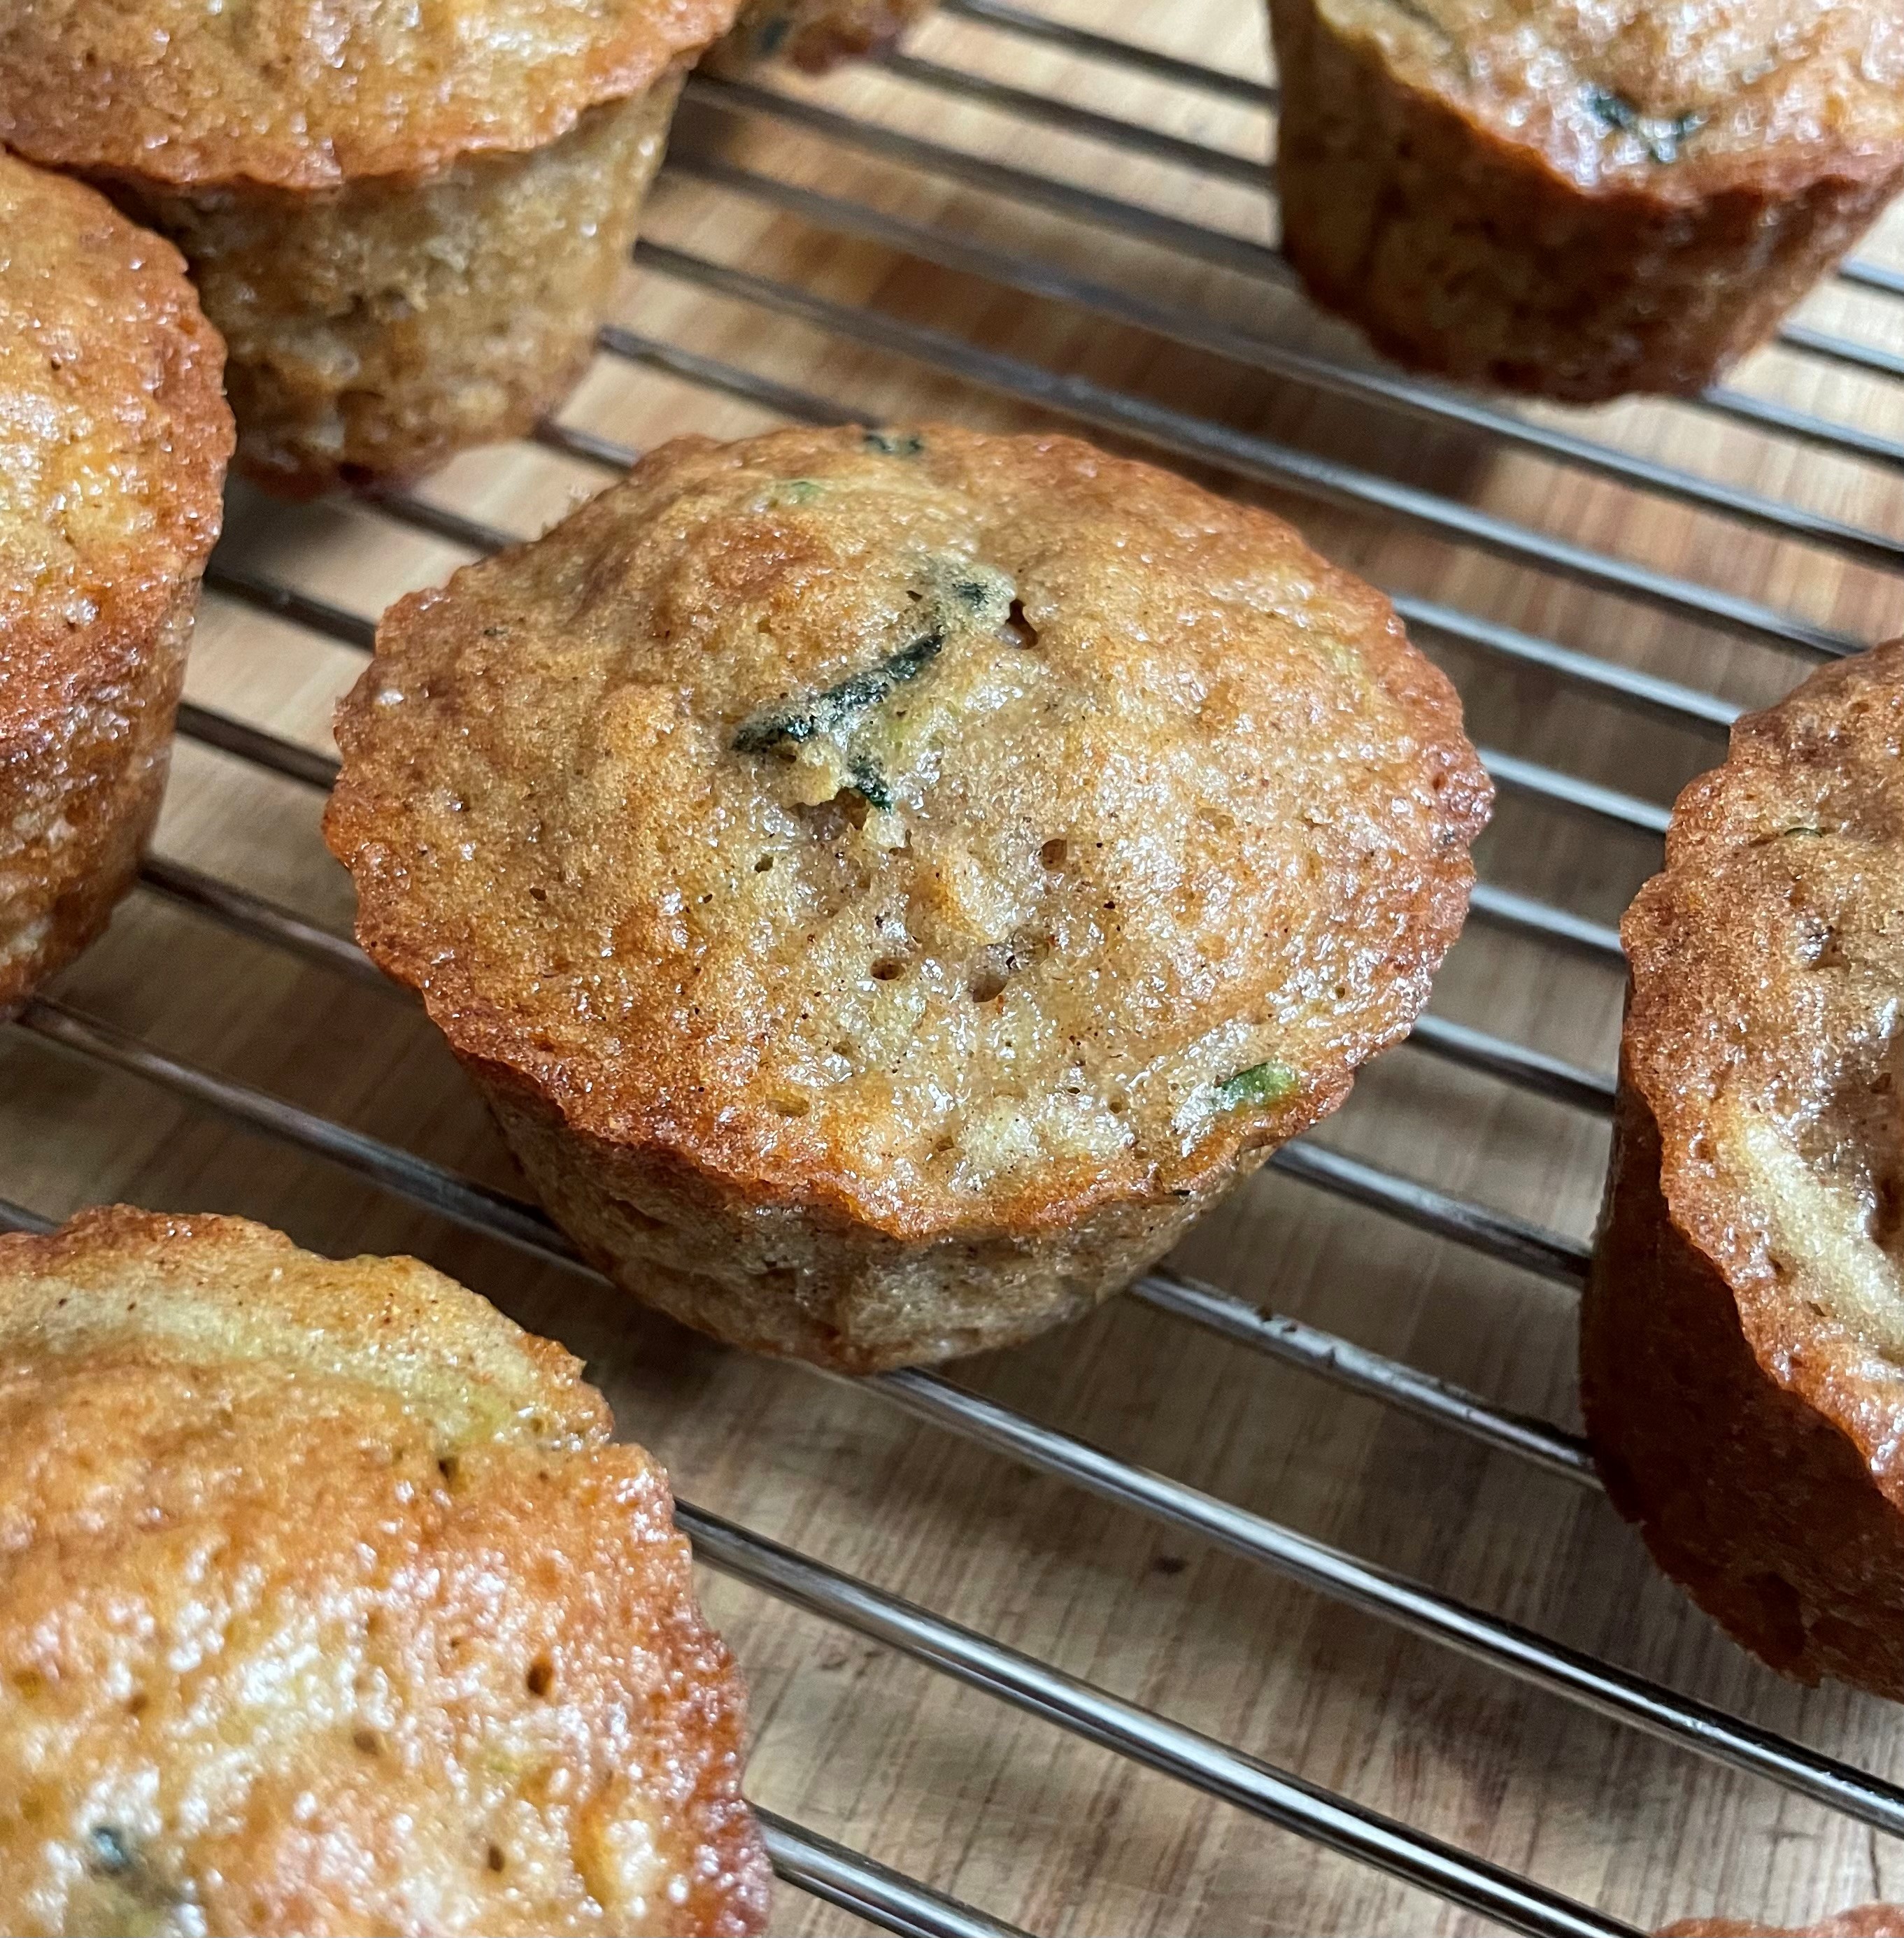
- 1 cup shredded zucchini
- 1 cup shredded apple
Preheat oven to 350 degrees. Prepare a 12-cup muffin tin by spraying with non-stick or use paper liners.
In a large bowl, stir together dry ingredients. In a smaller bowl stir together oil, eggs, and vanilla. Stir the oil mixture into the dry ingredients until incorporated. Fold in the shredded zucchini and apple. Distribute batter equally into prepared muffin tin. Bake at 350 degrees for 25 minutes.
NOTES: I did not peel either the zucchini or the apple. I did drain the zucchini a bit before using it, but I don’t think it was that important. A wetter batter would take a few minutes more to bake, that’s all. Full disclosure, I had a giant zucchini and was making something else. I scooped out and discarded the seeds, then shredded the zucchini flesh. I had about a cup of shreds leftover from my original purpose, so saved that and used it to make these delicious muffins.
This recipe is from Ali at Alexandra’s Kitchen. I wish I had Alaska wild blueberries to use in this cake, but store-bought will have to do. It is delicious no matter what kind of blues you use.
- Ingredients
- 1 cup sugar, divided
- 1/2 cup (1 stick) butter, softened
- Zest of one large lemon
- 1 egg, room temperature
- 1 tsp. vanilla extract (or paste)
- 2 cups flour, divided
- 2 tsp. baking powder
- 1 tsp. salt
- 1/2 cup buttermilk
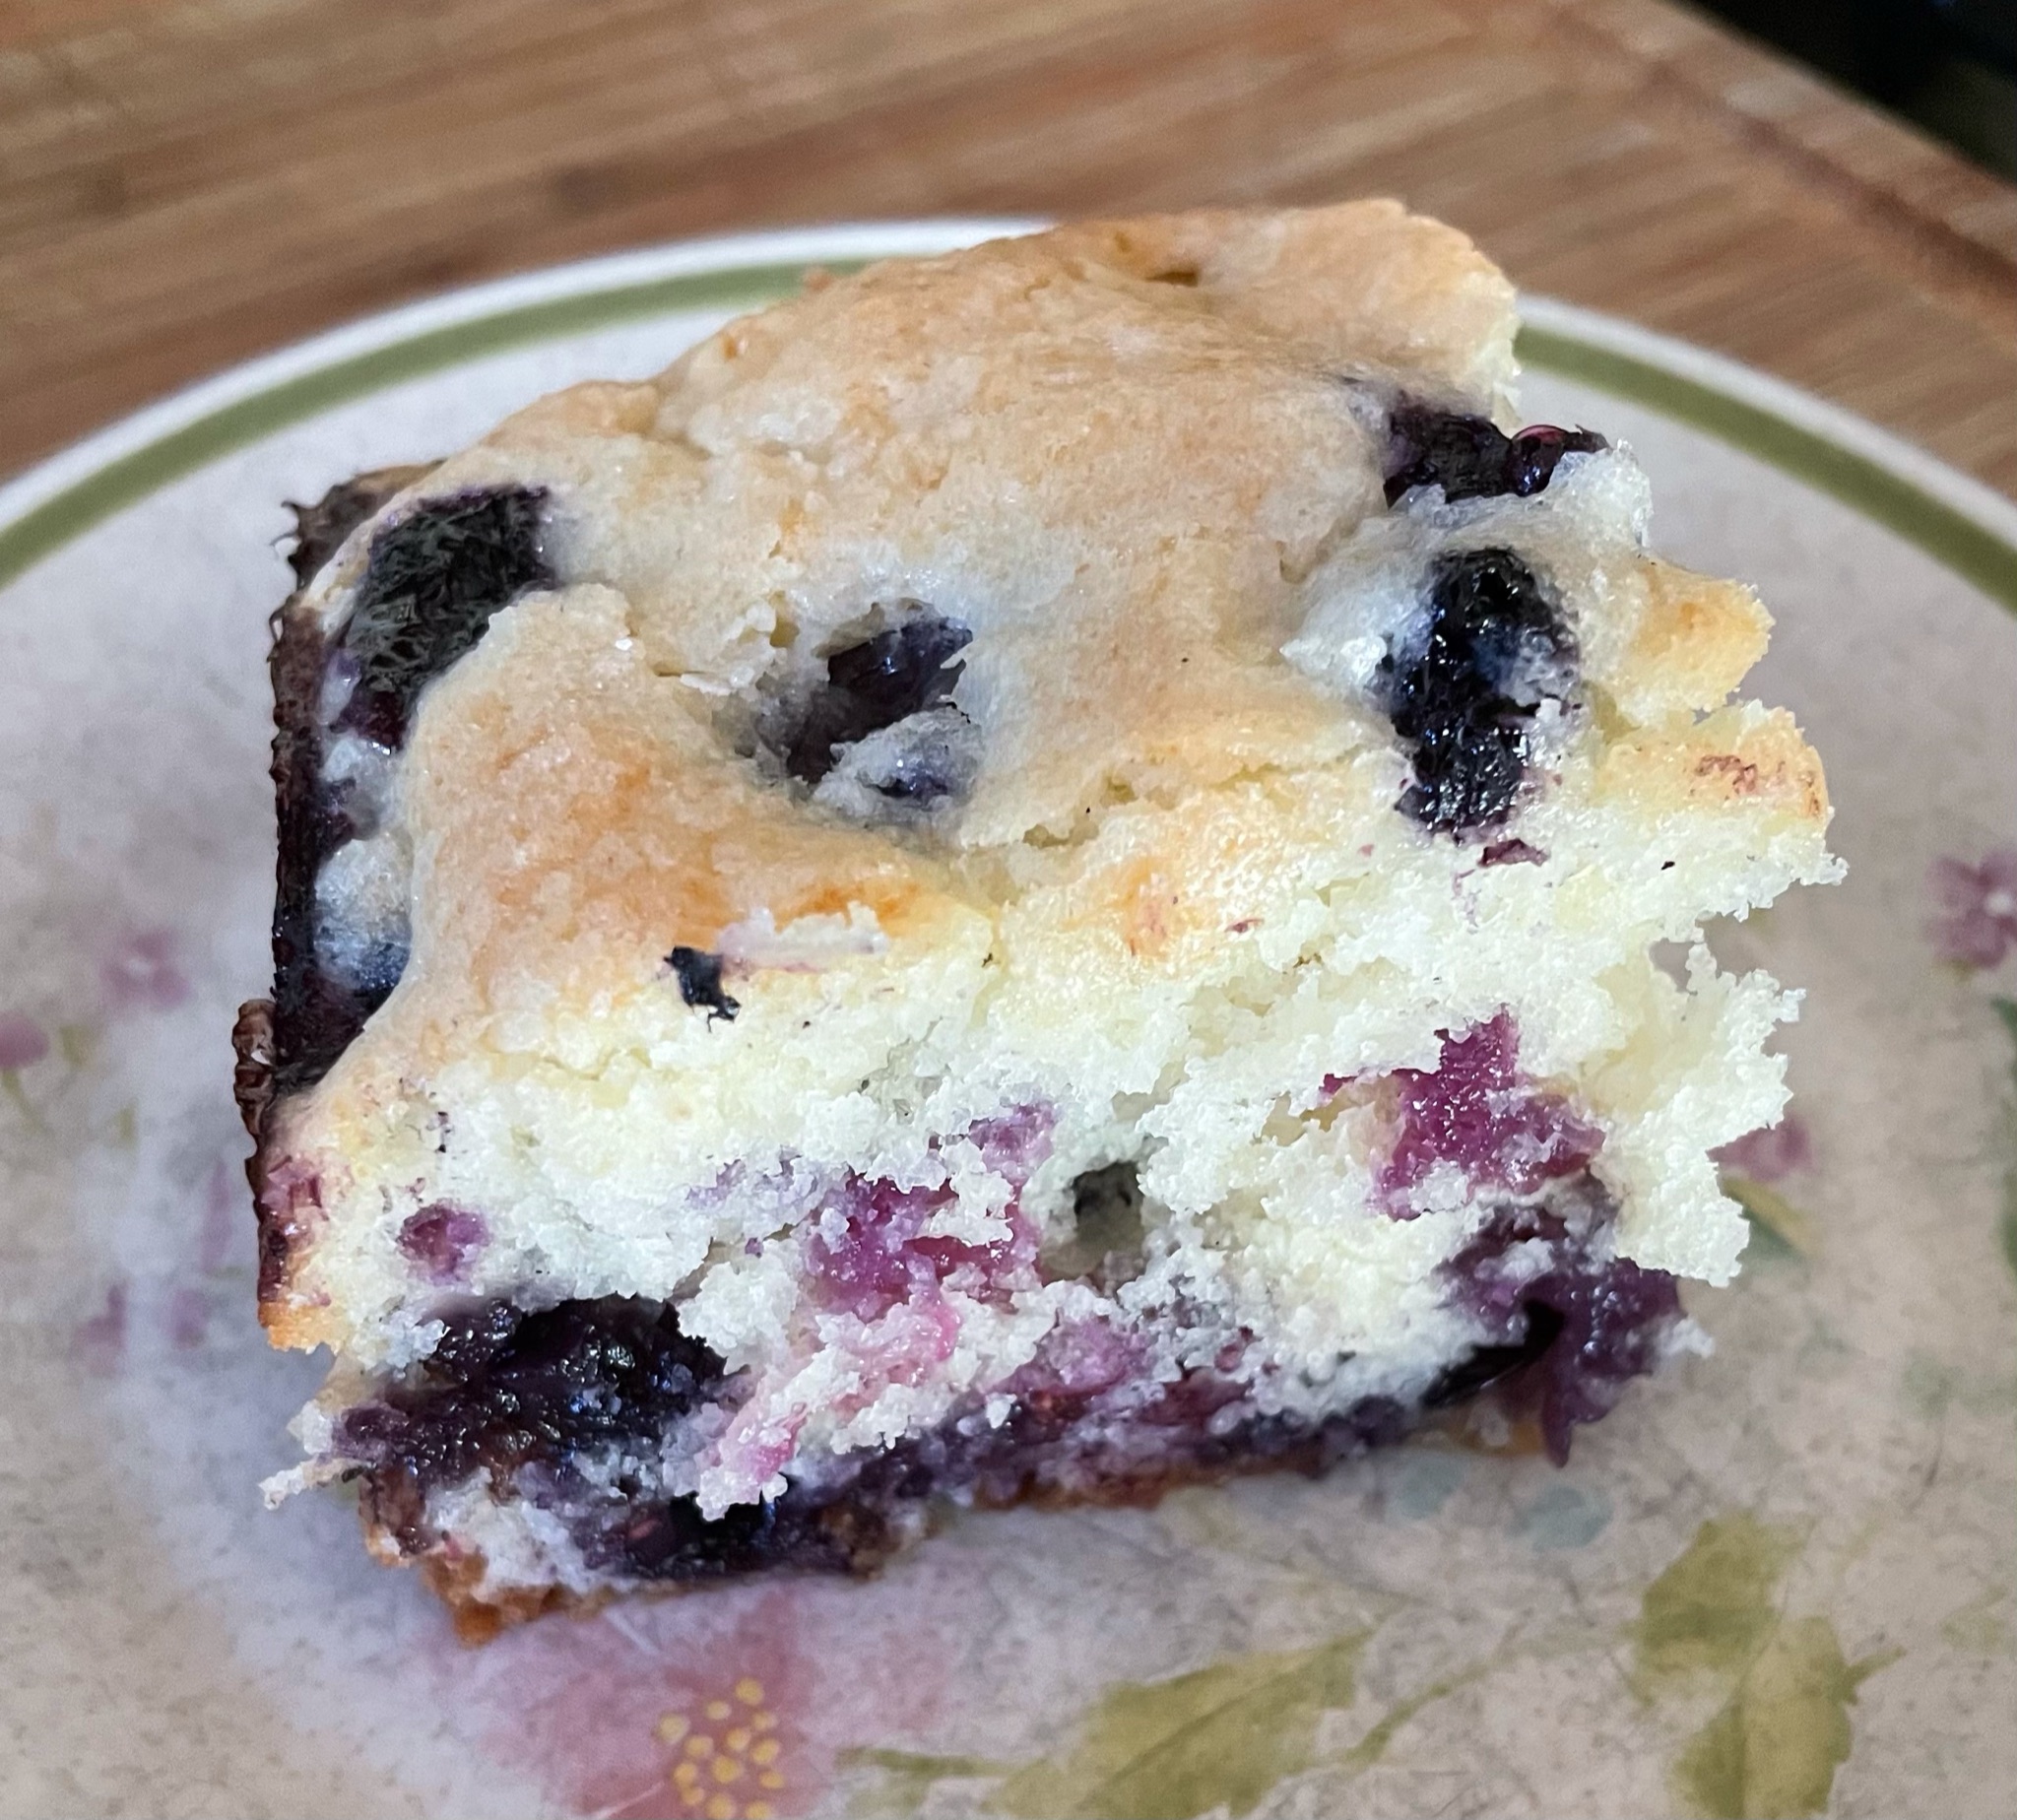
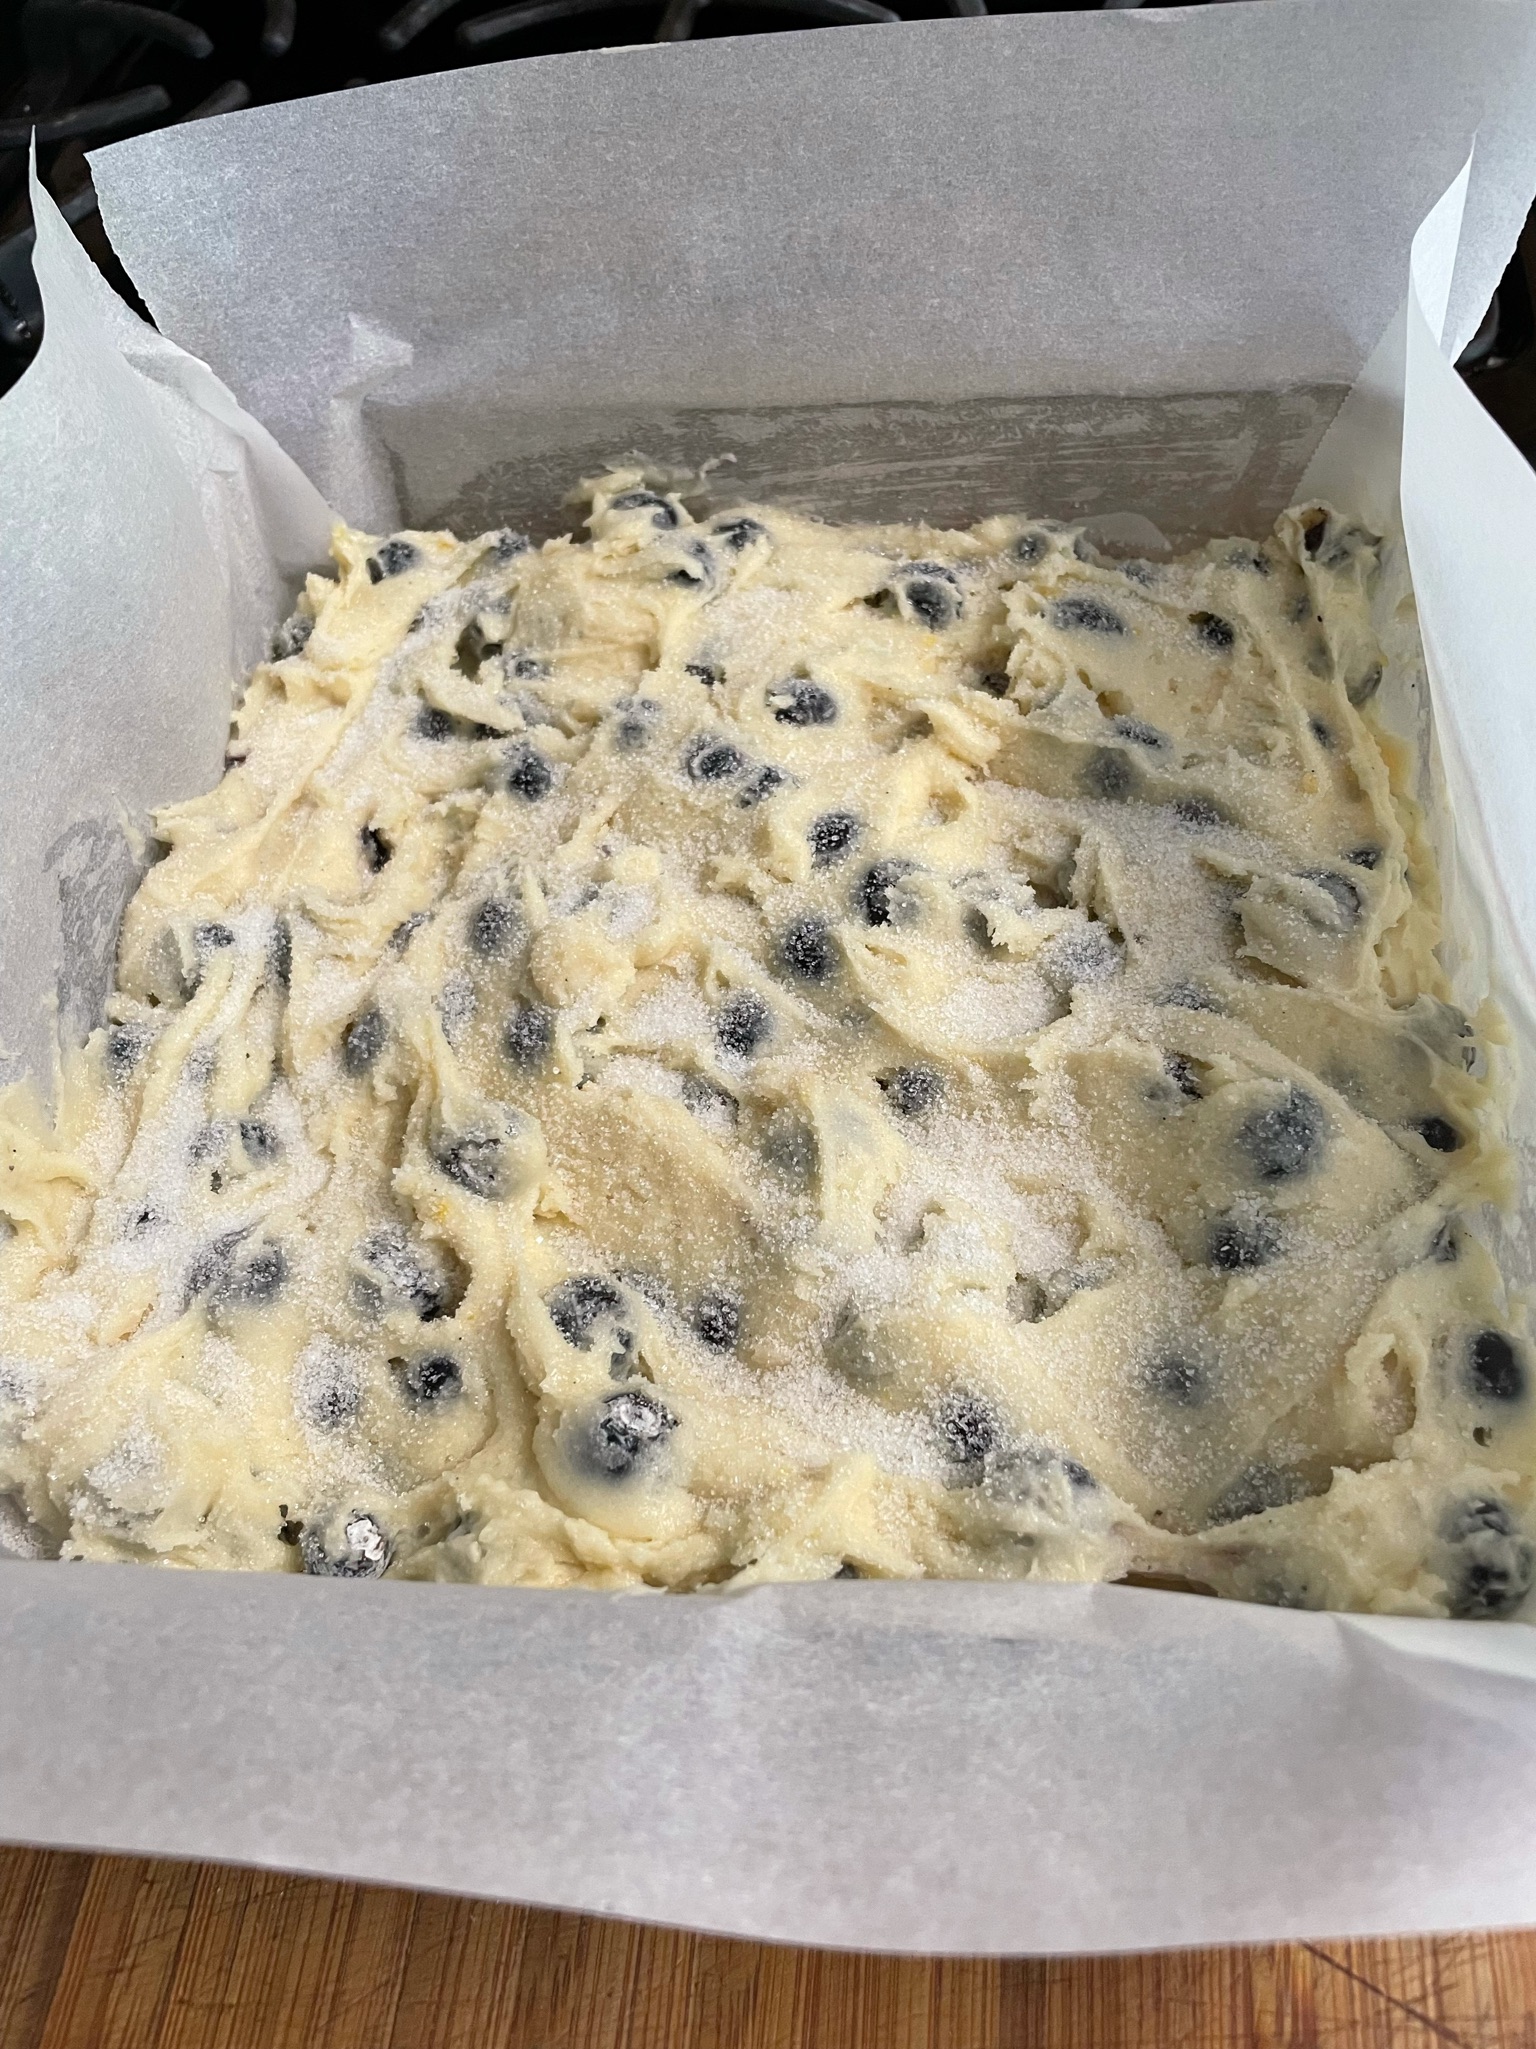
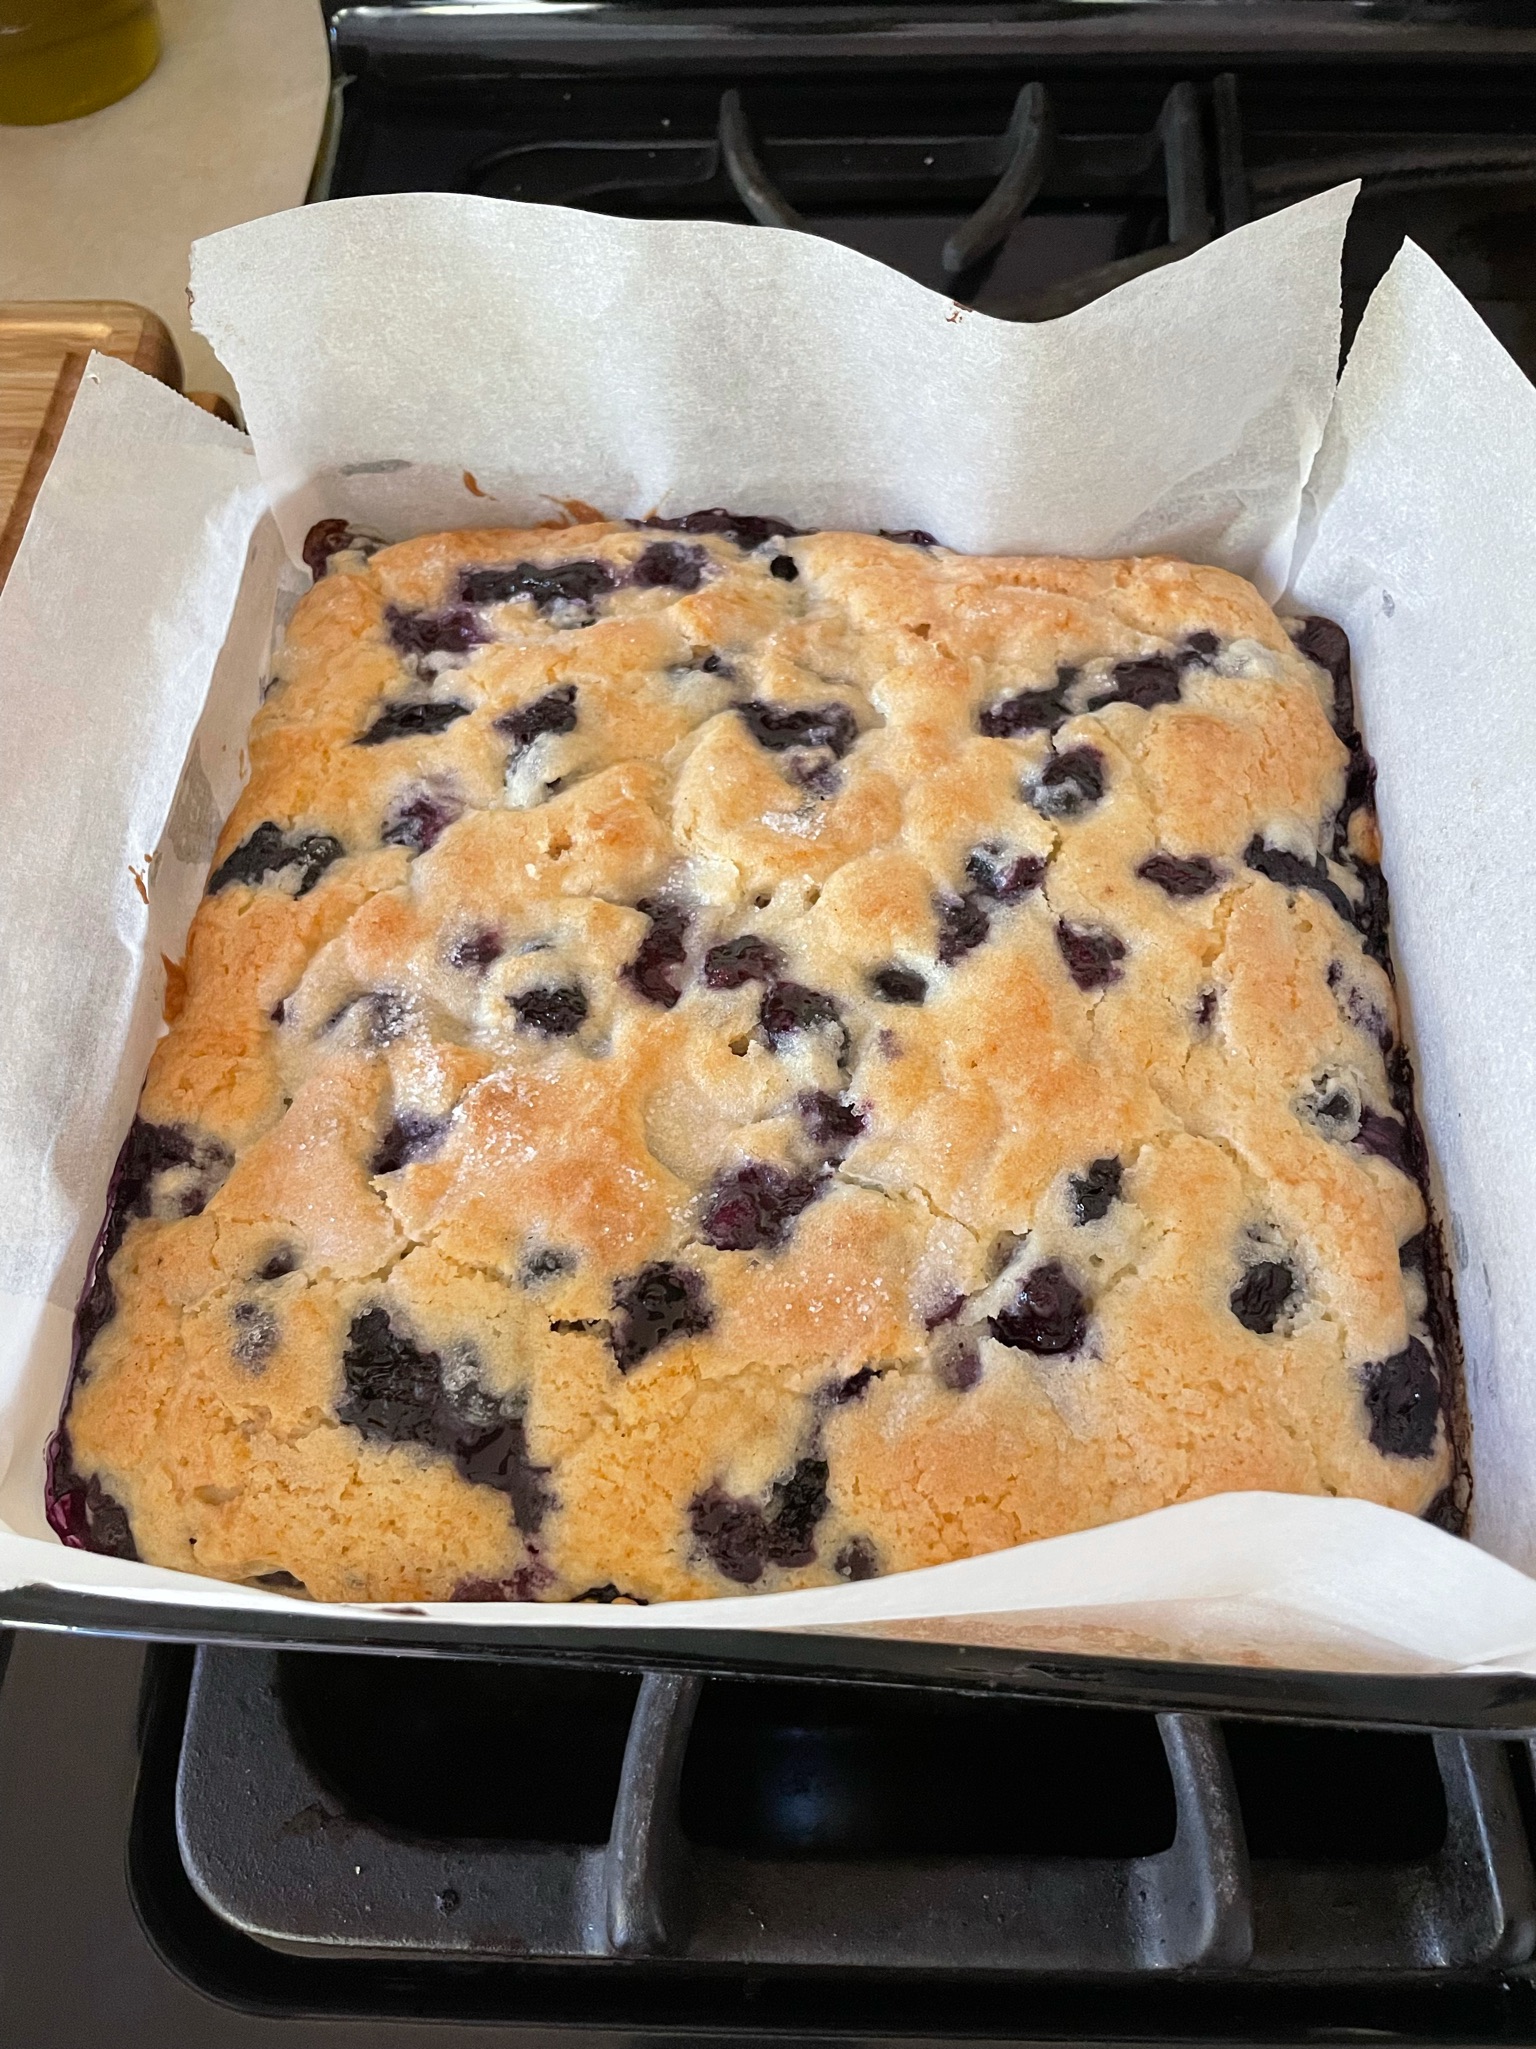
- 2 cups fresh or frozen blueberries
Preheat oven to 350 degrees F. Butter an 8″ square baking dish (and use parchment paper if you so desire).
Remove a Tbsp. of sugar from a cup of it (use the Tbsp. later). Cream together butter, scant one cup sugar, and lemon zest in a mixer until light and fluffy. Stir in egg and vanilla until well mixed.
In a separate bowl whisk together 1-3/4 cup flour, baking powder, and salt.
In another bowl toss the blueberries with the 1/4 cup remaining flour. Set aside.
Add half the flour/baking powder mixture to the mixer and give it a few turns to incorporate the flour. Pour in the buttermilk and stir until mixed. Stir in remaining flour mixture until just moistened. Pluck the set-aside blueberries out of the flour and, by hand, stir them into the batter. Discard any leftover flour from the blueberries. The batter is very, very thick. Dollop the batter into the prepared baking dish and smooth out the top as best you can. Sprinkle the top with the remaining 1 Tbsp. sugar.
Bake at 350 degrees F for 40-50 minutes. Remove from heat and let stand 10 minutes. Remove cake from baking dish or serve from the dish. Good morning!
Notes: Ali says you can use different sizes of baking dishes, so you would reduce the cooking time depending upon the dish size. I use an 8″ square glass pan and it takes about 50 minutes to bake through. I always have buttermilk on hand, it has so many uses. If you do not have buttermilk there are ways to create a liquid that forces the correct chemical reaction in the cake as buttermilk. Ali talks about it at her site or you can do a search for “Buttermilk substitutes” for ideas.


This dish is also known as a puff pancake. The recipe is based upon one by recipegirl. I was recently gifted a non-stick cast iron Dutch oven. The lid is multi-use and may be used as a skillet. If you do not have a cast-iron skillet, or one that is bake-proof, then a 9×13″ baking dish should work fine.
- Ingredients
- 4 eggs (I use extra large)
- 1 cup milk
- 1 cup flour
- 1/4 cup sugar
- 1/2 tsp. lemon zest
- 1/4 tsp. salt
- 2 Tbsp. butter
- 1 to 1-1/2 cups fresh berries
- Syrup or powdered sugar (optional)
Preheat oven to 400 degrees. Put your skillet into oven as it’s heating.
In a blender or food processor, mix together eggs, milk, flour, sugar, lemon zest, and salt.
Remove the skillet from oven and place butter into it. Return to oven until butter has melted.
Pour batter over melted butter. Sprinkle berries over the top of the batter. Place the skillet back into the oven for 18-22 minutes. Remove from oven and serve sprinkled with powdered sugar or with syrup, however you like it.
Serves 4
This is gluten-free and really yummy, a great idea for fancy brunch. I found the recipe at meaningfuleats.com and adjusted it somewhat.
- Crust Ingredients
- 1.5# sweet potatoes, peeled and grated
- 1 egg
- 2 tsp. salt
- 1 tsp. pepper
- Pinch red pepper flakes
- Filling Ingredients
- 1 Tbsp. butter
- 1/2 cup red onion, small dice
- 8 eggs
- 1/4 cup cream
- 1/2 tsp. salt
- 1/2 tsp. pepper
- 4 oz. crumbled Chevre (goat cheese)
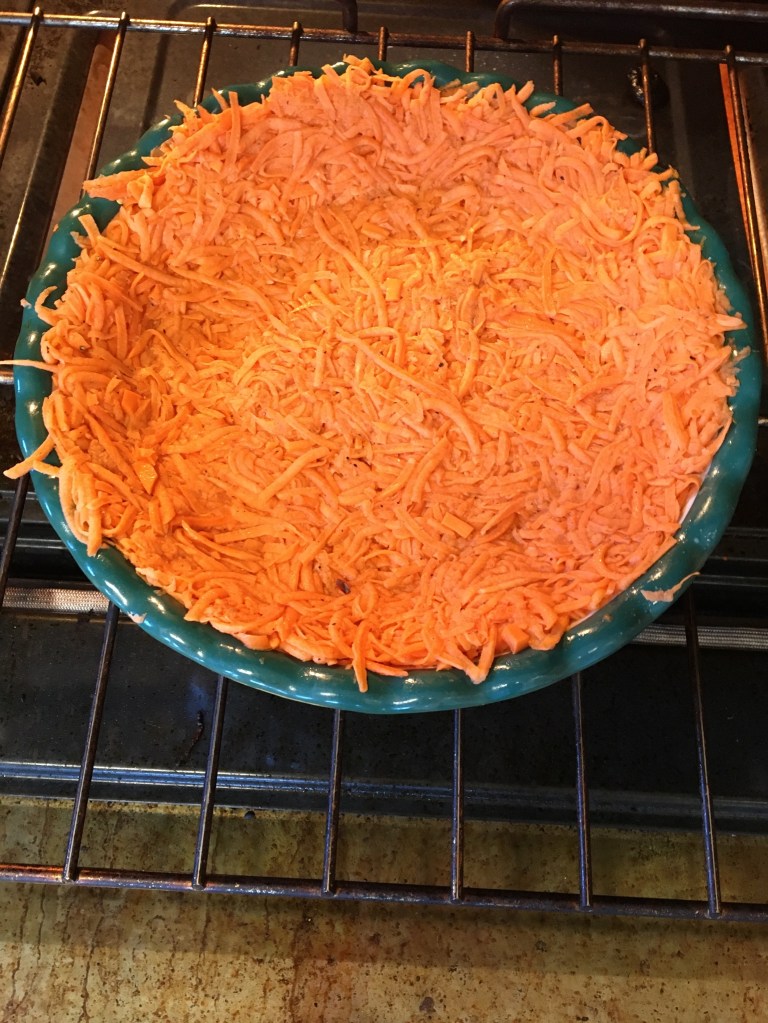
Working in batches, put the grated sweet potato into a dish towel and squeeze as much liquid out as you can. This looks like too much sweet potato, but it’s going to be okay. Trust me. Preheat the oven to 450 degrees F. Yes, very hot. Prepare a 9 or 10″ pie plate with cooking spray or grease.
In a large bowl mix together the grated, wrung sweet potatoes, egg, salt, pepper, and red pepper flakes. Press the mixture firmly into the prepared pie plate, bottom and sides. Bake at 450 degrees for 30 minutes.
While that is baking, saute the red onion in butter until translucent. I have made this recipe using leeks instead and it’s also super yummy. Remove from heat and let cool.
Mix together filling ingredients: eggs, cream, salt, pepper, half of the Chevre, and the sauteed onions.
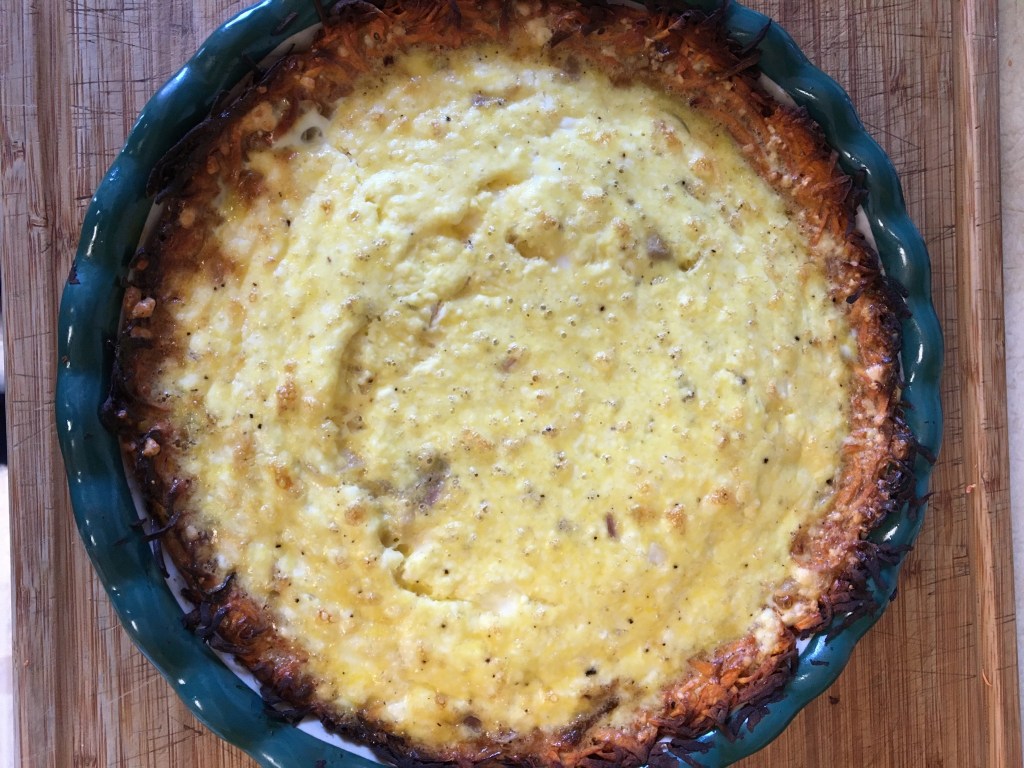
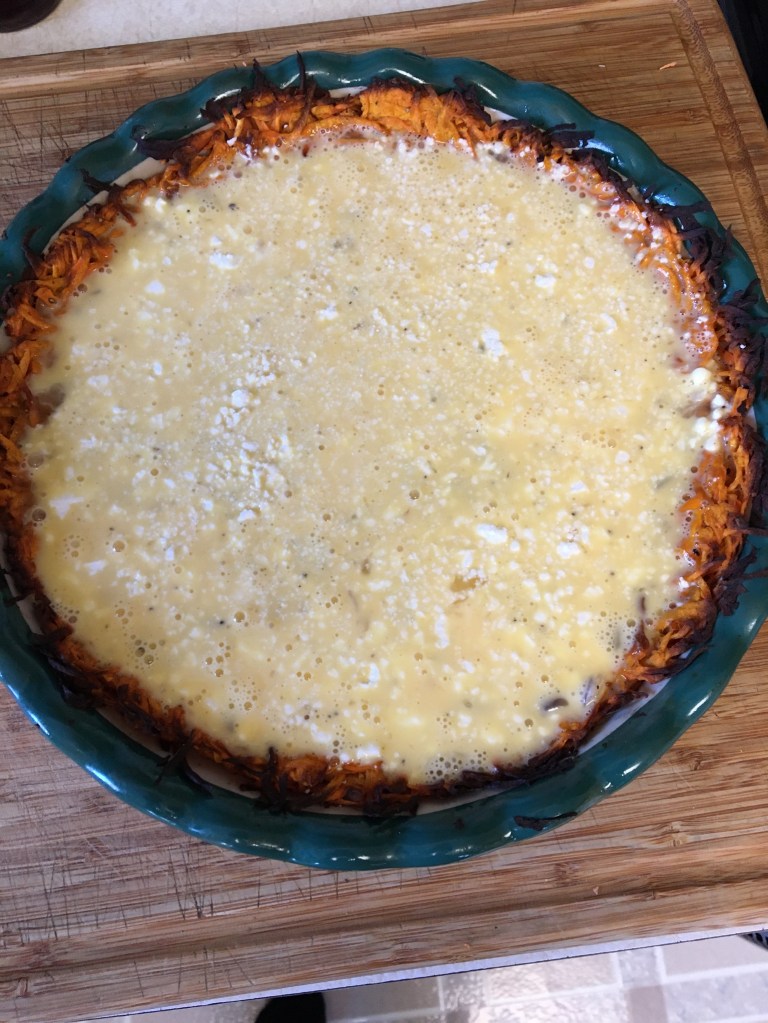
Remove sweet potato pie plate from oven and let sit for 10 minutes to cool slightly. Lower oven temperature to 350 degrees F. Pour filling mixture into crust. Sprinkle remaining Chevre over top. Bake at 350 degrees for 30 minutes. Remove from heat and let rest for ten minutes or so. Serve warm or at room temperature.


This was incredibly rich and delicious. It was easy to make. My pictures are awful, and I apologize. The tedious part of this was calculating the conversions from metric, so I want to get this down someplace so I don’t have to do it again. The recipe comes from thehappyfoodie.co.uk so if you want your quantities in metric, that’s where you can find them.
- Ingredients
- 1-1/2 cups flour
- 2 tsp. baking powder
- 1/2 tsp. salt (scant)
- 1/2 cup baking cocoa
- 1/2 cup butter
- 1 Tbsp. Chambord (I used raspberry cassis)
- 1/2 cup sugar
- 1/2 cup brown sugar
- 8 oz. bittersweet chocolate
- 3/4 cup brewed coffee, cooled (or 2 tsp. instant with 3/4 cup water)
- 3/4 cup water
- 2 eggs, room temperature, slightly beaten
- 8 oz. raspberries, fresh or frozen (thawed)
Prepare an 8 to 9″ springform pan by greasing or spraying with non-stick spray. Line the bottom with parchment paper. Preheat oven to 350 degrees F. Place a sheet pan under the springform or on a lower rack in the oven to catch drips from the springform while baking.
Mix flour, baking powder, salt, and baking cocoa together in a small bowl. Set aside. In a large saucepan, add butter, Chambord, sugar, brown sugar, chocolate, coffee, and water. Heat and stir until it’s all incorporated. The original recipe said it should be thick and glossy, but mine never did that. No worries. Remove from heat and let it sit for a couple minutes. Stir in the flour mixture and beat well. Gradually beat in the eggs. It’s a runny batter, but never fear, it works!
Pour half the batter into the bottom of the prepared springform pan. Sprinkle the raspberries across the batter in the pan. I used thawed frozen and gently scooped the raspberries out of the bag with my fingers and sprinkled them across the batter. I did not wring the juice out, nor did I pour the remaining juice over, but it might have been okay to do so. I simply sprinkled the wet raspberries across the top. Pour the remaining batter over the top, covering all the raspberries.
Bake at 350 degrees F for 40-45 minutes. The top of the cake does crack. You can’t use the toothpick test because this is supposed to be gooey in the center. Eyeball it so it’s not too jiggly. I baked mine about 43 minutes in a 9″ springform.
I let it sit for an hour and then removed the springform sides. The original recipe said to serve it on the springform bottom, but then you’re dealing with that parchment paper, as pictured. I should have slid it onto a plate, removing the paper. Next time!

You can sprinkle with powdered sugar to make it look prettier and you can serve with ice cream or whipped cream and fresh raspberries. It serves about 8 people.
