
You are currently browsing the category archive for the ‘Bread’ category.
- Ingredients
- 1-1/2 cups milk
- 3 Tbsp. sugar
- 3 Tbsp butter, cut into pieces
- 2 tsp. salt
- 3 tsp. dill seed
- 3 Tbsp. dried minced onion
- 1 cup shredded Parmesan
- 1 package active dry yeast (2-1/4 tsp.)
- 1/4 cup warm water (about 110 degrees F)
- 3-3/4 cups all-purpose flour (divided)
- 2 eggs
In a pan over medium heat, or in a safe bowl in the microwave, heat together milk, sugar, butter, salt, dill seed, onion, and Parmesan to about 110 degrees F. The butter and cheese does not have to melt.
While that’s going on, in a stand mixer (or a large bowl), dissolve yeast in warm water. Then, add the milk mixture and 1-1/2 cups flour. Mix very well. Add eggs, one at a time, beating well after each addition. Gradually beat in the remaining flour until well incorporated. Cover and let rise in a warm place until doubled (about 45 minutes).
Stir the batter down and spoon into 2 generously greased or sprayed 4-1/2 x 8-1/2″ loaf pans. Cover and let rise in a warm place until almost doubled (about 45 minutes).
Bake in preheated 350 degree F oven for 40-45 minutes or until browned. Let cool on a rack for 5-10 minutes, then turn out onto rack to cool completely. Makes 2 loaves.
Notes: Batter breads are made from a very soft yeast dough, thus the term “batter” bread. This is a variation of Cheddar-Caraway Batter Bread. It comes from Sunset Breads (Lane Publishing Co, Menlo Park, CA 1984). Unlike most batter breads, it requires two rises. This makes a very nice sandwich bread. The onion flavor is pretty strong, so if you don’t want that, sprinkle with onion powder. If the dill seeds bother you, substitute 2 teaspoons of dill weed. I have tried the onion powder/dill weed subs with great success. It’s all good!
- Ingredients
- 1 cup warm water, divided
- 2 tsp. yeast
- 1/4 cup sugar, divided
- 2 Tbsp. melted butter
- 1 egg
- 1 tsp. cider vinegar
- 11.5 oz gluten-free baking blend with xanthan gum (2.75 cups)
- 1 tsp. salt
- 1 Tbsp. melted butter (for brushing on the top)
In a stand mixer, place 1/4 cup warm water, yeast, and a couple tablespoons of sugar. Let stand until the yeast is dissolved and the mixture is frothy. In a separate bowl, whisk together gluten-free flour, remaining sugar, and salt. Set aside.
Into the stand mixer, add remaining 3/4 cup warm water, melted butter, egg, and cider vinegar. Mix in flour mixture. Let the mixer run for 3 minutes on medium.
Spray an 8″ or 9″ cake pan with non-stick spray. Using a 1/4 measuring cup, dollop the batter into the cake pan, to get 9 mounds of batter. It’s best to start in the center.
Dip your fingertip in warm water and smooth out the tops of the mounds. Cover the pan with a dry towel. Let rise for an hour or so.
Preheat oven to 400 degrees F. Bake rolls 25-28 minutes at 400 degrees F. The tops should be golden brown. Remove from oven and brush the tops with melted butter. Serve.
NOTES: I was amazed that this worked so well. I used Bob’s Red Mill 1 to 1 Baking Flour. I weighed my flour as that is the most accurate way to measure flour. The recipe is from mygluten-freekitchen.com and I would recommend that you visit her site for more detailed instructions. She offers a lot of options regarding types of gluten-free flour, xanthan gum, yeast, and dairy. I’m just telling you here how I did it.
I learned that since there is no gluten to build, it doesn’t hurt anything to mix it for awhile. Mixing helps the flour to absorb the moisture. I learned that the pan provides the structure. If I had used an 8″ pan, instead of a 9″ pan, my rolls would not have been so flat. I learned that 1/3 cup dollops, as stated in the recipe, was too much so I ended up only with 7 rolls, as pictured. Next time I will use a 1/4 cup measurer. When I started, I used 1/4 cup warm water to activate the yeast. Then I measured 3/4 cup more warm water when it was time, so that it didn’t cool in the interim. Again, visit mygluten-freekitchen.com for more options. All in all, these turned out great and everyone liked them. They were soft and fluffy and went really well with the Beef Bourguignon.

- Dough ingredients
- 1 cup milk
- 2 tsp. dry yeast
- 2 tsp. sugar
- 1/2 tsp. salt
- 1/3 cup butter, melted
- 1 egg
- Apx. 3 cups flour
- Filling ingredients
- 1 large onion, chopped
- 2 Tbsp. butter
- 1 lb. hot-smoked salmon, flaked, with bones and skin removed
- 3 Tbsp. fresh dill, minced
- 12 oz. cream cheese, softened (room temperature)
- 1 tsp. garlic powder
- 3/4 tsp. salt
- 1/2 tsp. smoked Spanish paprika
- 1/2 tsp. ground black pepper
- 1 cup farmer’s “quark” cheese (or ricotta)
- Egg Wash ingredients
- 1 egg
- 1 Tbsp. water
- 2 Tbsp. fresh dill, minced
Dough: Heat milk to 110 degrees. I use a stand mixer for this next part. Pour milk into the bowl and sprinkle yeast over the top and stir around a bit. Wait 5-10 minutes for the yeast to dissolve. Stir in sugar, salt, butter, and egg. Mix until well combined. Using the dough hook, stir in 2 cups flour. On low speed, over the course of ten minutes, let the gluten build while occasionally adding more flour. Once the dough is smooth to the touch by using the least amount of flour possible, set the dough aside to rise to double in size, about an hour and a half.
Filling: While the dough is rising, melt butter in a skillet and saute onions in butter until they are translucent. Do not brown the onions. Remove from heat and let cool.
Place the flaked salmon into a large bowl and stir in the onion and dill. In a separate medium bowl, beat the cream cheese until it is fluffy. Stir in garlic powder, salt, paprika, and pepper until well mixed. Gently stir in farmer’s cheese. It’s okay to have lumps, don’t overmix. Stir the cream cheese mixture into the flaked salmon mixture. Again, do not overmix.

Assembly: Prepare a couple baking sheets with parchment paper or a silpat or by greasing. On a floured surface, divide the dough into 8 equal pieces. To prevent them from drying out, cover the pieces you are not working with. Roll the first piece into a 7″ by 4″ rectangle. Lay about 1/2 scant cup of filling along 3/4 the length of the dough. Pull the dough up each side of the filling and press along to the top to seal. Make sure not to get filling onto the edges of the dough or it may not seal. The 1/4 length without filling, press flat. Make sure the seam is sealed very well. Using a sharp floured knife, cut the flat part in half to form the tail. Move it to a prepared baking sheet. Using a finger, gently press little indentations along side the seam on each side. Repeat with the remaining seven pieces of dough. Cover the baking sheets. Let stand until puffy, about 30 minutes. This is easiest to see on the tails.


Preheat the oven to 350 degrees F.
Make the egg wash by mixing together an egg and water. Brush the egg wash carefully over each puffy piroshki. Bake at 350 degrees F for 28-35 minutes. Remove from heat and let cool for about ten minutes before serving. Yum!

NOTES: This recipe originates with Tatyana’s Everyday Food. Tatyana has an excellent video of how to make these. Be certain to seal them well or they may split open. Yes, this is experience talking to you. Piroshki’s are like calzone. The bread is meant to be thin and the filling generous. I smoked my own salmon and I made my own farmer’s (ricotta) cheese. These Piroshkis make a very filling lunch. They freeze well.
- Ingredients
- 1 cup + 2 Tbsp. flour
- 3/4 cup sugar
- 1 tsp. cinnamon
- 1/2 tsp. baking soda
- 1/2 tsp. baking powder
- 1/4 tsp. salt
- 1/3 cup cooking oil
- 2 eggs
- 1/2 tsp. vanilla extract or paste
- 1 cup shredded zucchini
- 1 cup shredded apple
Preheat oven to 350 degrees. Prepare a 12-cup muffin tin by spraying with non-stick or use paper liners.
In a large bowl, stir together dry ingredients. In a smaller bowl stir together oil, eggs, and vanilla. Stir the oil mixture into the dry ingredients until incorporated. Fold in the shredded zucchini and apple. Distribute batter equally into prepared muffin tin. Bake at 350 degrees for 25 minutes.
NOTES: I did not peel either the zucchini or the apple. I did drain the zucchini a bit before using it, but I don’t think it was that important. A wetter batter would take a few minutes more to bake, that’s all. Full disclosure, I had a giant zucchini and was making something else. I scooped out and discarded the seeds, then shredded the zucchini flesh. I had about a cup of shreds leftover from my original purpose, so saved that and used it to make these delicious muffins.
- Ingredients
- 8 oz (1 stick) butter, melted
- 1/2 cup sugar
- 1/4 cup honey
- 2 eggs, room temperature
- 1 cup buttermilk, room temperature
- 1 cup flour
- 1 cup cornmeal
- 1/2 tsp. salt
- 1/2 tsp. baking soda
- Optional apx. 1/2 Tbsp. butter
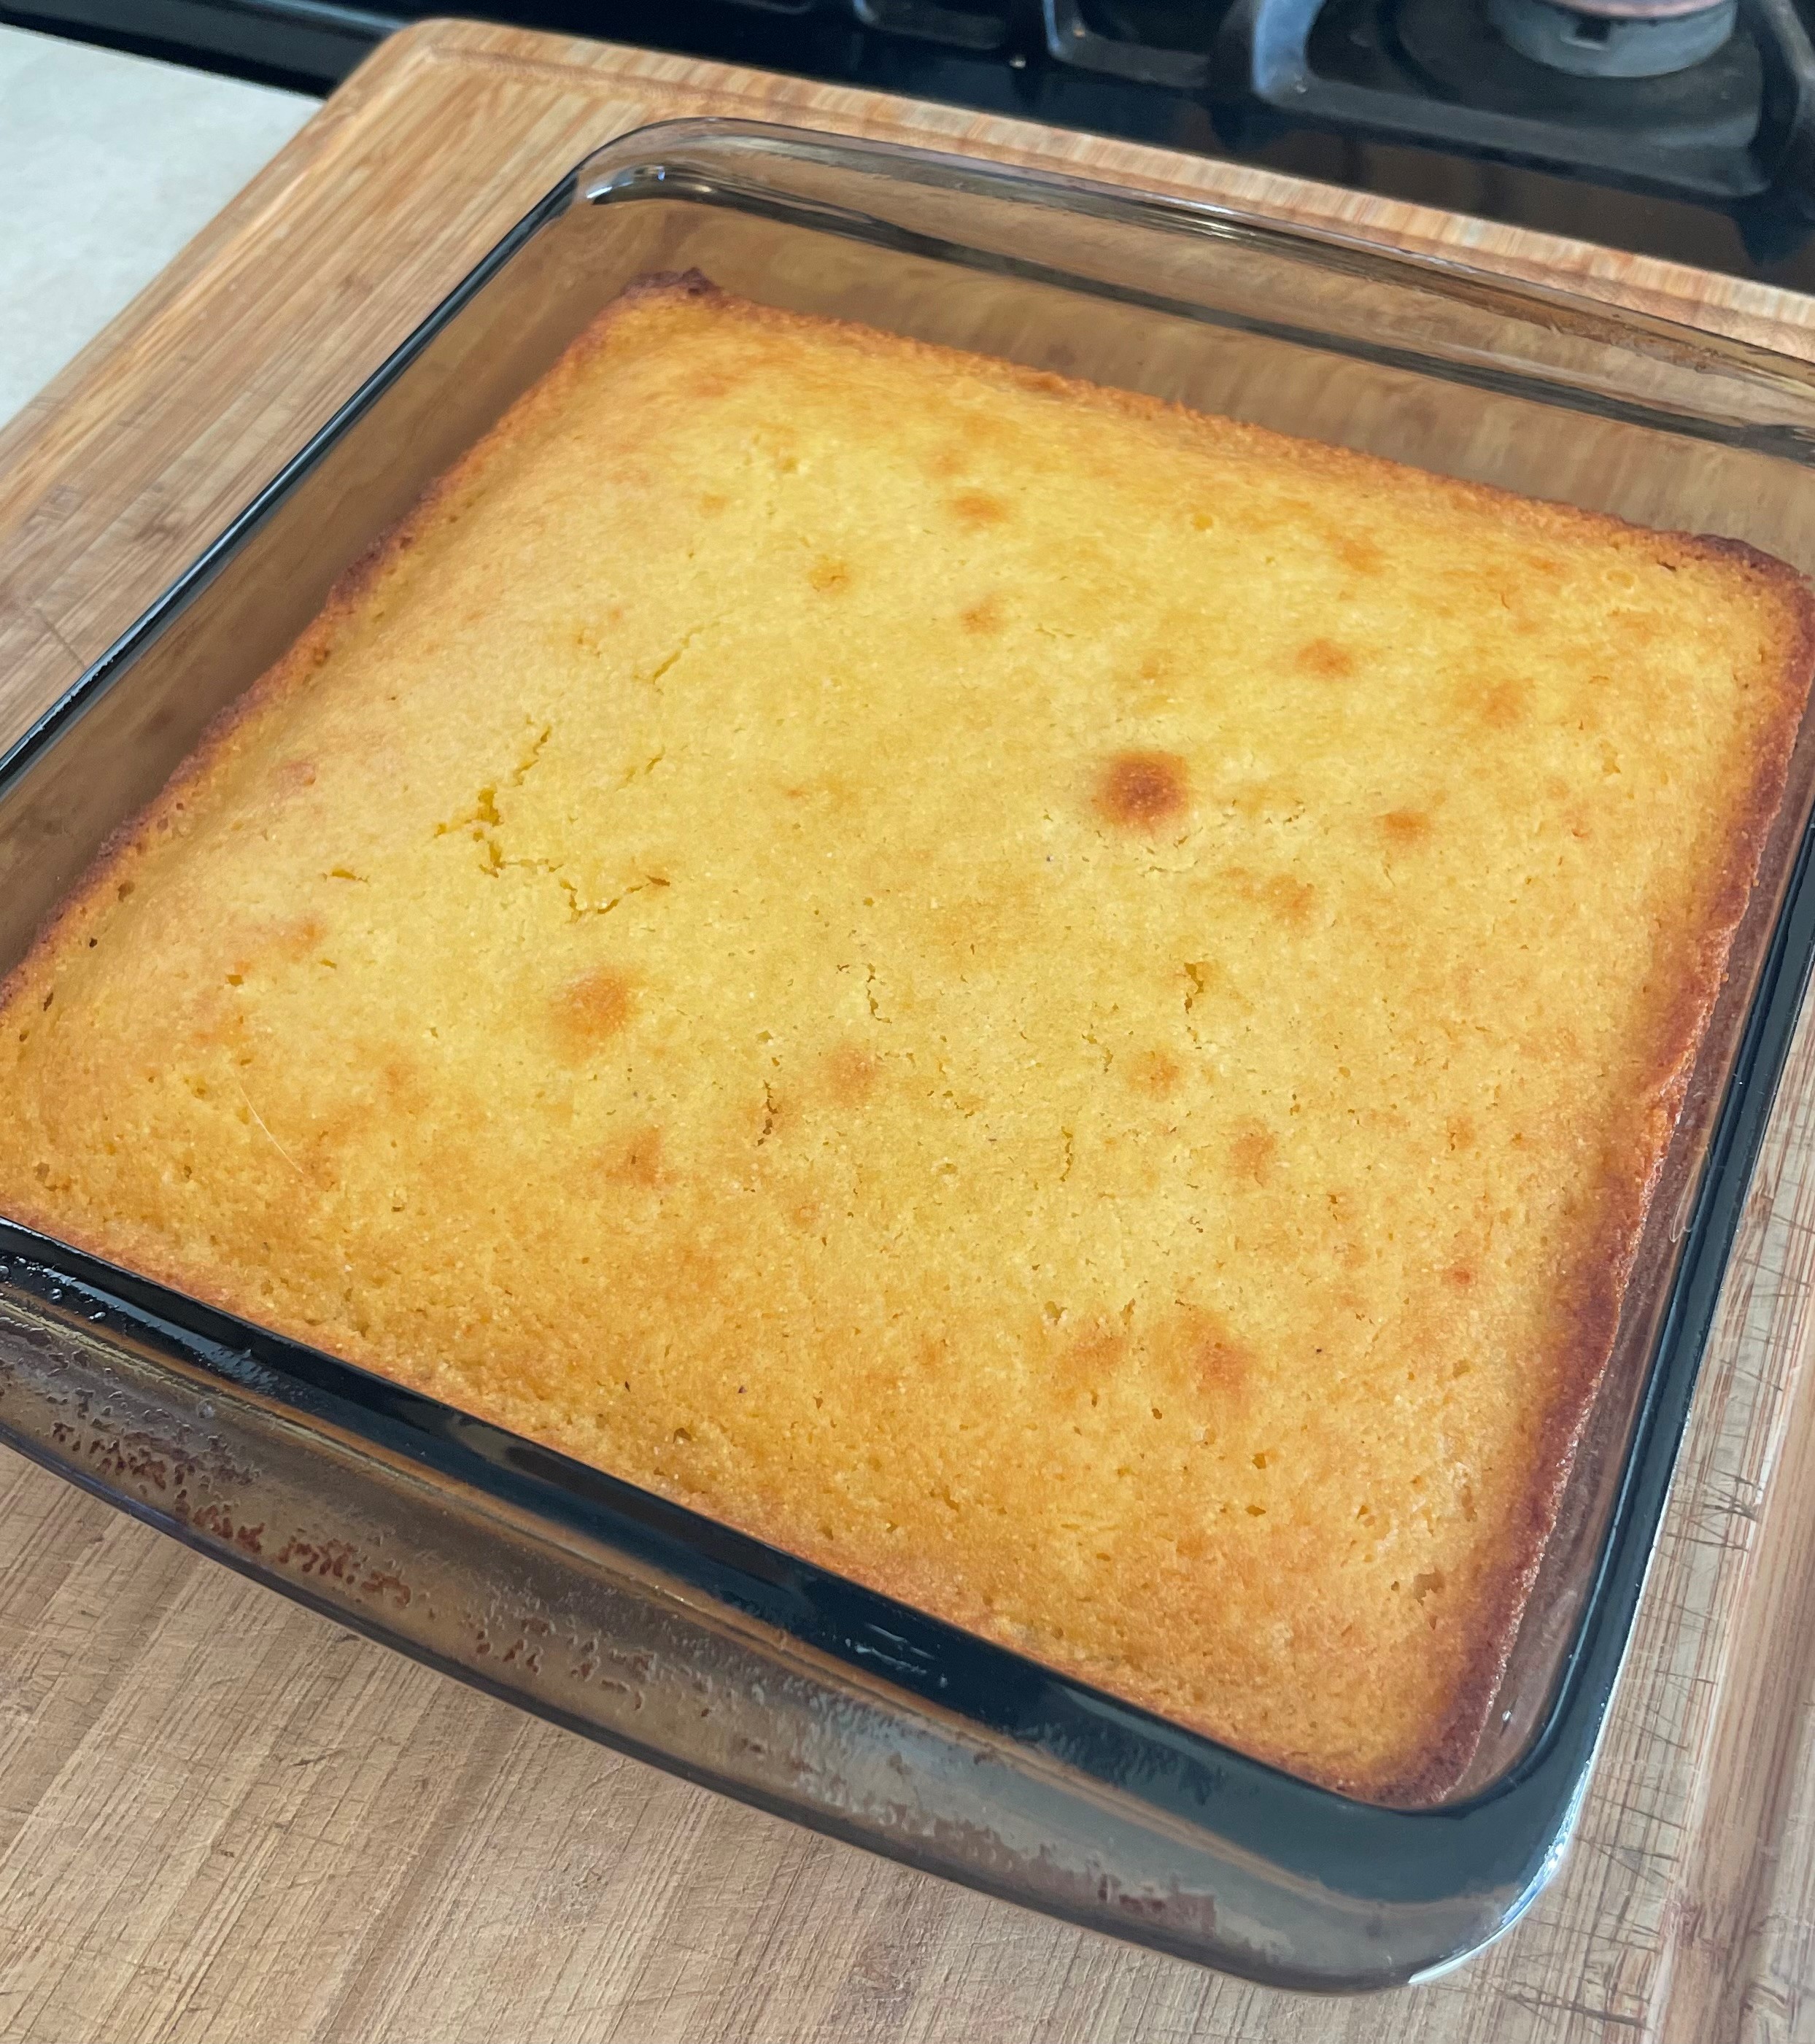
Prepare an 8″ square baking dish with butter or by spraying with non-stick spray. Preheat oven to 375 degrees F.
In a large bowl, mix together the melted butter, sugar, and honey until well combined. Stir in eggs, one at a time, until well combined. Stir in buttermilk until well combined.
In a separate bowl, stir together dry ingredients. Gently stir the dry ingredients into the butter mixture and stir until most of the lumps are gone. Pour into the prepared baking dish and smooth the top. Let it stand for three minutes. Bake at 375 degrees for 25-35 minutes. It’s done when a cake-tester comes out clean. It will be golden brown across the top. You may brush the optional 1/2 Tbsp. butter across the top of the hot bread. Let stand 5-10 minutes, slice, and serve.
NOTES: This is a SUPER sweet cornbread, but it’s exceedingly delicious and goes great with chili, pulled pork, or soup. YUMMY! The recipe originates with LifeMadeSimpleBakes.

This recipe is based upon the one found in Electric Bread (Innovative Cooking Enterprises, 1991) written by Suzan Nightingale. I haven’t used a bread machine in years, but I’ve adapted the recipe to my stand mixer and oven. It really works! Make sure your sourdough starter is active. Most people don’t have 2 cups of it at the ready, so planning may be involved. The last couple of times I made this, I doubled the recipe.
- Ingredients
- 3 tsp. active dry yeast (or instant)
- 2 cups sourdough starter
- 2 Tbsp. sugar
- 2 Tbsp. powdered milk
- 1-1/2 tsp. salt
- 2 Tbsp. butter
- 2-3 cups flour
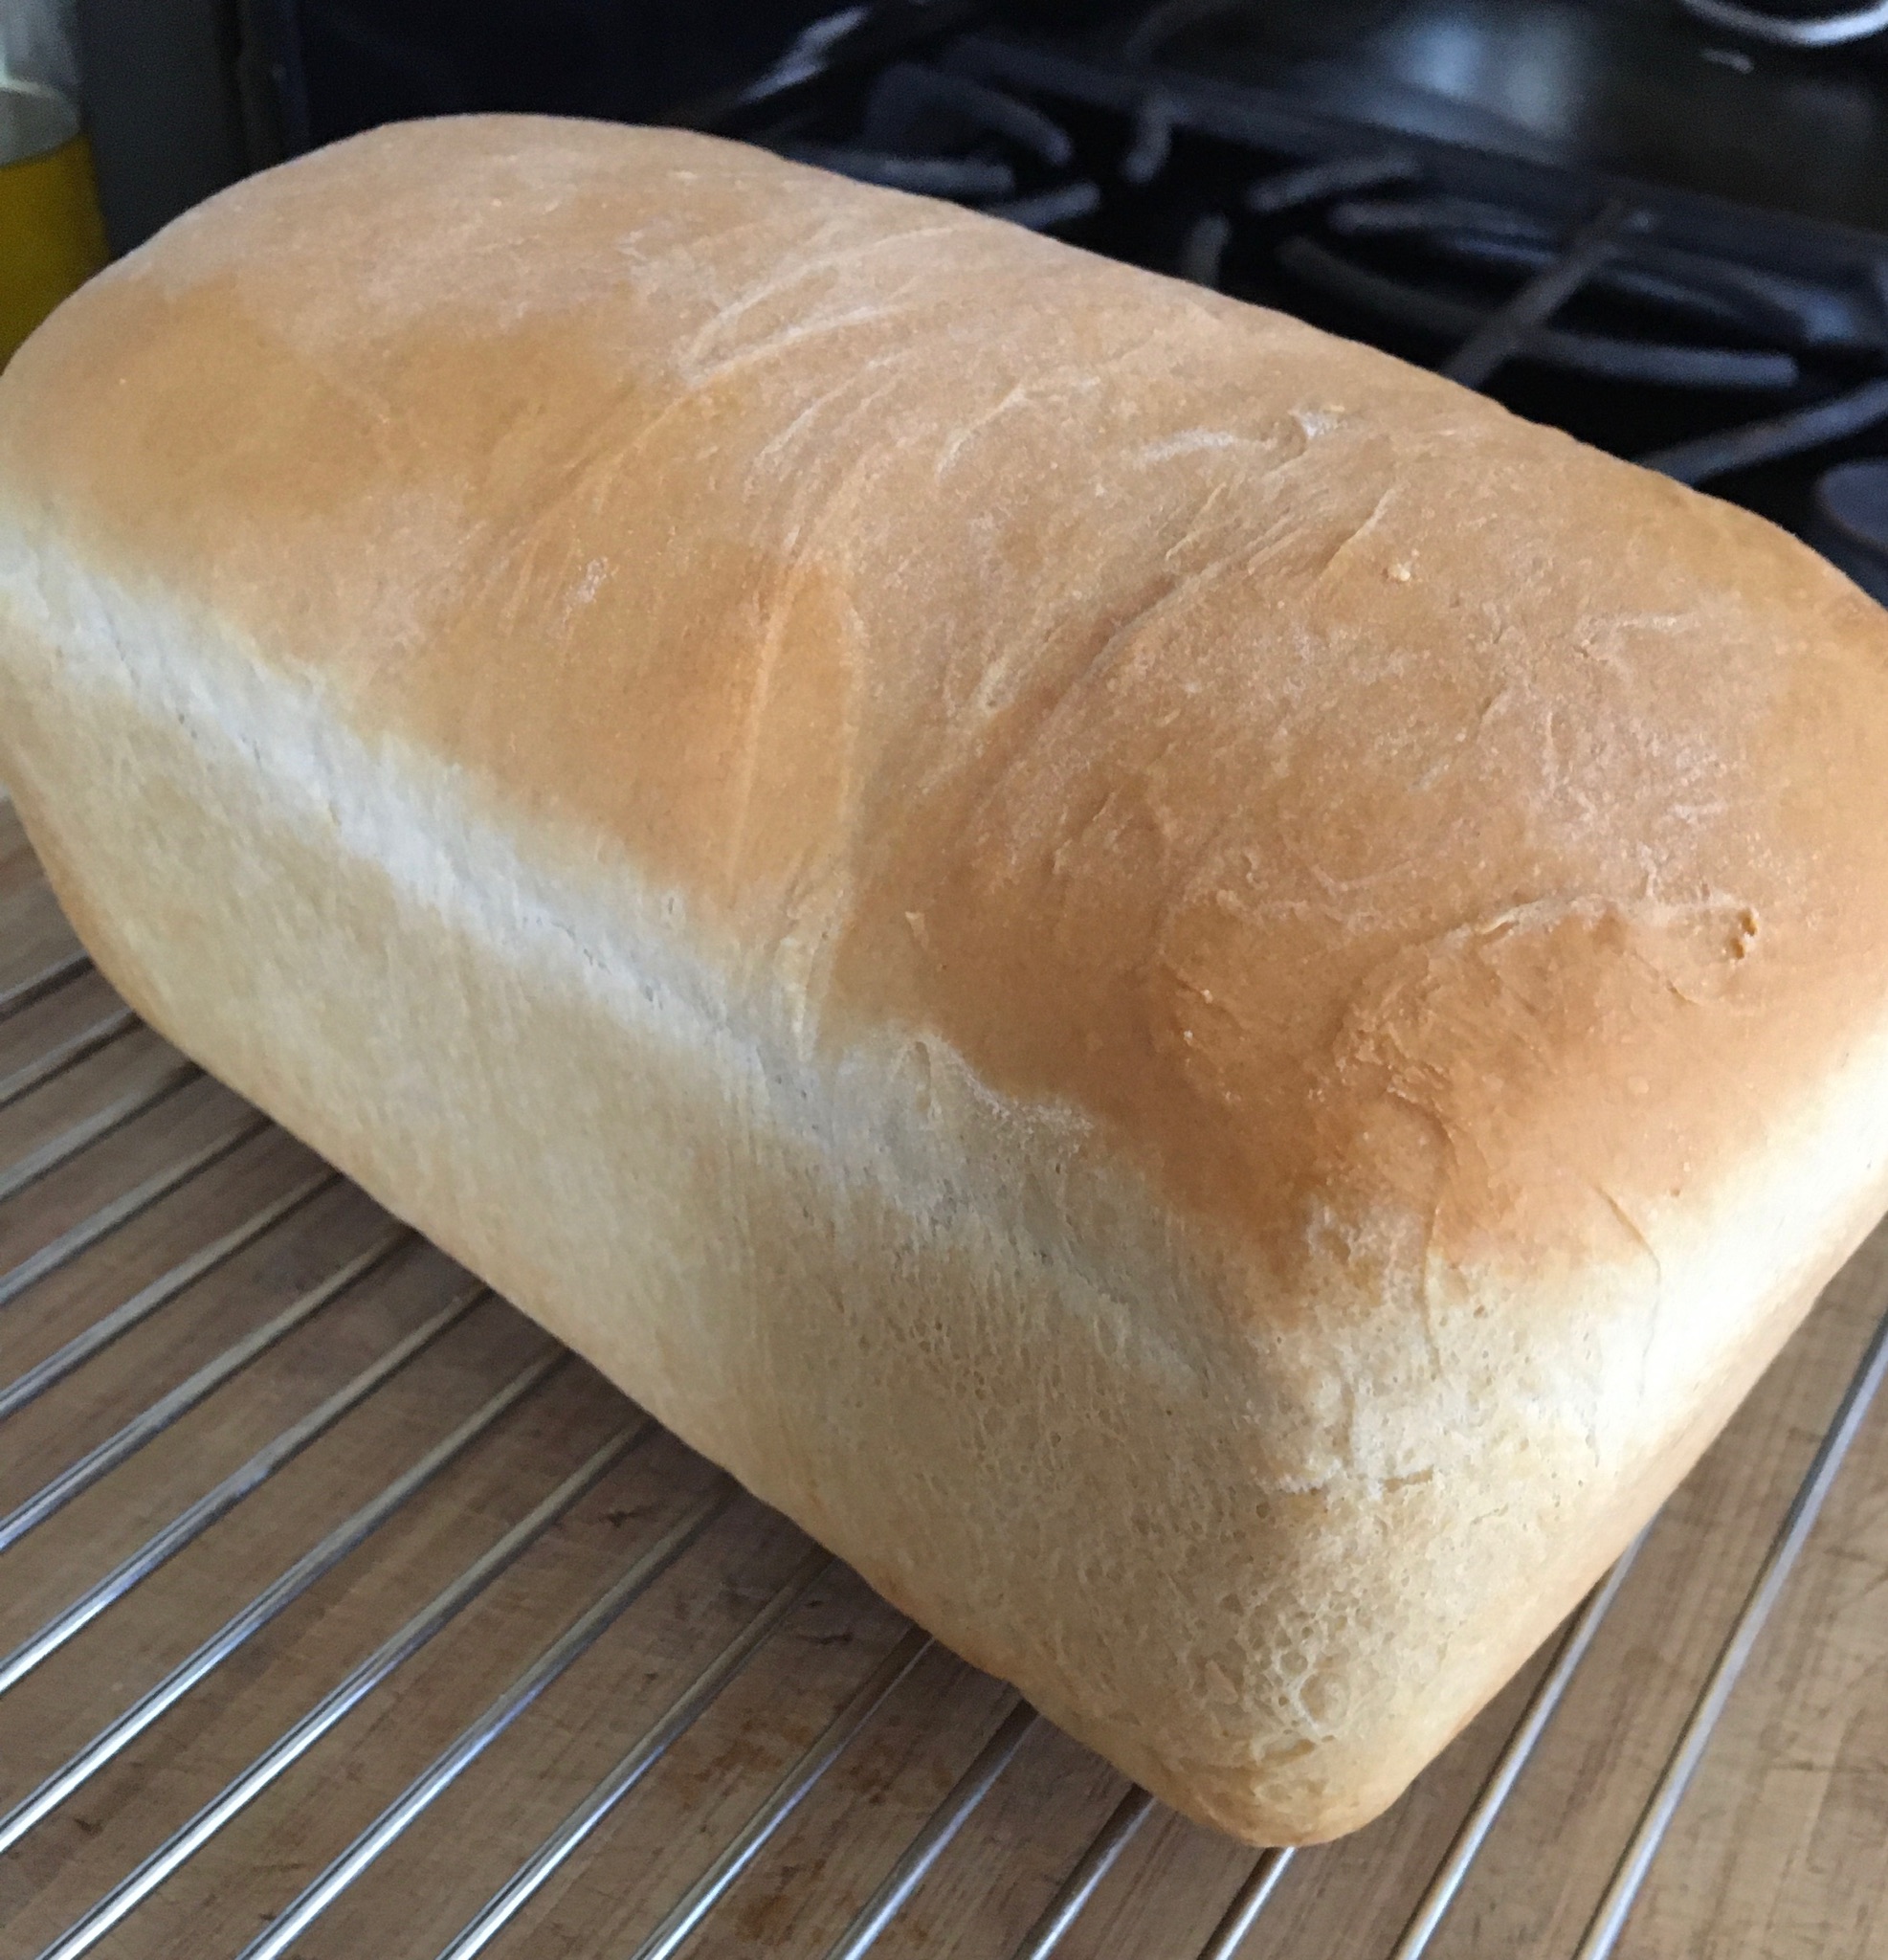
In the bowl of a stand mixer fitted with a dough hook, stir together the yeast, sourdough starter, and sugar. Once the yeast has started to dissolve, stir in the powdered milk, salt, butter, and 1-1/2 cups flour. Turn the machine on low and let it mix for 5-8 minutes to build the gluten. Start adding flour a little at a time until the dough comes away from the sides of the bowl and clings to the hook. The dough should feel smooth and elastic. Remove the dough hook and cover the bowl. Let sit in a warm place for a couple hours or so, until the dough has doubled in size. Punch it down and form into one loaf. Spray or grease a 9×5″ loaf pan and set the dough into the pan. Let rise in a warm spot until it rises level with the top of the loaf pan. Preheat the oven to 350 degrees. Bake at 350 degrees for 40-50 minutes. Bread should sound hollow when tapped and it should be a golden color all over.
When I made this last week, I doubled the recipe. After the first rise, I placed both loaves into loaf pans. One loaf I let rise and the other loaf I placed into the freezer. Once it was frozen, I removed it from the pan and wrapped it tightly in plastic cling wrap. According to sources on the Internet, I should be able to take it out of the freezer, put it into a loaf pan, let it thaw and then rise like usual, and then bake. I’m hoping that works. I’m awash in sourdough and don’t eat that much bread.

A friend posted a picture of several loaves of Julekake that he had made and I remembered my mother making it at Christmas. I’ve been in Nevada over a month, visiting my parents for the holidays, and we have been unable to lay hands on candied red cherries, so Mom got maraschino cherries instead. I thought I would give Julekake a try with what we had on hand. It turned out delicious! I made it in a loaf pan so that it could be easily cut and toasted later.
- Ingredients
- 1/4 cup butter
- 1 cup milk
- 1/4 cup water
- 1 package (2-1/4 tsp.) active dry yeast
- 1/4 cup sugar
- 1 Tbsp. orange zest
- 3-4 cups flour, divided
- 1 tsp. salt
- 1/4 tsp. ground cardamom
- 1 cup mixed candied fruit and raisins
Heat butter, milk, and water together until it’s hot to the touch, but not scalding. Sprinkle yeast over and let it dissolve, stirring once in awhile. Stir orange zest into the sugar, mashing it around to get the sugar infused with the orange oil. Stir the sugar-zest mixture into the yeast mixture. Stir in about 2 cups flour, salt, and cardamom. Stir and stir and stir to build up the gluten. When it’s stretchy, start adding flour, one half-cup at a time, stirring well after each addition. When it becomes too hard to stir, take it out of the bowl and start kneading on a lightly floured surface. At this point, use as little flour as possible. Knead for about five minutes. Once the dough ball is smooth and springs back when touched, press it flat. Sprinkle about a third of the mixed fruit over the surface. Roll up the dough and knead a little bit. Press flat again and sprinkle another third of the fruit over, then roll it up and knead it again. Do that one last time with the remaining fruit. The fruit should be well incorporated into the dough.
Place the dough into a greased bowl and turn the dough over so that the top of it is also greased. Let rise in a warm place until nearly doubled, 1 to 1-1/2 hours should do it. You can leave it longer if you don’t have time to deal with it.
Punch the dough down and shape into a loaf and place into a greased loaf pan 8-1/2 x 4-1/2. Let rise until just over the top edge of the pan. Preheat oven to 375 degrees. Once the oven has heated, place the loaf into the oven and bake for 30-35 minutes.
Notes: I used about a third cup of chopped green candied cherries, a third cup of raisins, and a third up of chopped maraschino cherries. Maraschinos have too much liquid, so I let them drain onto a paper towel and chopped them on the paper towel. It wouldn’t hurt anything to let them sit out for quite awhile to lose more moisture and get tacky.
You should be able to make this into different shapes: rings or rolls and also you can drizzle icing over, an almond icing would be great. I knew we could not eat this all while it was fresh, so my goal was to be able to toast it in the toaster later, thus no icing. It’s been really delicious toasted and slathered with butter. Yum!
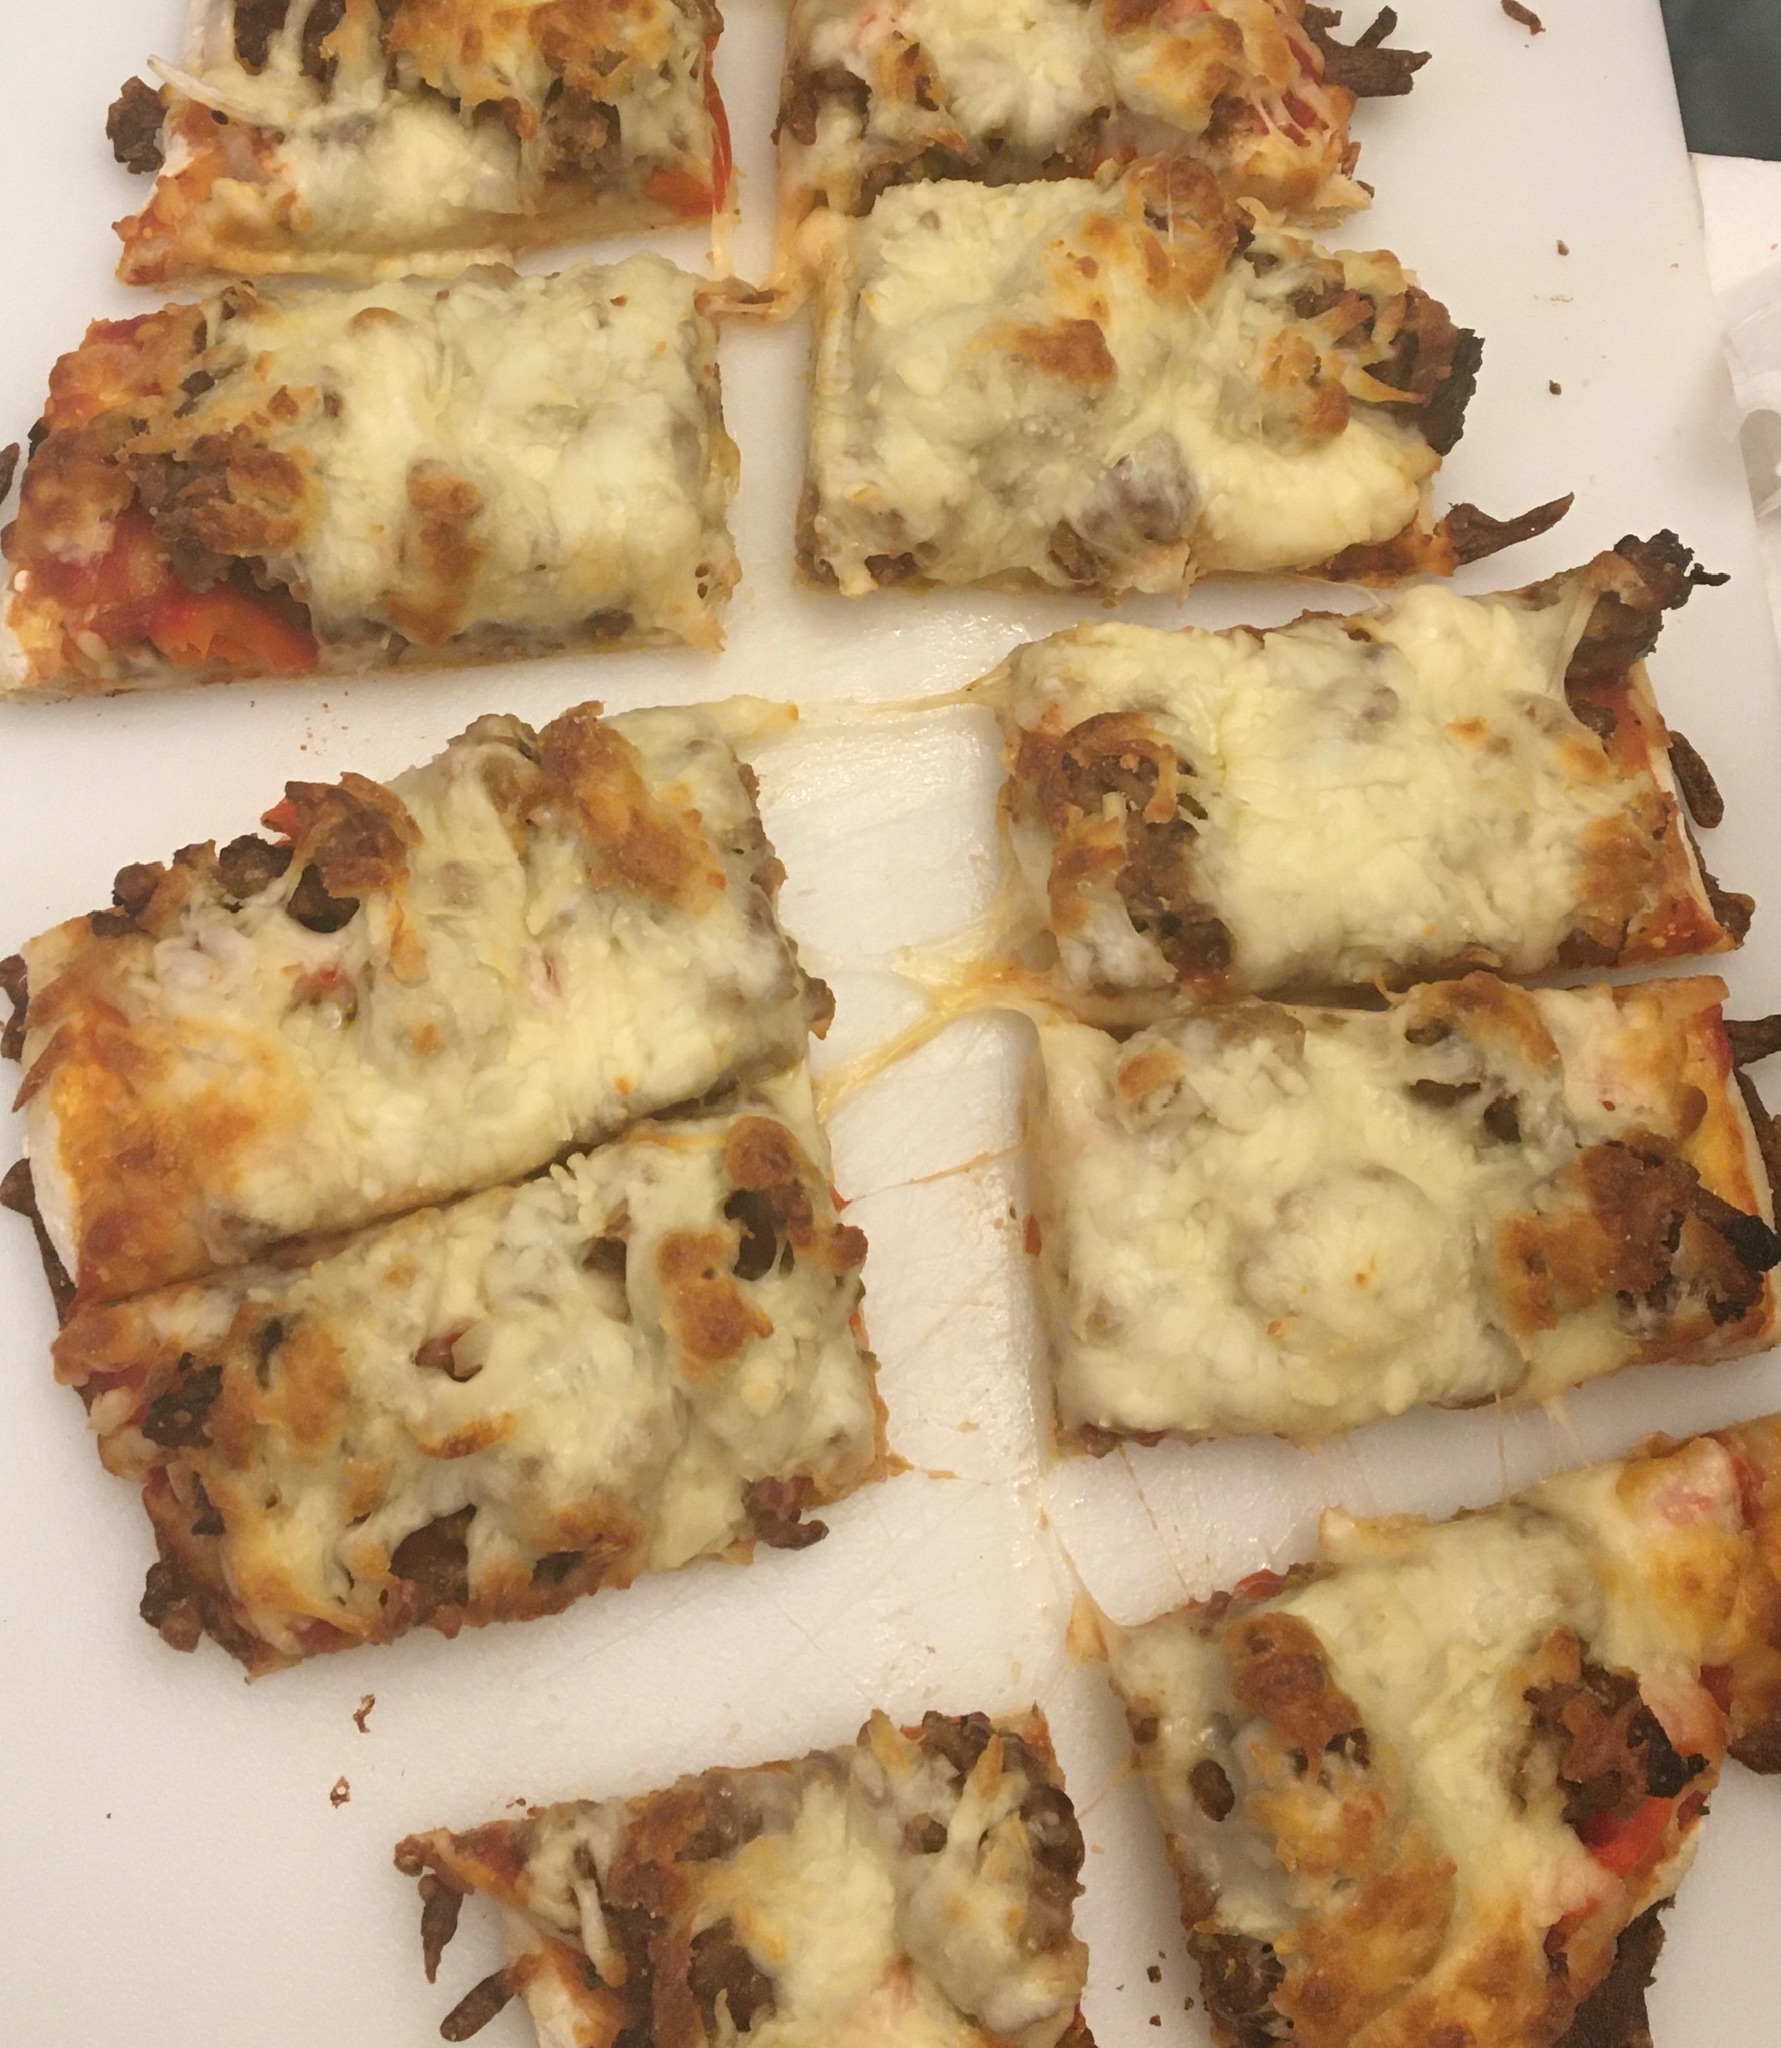
This is my new favorite pizza dough recipe. I’m not a pizza crust connoisseur by any means, but this crust made me pause and ask, “Where have you been all my life?” The recipe originates at babysavers.com.
- Ingredients
- 1/4 cup warm beer
- 3/4 cup warm water
- 1 package (2-1/4 tsp.) active dry yeast
- 1 Tbsp. sugar
- 1 tsp. salt
- 1 Tbsp. olive oil, plus more for drizzle
- 2-1/2 to 3-1/2 cups flour (I have used both bread flour and all-purpose to great effect)
- Favorite toppings
This recipe makes one 16″ pie or a couple smaller ones.
Mix beer, water, yeast and sugar together and let sit until foamy. Stir in salt and olive oil and 1 cup flour. Stir and stir and stir to build the gluten. Stir in more flour in half-cup increments until it’s a bit shaggy. If you’re using a stand mixer, keep mixing and adding smidges of flour until the the dough is smooth. If you’re doing this by hand, turn it out onto a floured surface and knead for 6-8 minutes until the dough is smooth. Place the dough ball into a lightly oiled bowl and drizzle more olive oil over the top. Cover with a damp cloth and let rise in a warm spot for 45 minutes or so.
Preheat oven to 425 degrees F. Prepare your pan(s) by covering with parchment paper or lightly greasing or oiling or spraying with non-stick spray. Prepare your toppings.
Roll the dough out to about 1/4″ and set on your prepared pan(s). BAKE FOR 4-5 MINUTES (PARBAKE)!
Remove the parbaked crusts from the oven and sprinkle with your favorite toppings. Return to the oven and bake 8-12 minutes or until crust is golden and toppings melted.
Notes: What I liked about this was the flavor coming off of the beer. I heat my beer in the microwave until it’s warm to the touch, but not scalding hot. Don’t want to kill the yeast. The beer makes for a deeply flavored crust. My 89-year-old dad said it was the best pizza he ever had, so that’s saying something. The last time I made this I increased the ingredients a little bit because I didn’t think there would be enough pizza. I was wrong because we ended up with leftovers, but it turned out well, so now I know it works. I just eyeballed and added about a third more of everything and then made one pizza on a very large baking sheet and the other one on a smaller baking sheet. I think the key is the parbaking. It means the sauce doesn’t cause the crust to get soggy or worse, remain raw.
The topping ideas are endless: Italian sausage, pepperoni, chicken, mushroom, mozzarella cheese, parmesan cheese, tomato sauce, pesto sauce, Canadian bacon, pineapple (euw), bacon, peppers, tomatoes, onion. I remember eating a kabab pizza in Sweden, but I can’t remember what constituted the kabab. It was yummy, though. Some kind of meat with some kind of white sauce drizzled over. I really love a spicy Thai pizza with chicken and sweet chile sauce and peanuts and bean sprouts. This is making me hungry.

People joke about holiday fruit cakes and I get that. But there are people who genuinely enjoy them, my father, my husband, and myself being three of them. I inherited my mother-in-law’s recipe box when she passed away on Good Friday 1991. I think I had actually started making these fruit cakes prior to that, but I really didn’t get into the swing of it, realizing that the brandy was key, until just a few years ago. In 2019 I made two batches and sent my dad a couple different loaves, soaked in brandy. Soaked. My husband and I took a loaf out of the freezer last month, and oh my, it was the best ever! So, here we go, this is what you do . . .
- Ingredients
- 3 oz. candied diced lemon peel
- 3 oz. candied diced orange peel
- 1/4 # candied chopped pineapple
- 1/4 # candied diced citron
- 1/2 # chopped pitted dates
- 1/2 # candied cherries, halved
- 1/2 # raisins
- 1/4 # rough chopped walnuts
- 1/4 # rough chopped pecans
- 1/4 cup flour, for dredging
- 1 cup shortening
- 1/2 cup sugar
- 1/2 cup honey
- 5 eggs, well beaten
- 1-1/2 cups flour
- 1 tsp. salt
- 1 tsp. baking powder
- 1 tsp. allspice
- 1/2 tsp. nutmeg
- 1/2 tsp. ground cloves
- 1/4 cup orange or grape juice
- Apx. 3 cups brandy
In a very large bowl (mine is 32 cups), dredge fruit and nuts in 1/4 cup flour and set aside.

Preheat oven to 250 degrees F. Prepare three 3-1/2 x 7-1/2″ loaf pans by spraying with non-stick spray and lining with parchment paper, allowing at least a 1/2″ overhang on all sides of pans. Heat 2 cups water to boiling in another pan.
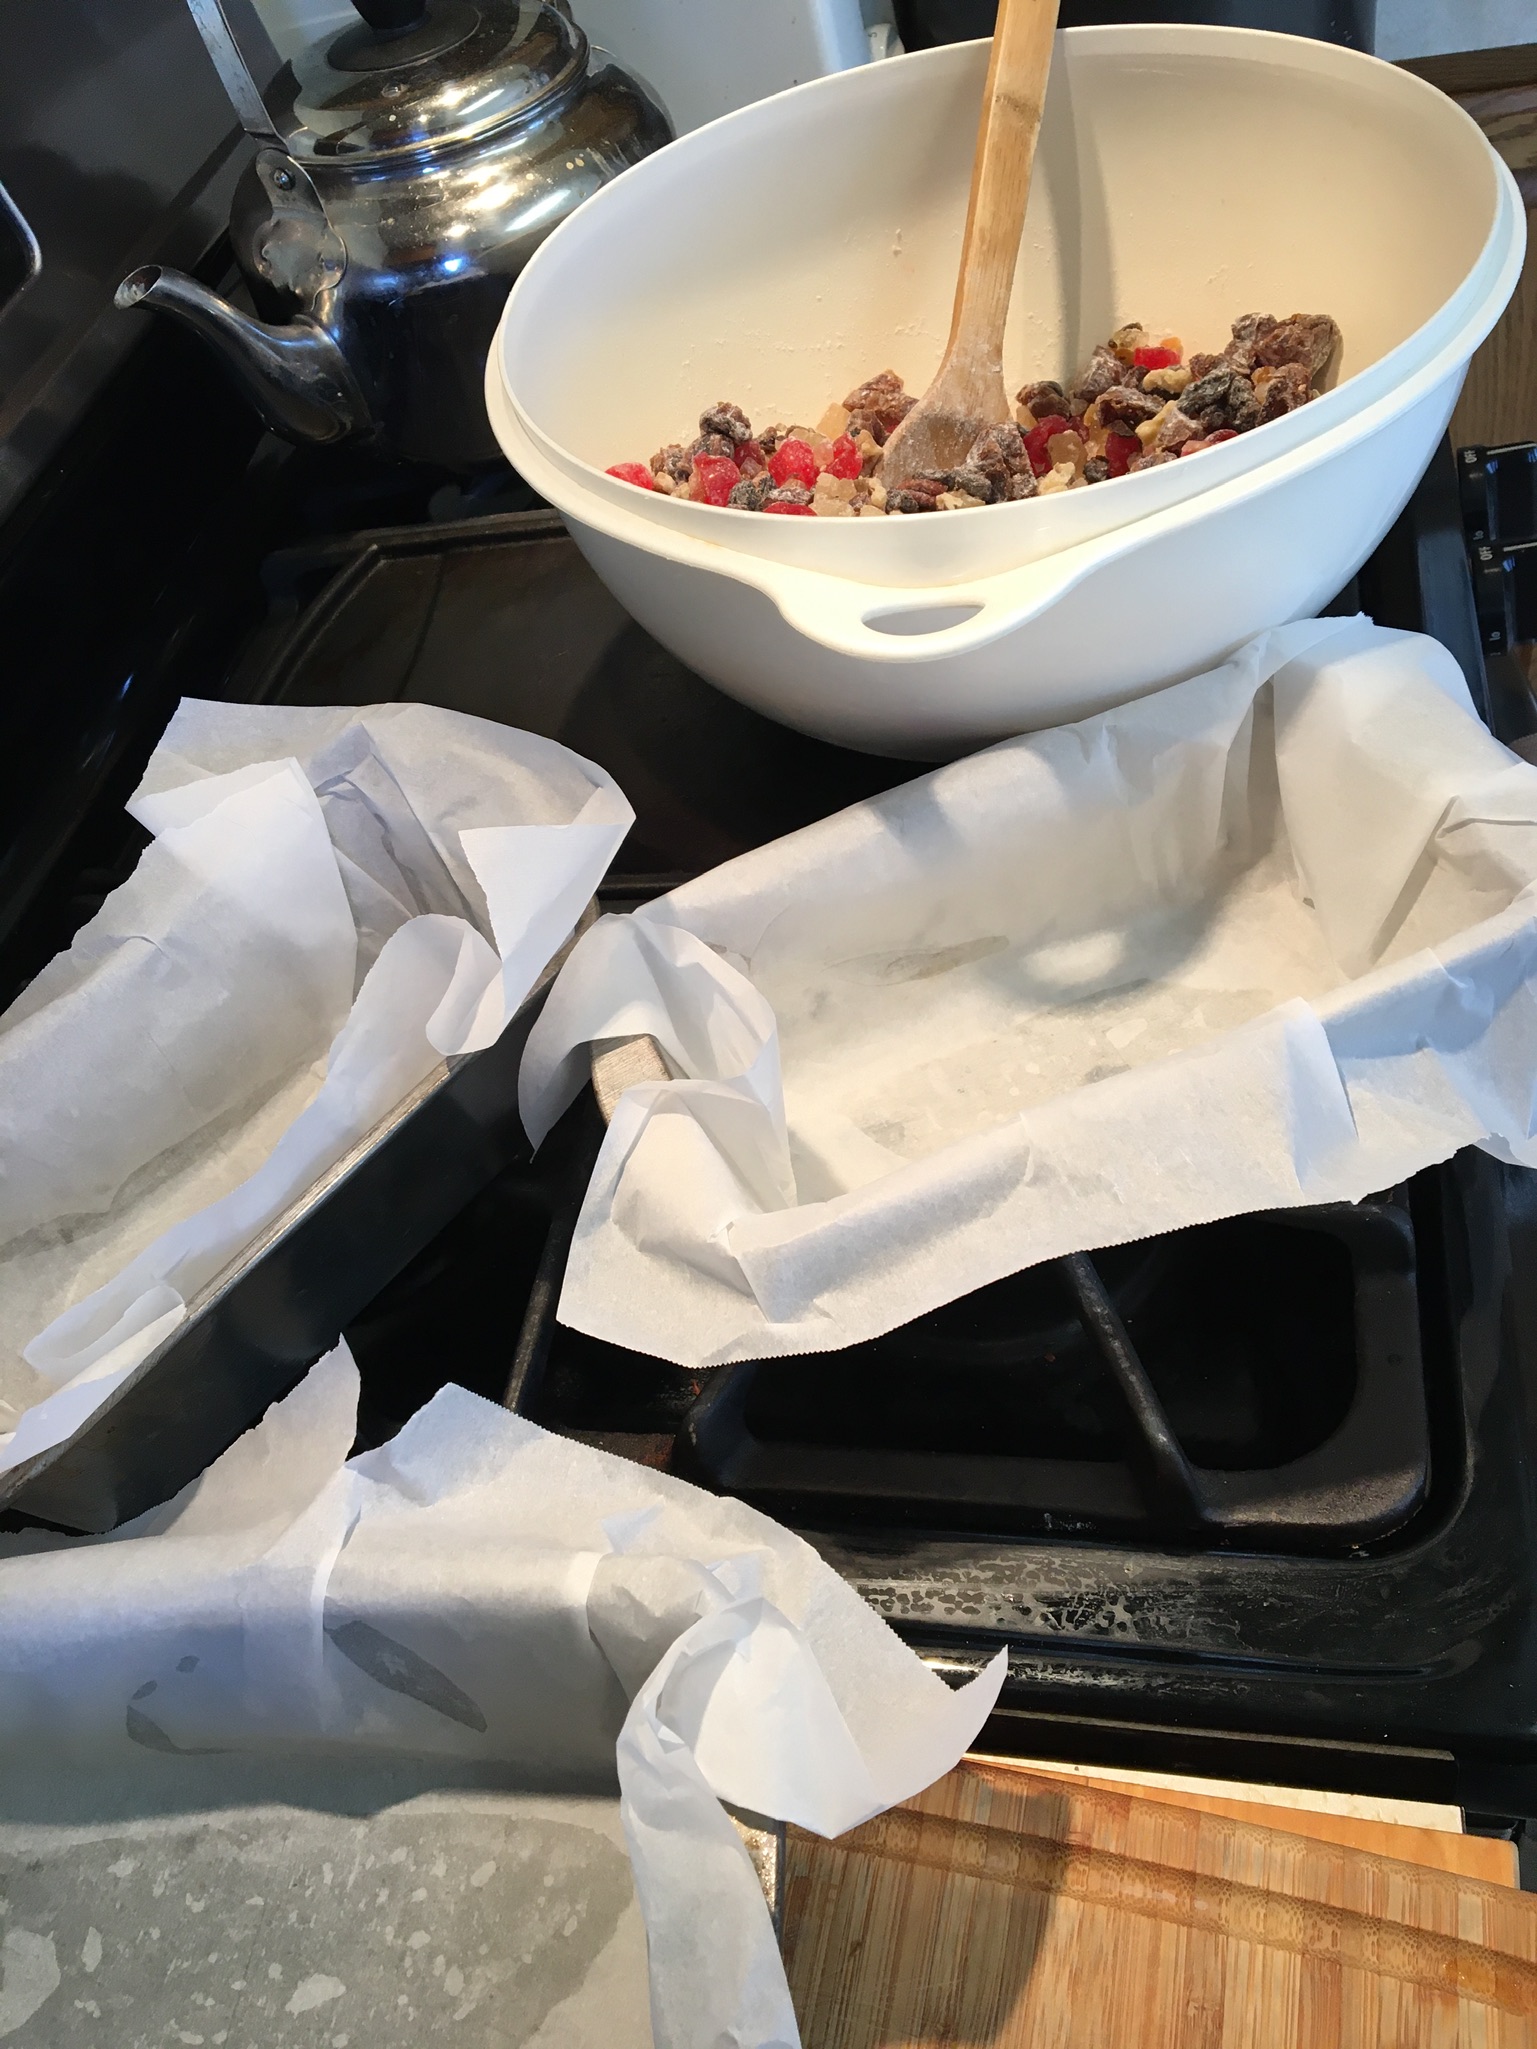
In a separate bowl (I use a stand mixer) cream sugar and shortening. Add honey, then eggs, and beat well. Sift remaining dry ingredients and stir in alternately with fruit juice — beat thoroughly. Pour batter over floured fruit in the very large bowl and mix well.
Dollop the batter evenly into the pans, but do not flatten the batter down. Place pan with boiling water in the oven and also place loaves into oven. If you have the shelf space, put the boiling water pan on a rack beneath the loaves. Mine gets all crowded in there together on the same rack. No problem. The loaves do NOT go into the water. Bake at 250 degrees F for 3 to 4 hours.
Remove from heat and allow to cool to room temperature. Wrap each loaf in a cloth. Place the loaves into a shallow pan with sides (9 X 13″ Pyrex baking dish works great). Pour apx. 3 cups brandy (half of a 1.75 L bottle) evenly over the loaves in the baking pan, a bit at a time. Let sit, uncovered, for a couple days. Unwrap, slice and serve, or place into plastic freezer bags, cloth and all, and pop into the freezer. Thaw, unwrap, slice and serve. My, oh, my is that ever a rich dessert!
Yield: 3 Loaves


Well, well, well! Look what I made! I’m so pleased. All credit must be given to Andrea Slonecker over at Food & Wine whose video on this made all the difference. These probably look like croissants, but they’re not, these are bread. The bread dough is rich in eggs and butter. Please review Andrea’s video and make sure you have enough eggs (5) prior to starting.
- Dough Ingredients
- 3 cups flour, divided
- 1 envelope active dry yeast (2-1/4 tsp.)
- 1/3 cup sugar
- 1 cup milk, heated to between 100 and 115 degrees F
- 1/2 cup butter (4 oz. or 1 stick), melted
- 3 large egg yolks
- 1 tsp. kosher salt
- Streusel Ingredients
- 1 Tbsp. melted butter
- 2 Tbsp. sugar
- 2 Tbsp. flour
- Cream Cheese Filling Ingredients
- 8 oz. cream cheese, room temperature
- 2 Tbsp. powdered sugar
- 1 large egg yolk
- 1 tsp. lemon zest
- Egg Wash Ingredients
- 1 large egg yolk
- 1 Tbsp. milk
- A Variety of Jelly or Jam or Pie Filling
Dough: I used a stand mixer. Stir together 1 cup flour, yeast, and sugar. Stir in warm milk and let sit until bubbles form across the top of the mixture. While you’re waiting for that to happen, in a separate bowl, mix together the melted butter, egg yolks, and salt. Stir the butter-egg mixture into the activated yeast mixture. Mix well. One cup at a time, stir in the remaining 2 cups flour. Let it knead on low speed for about 4 minutes, only adding flour if absolutely necessary if the dough is still tacky. Add as little flour as possible, it’s supposed to be a very soft dough. Once the dough is smooth, cover and set aside to rise until doubled, 1 to 1-1/2 hours.
Streusel: While the dough is rising, in a very small bowl, stir together melted butter, sugar, and flour. Set it aside so that once the butter cools and firms up you can break the mixture into a crumbly mixture to sprinkle on top of the Kolaches. For now, just set it aside to cool down.
Dough again: Prepare a sheet pan with parchment paper. Once the dough has risen, punch it down and divide it into a dozen equal pieces. Roll each piece into a smooth round ball. Place the dough balls, evenly spaced, onto the prepared sheet pan, cover with a damp cloth, and let them rise until nearly doubled, about 45 minutes.
Cream Cheese Filling: While the dough balls are doing their rise . . . In a food processor or mixer, stir together all the ingredients (cream cheese, powdered sugar, egg yolk, and lemon zest) until smooth. I used a food processor and it worked well. Set aside.
Egg Wash: In a very small bowl mix together the large egg yolk and milk.
Assembly: Preheat oven to 375 degrees F. Once the dough balls have nearly doubled in size, using several fingers, make a well in the center of each dough ball about 2″ in diameter. This is where watching the video comes in handy. She really dug a spread-out center in each dough ball. Make sure not to pierce the bottoms.
Once each dough ball has a well, use a pastry brush to brush the sides of the dough balls with the egg wash.
Place one tablespoon of cream cheese filling into each well and leave an imprint for the jam filling to go next.
Place one tablespoon of jelly, jam, or whatever kind of filling you’re using into each cream cheese well.
Break up the firmed streusel topping and sprinkle it across the tops of the Kolaches.
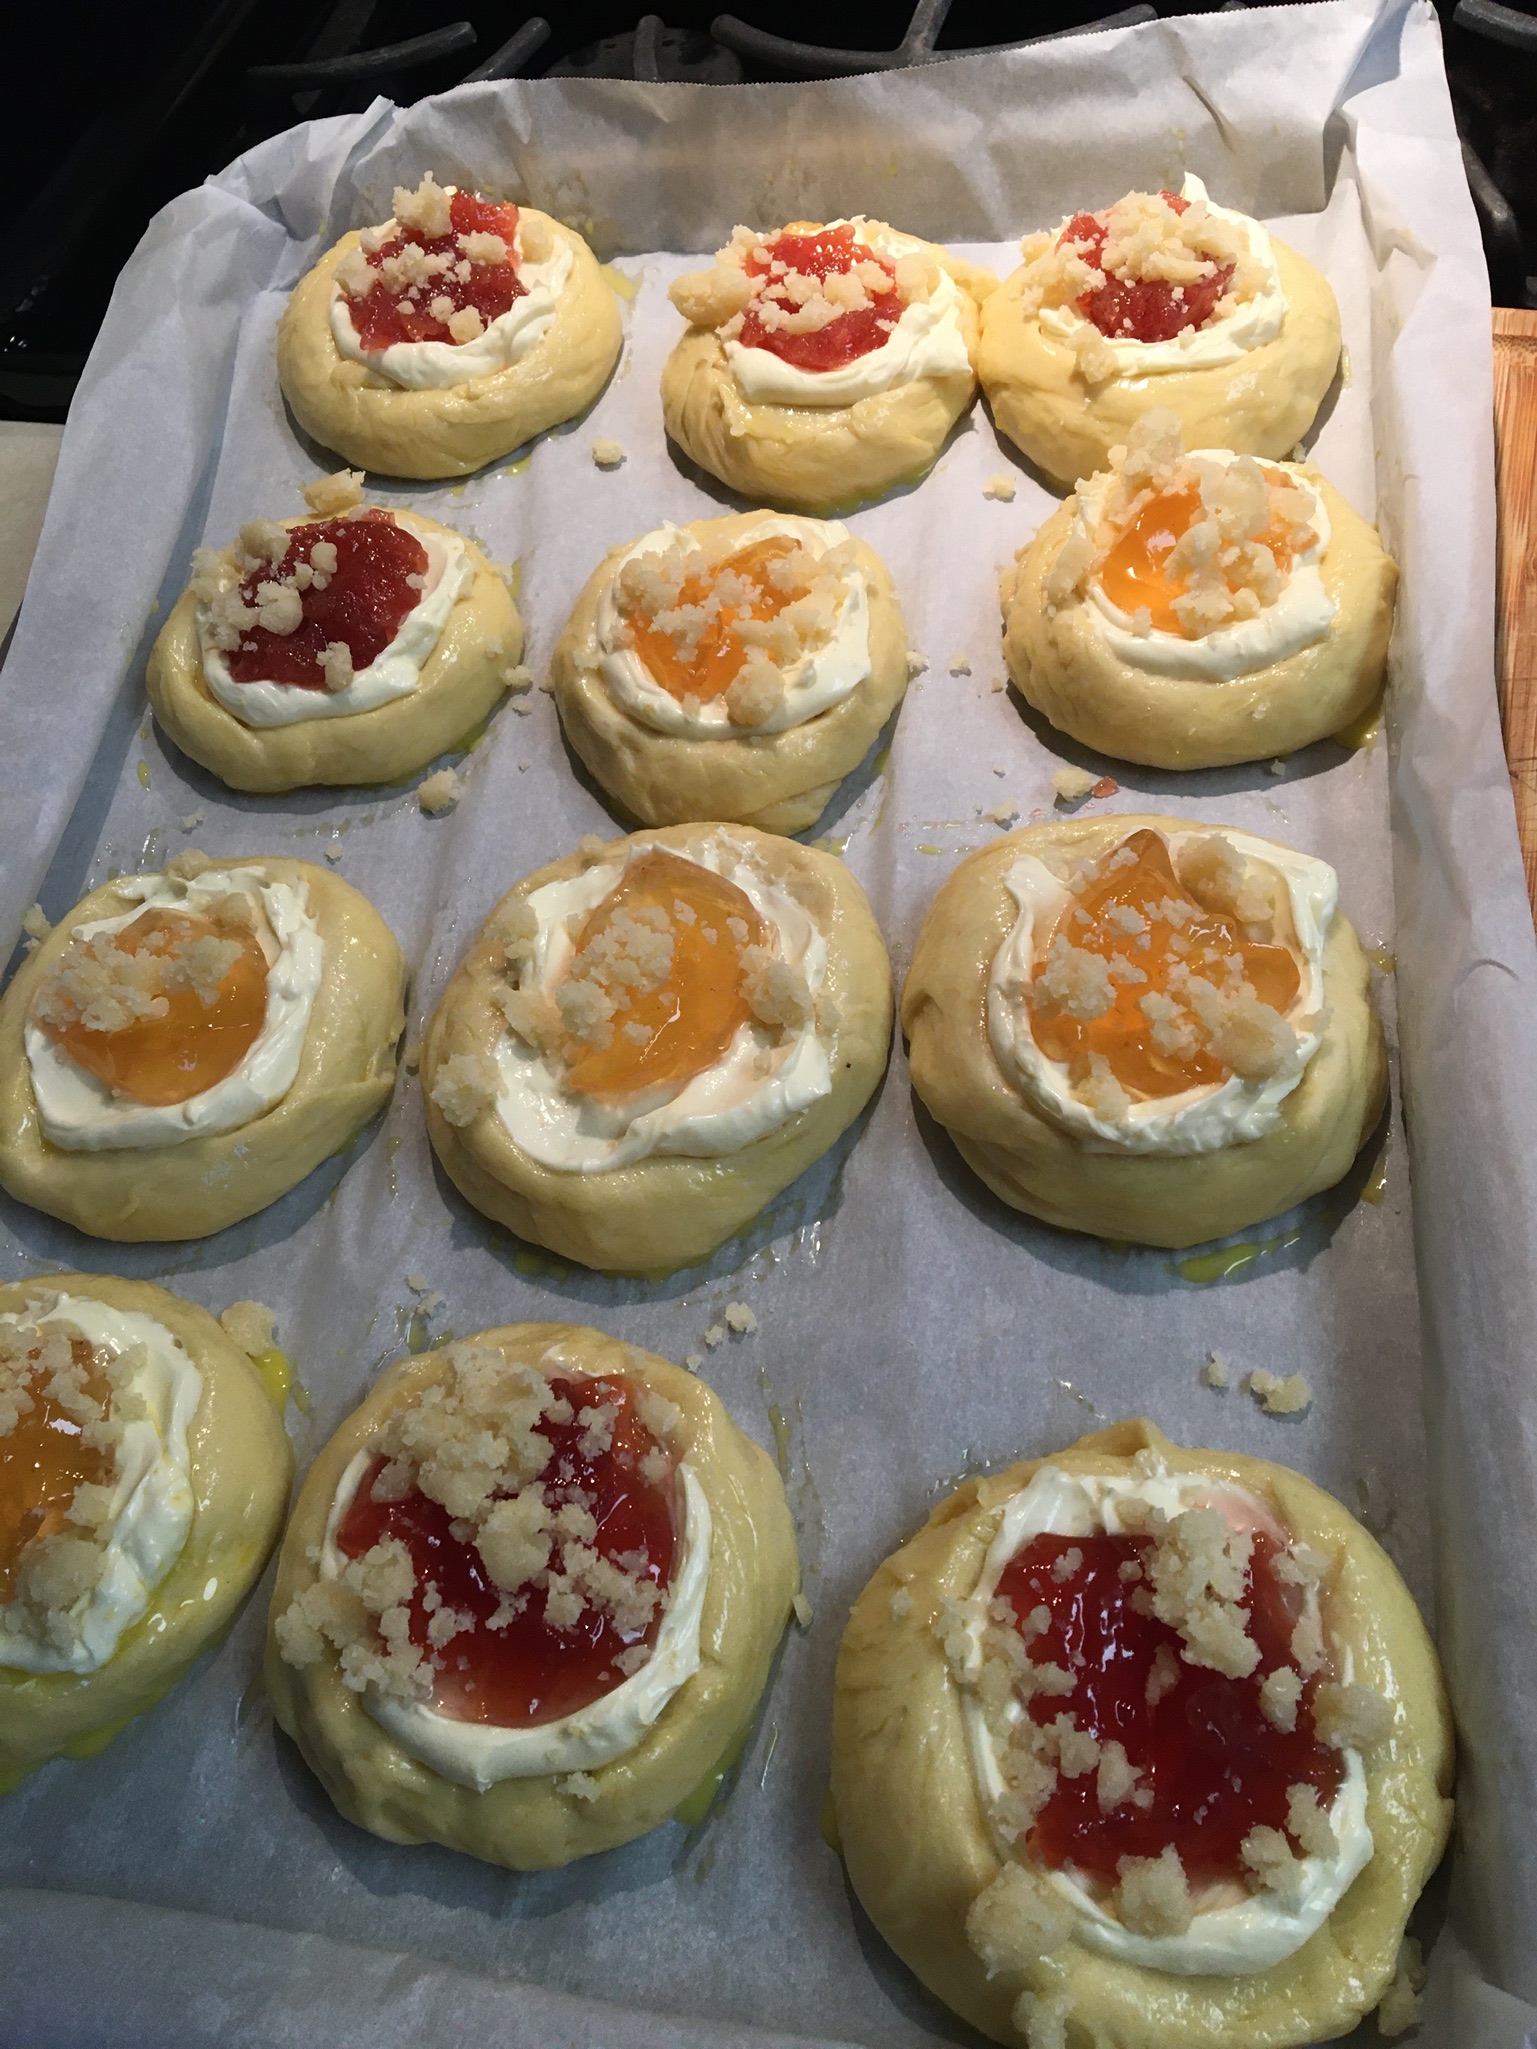
Bake at 375 degrees F for 20 minutes or so. Mine took quite a bit longer than that. I waited until the edges were a dark brown.
Enjoy! These are beautiful and delicious. They weren’t hard to make.

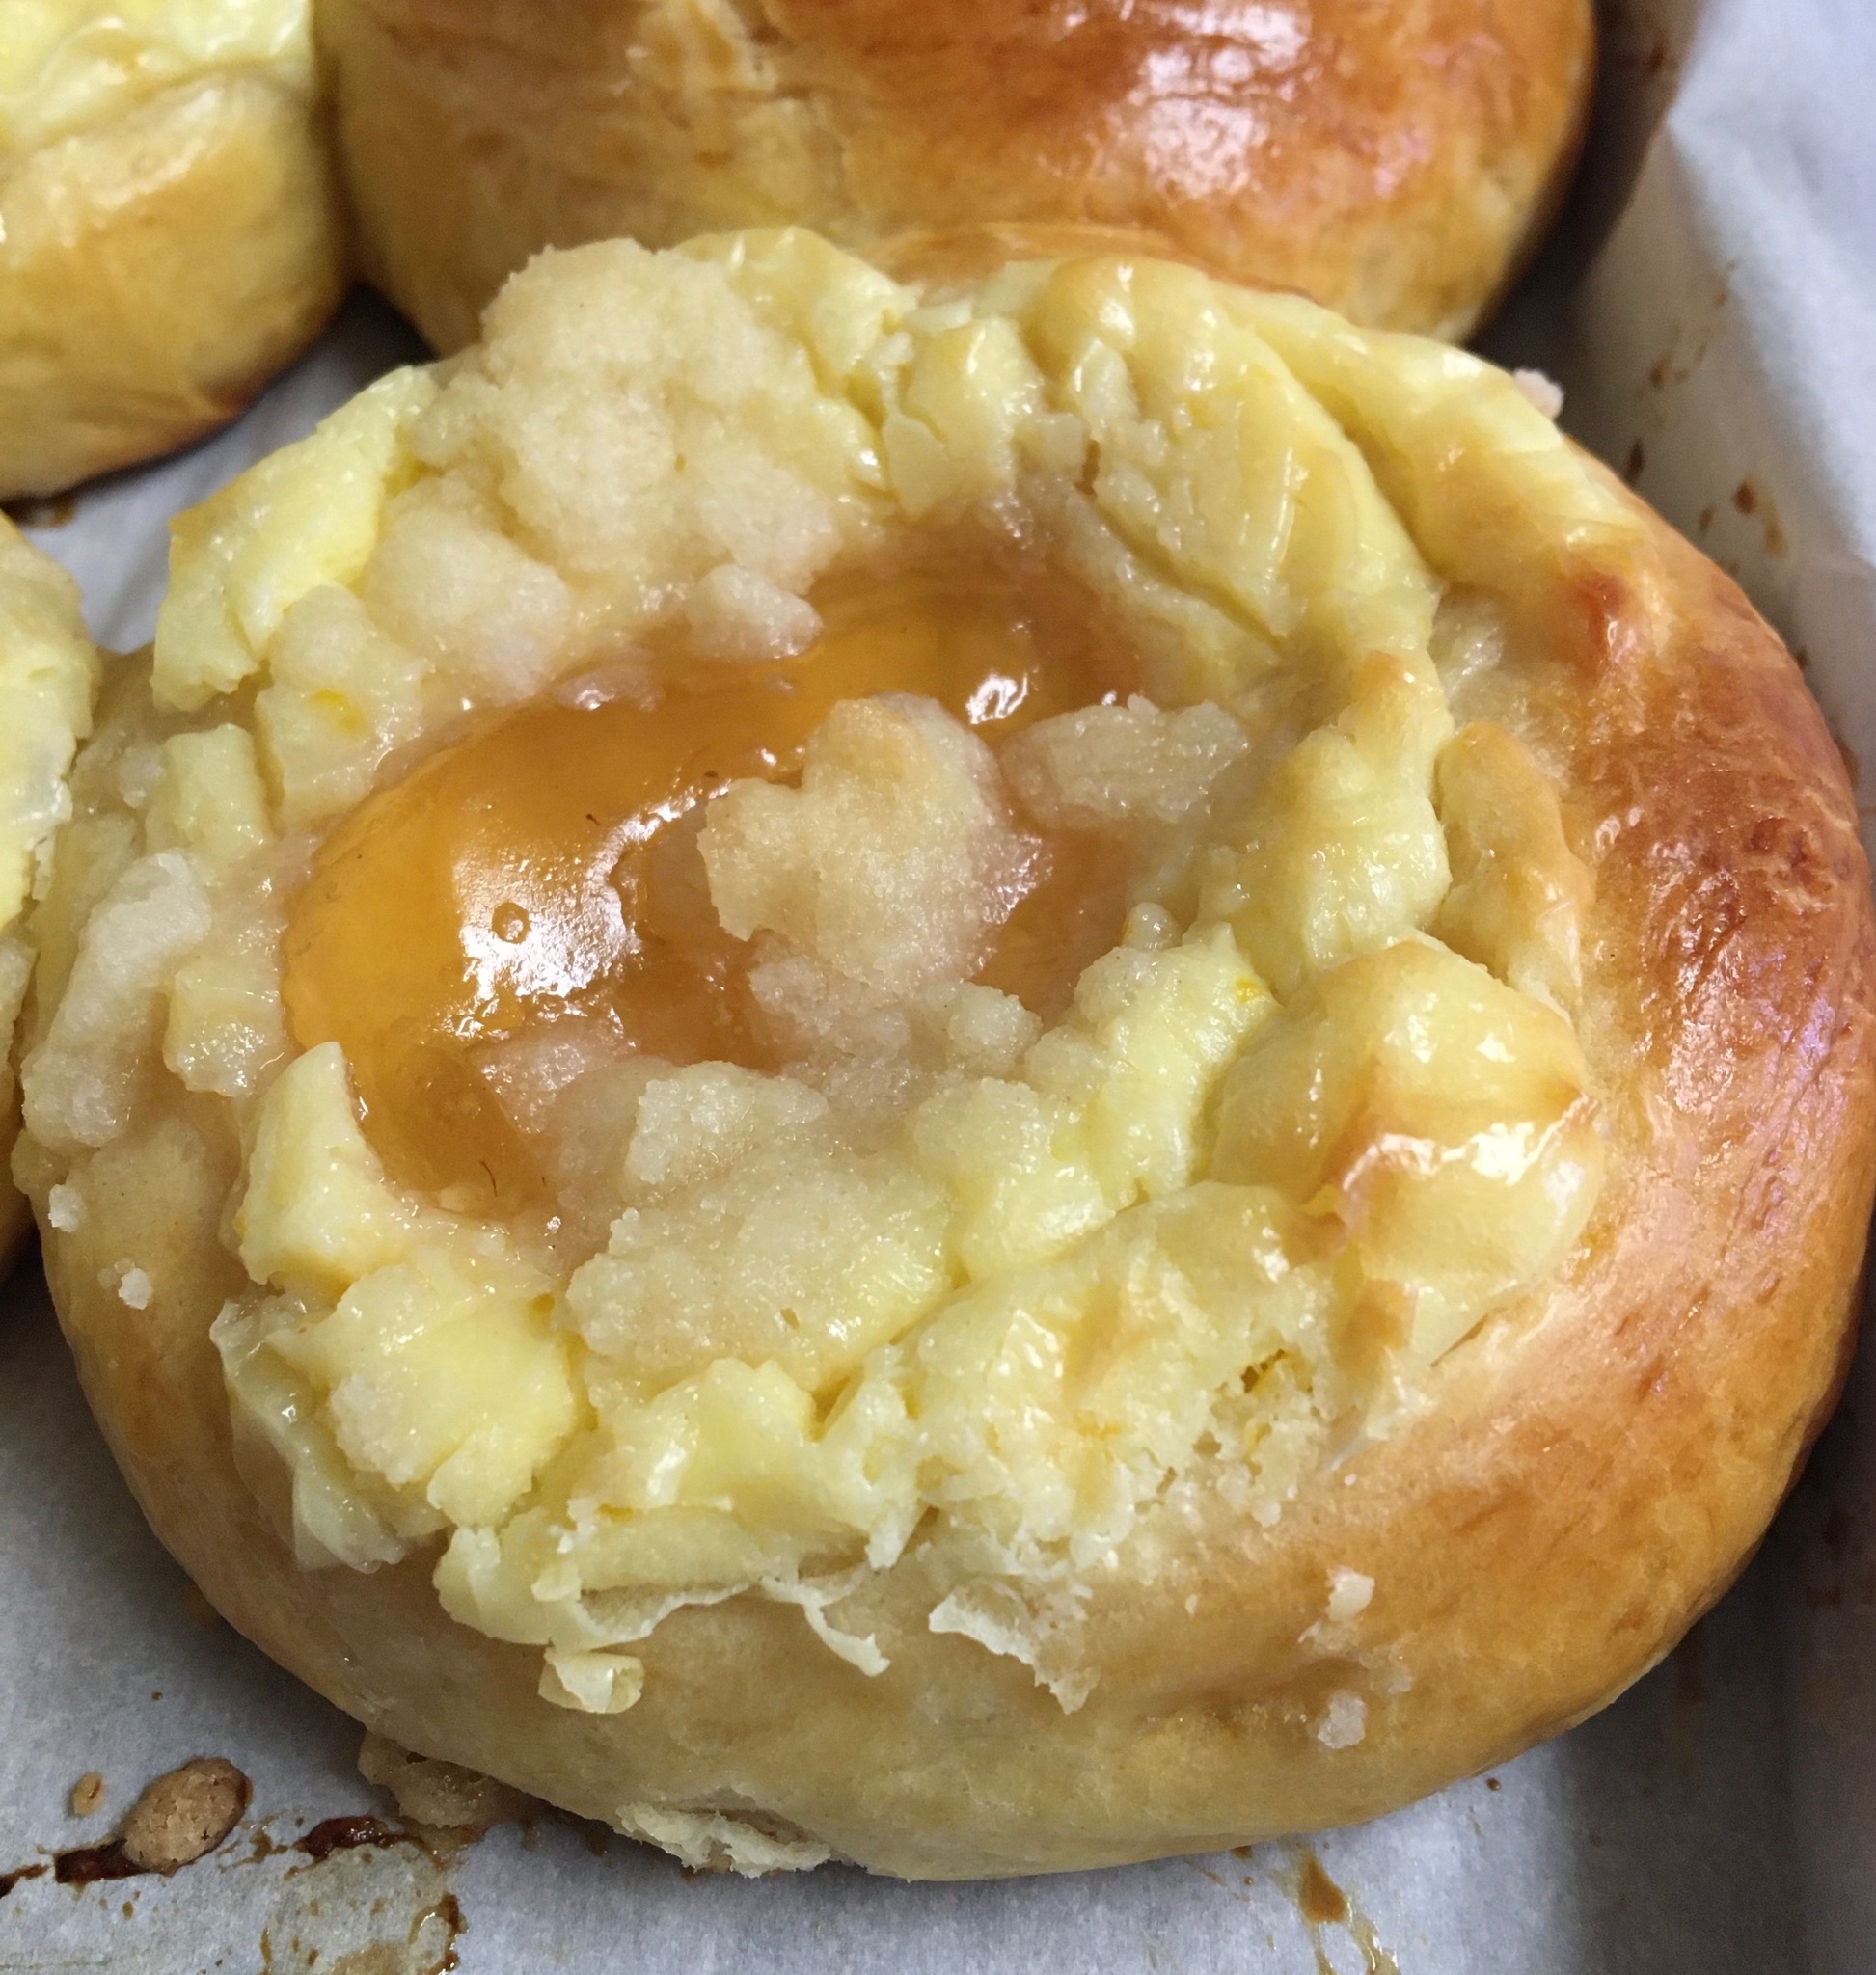
Notes: I used bread flour, but I wonder if all-purpose would have been better. This dough is like challah or brioche, so it’s supposed to be soft. I always use salted butter, but I don’t think it matters. I used my stand mixer for the dough and my food processor for the cream cheese filling. I use extra-large eggs and I think that’s one reason it took longer to bake, because my Kolaches had more liquid. I also didn’t spread mine out as much as Andrea did in the video which I think also contributed to the longer bake time, mine were thicker. Andrea didn’t put cream cheese into all of hers, she just put jam into a few of them. It still worked great. I am so, so pleased that these turned out. I love it when I have all the ingredients on hand and it goes according to plan.
